Wood Center Bands

Signed-In Members Don't See This Ad

Wmcullen

Member
Joined
Dec 1, 2020
Messages
398
Location
Fairfax, Virginia
I'm not sure if this process is right or wrong; unique or common. But it works for me and I want to share in case it's interesting.​
02-Wood Center Bands
last post: 01-Blanks In A Row
b5.jpg
It seems I'm in good company with folks who are tired of the standard slimline center bands. They looked fine at first but quickly became an annoyingly constant part of the pens I wanted to make "my own."

The Problem
I worried the only way I could make more interesting pens was to buy more expensive kits. Or I could use the standard bands while turning "non slimline" shapes that reminded me of trying on old pants "that had shrunk" and were now too tight around the waist.
b9.jpg
After experimenting I discovered I had some preferences.
1. I liked including center bands because they distract from the pen's crosscut.
2. Using contrasting or complimentary colored woods made for some nice combinations.
3. Turning my own bands provided a little more "workshop" fun during each pen project.

Here's my simple process
(Not rocket surgery, just how I do it.)
1. I cut thin strips of interesting boards on the miter saw. The width isn't so important, though I typically use between 5/32" and 5/16".
2. I mark lines along the strip, about 3 to an inch, using this handy measuring jig I made. It was 3D printed and I'm happy to share the file below.
b3.jpg
3. I drill holes on every other line with a 0.25" bit. I keep a bunch of these prepared strips in a bin.
b4.jpg
4. I cut the wood when I need it and mount between bushings. I could square up the piece for easier turning, but typically get away without this extra step.
b1.jpg
Then comes the fun with some interesting decisions.
b2.jpg
Current Favorite Design
My current favorite band is this one which "creases" in the center and changes the line direction between top and bottom.
b5.jpg

b6.jpg

b7.jpg
Summary
Turning my own center bands is the easiest way I've found to keep using slimline kits while not restricting the shape of my pens. I get to make more decisions about the design, show off beautiful wood, and play with the contrasts.

The Jig
The jig file is a zipped "stl" file and measures about 6" long.
b8.jpg
 

Attachments

  • JigThirdOfAnInch.zip
    6.5 KB · Views: 157
Signed-In Members Don't See This Ad

Grampy

Member
Joined
Dec 28, 2019
Messages
61
Location
Michigan
I'm not sure if this process is right or wrong; unique or common. But it works for me and I want to share in case it's interesting.​
02-Wood Center Bands
last post: 01-Blanks In A Row
View attachment 292723
It seems I'm in good company with folks who are tired of the standard slimline center bands. They looked fine at first but quickly became an annoyingly constant part of the pens I wanted to make "my own."

The Problem
I worried the only way I could make more interesting pens was to buy more expensive kits. Or I could use the standard bands while turning "non slimline" shapes that reminded me of trying on old pants "that had shrunk" and were now too tight around the waist.
After experimenting I discovered I had some preferences.
1. I liked including center bands because they distract from the pen's crosscut.
2. Using contrasting or complimentary colored woods made for some nice combinations.
3. Turning my own bands provided a little more "workshop" fun during each pen project.

Here's my simple process
(Not rocket surgery, just how I do it.)
1. I cut thin strips of interesting boards on the miter saw. The width isn't so important, though I typically use between 5/32" and 5/16".
2. I mark lines along the strip, about 3 to an inch, using this handy measuring jig I made. It was 3D printed and I'm happy to share the file below.
3. I drill holes on every other line with a 0.25" bit. I keep a bunch of these prepared strips in a bin.
4. I cut the wood when I need it and mount between bushings. I could square up the piece for easier turning, but typically get away without this extra step.
Then comes the fun with some interesting decisions.
Current Favorite Design
My current favorite band is this one which "creases" in the center and changes the line direction between top and bottom.
Summary
Turning my own center bands is the easiest way I've found to keep using slimline kits while not restricting the shape of my pens. I get to make more decisions about the design, show off beautiful wood, and play with the contrasts.

The Jig
The jig file is a zipped "stl" file and measures about 6" long.
Thanx for the vision, and the technique...
I had to give it a try.. I don't know if I can go back to the "standard center band" and what a great way to use those small cut offs...
That cherry "scrap" is a good contrast with cocobolo.
cherry center band.jpg
Could be a curse because...Now my imagination is in overdrive on the various shapes and sizes I can make..
 
Last edited:

Wmcullen

Member
Joined
Dec 1, 2020
Messages
398
Location
Fairfax, Virginia
Thanx for the vision, and the technique...
I had to give it a try.. I don't know if I can go back to the "standard center band" and what a great way to use those small cut offs...
That cherry "scrap" is a good contrast with cocobolo. Could be a curse because...Now my imagination is in overdrive on the various shapes and sizes I can make..
Grampy: that looks fantastic. I've only been a member for a couple of weeks and have already gotten some great ideas from others. It's so gratifying to hear I've been helpful to another wood turner. I appreciate the kind posts you wrote.
 

leehljp

Member Liaison
Joined
Feb 6, 2005
Messages
9,326
Location
Tunica, Mississippi,
That sounds amazing, Lee. I would love to see what the segment look like before you turn them.
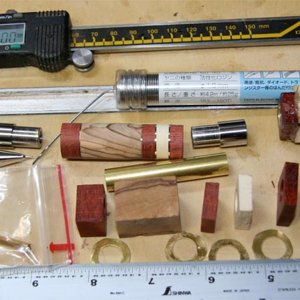
I only have one pict but it is of the individual metal segments before using them. I put a sheet of brass or copper or aluminum between two layers of 1/2" plywood, screw the two pieces together and lay out a pattern similar to yours and drill. (if trying to drill thin sheet metal, most of the time it will greatly distort unless it is sandwiched between a solid structure.) Then I use tin snips to separate them in "generally" round pieces. The tin snips greatly distort the metal when doing that but I flatten them out one by one. My tools round them off on the lathe with no problem once they are in a glued up blank.

At the bottom of this pict, you can see 4 brass segments; and you can see how I used them in segments.
That pict is probably over 11 -12 years old, but I still do it the same way.
 
Top Bottom