Wood carbide insert holder for the metal lathe.

Signed-In Members Don't See This Ad

More4dan

Member
Joined
Mar 17, 2016
Messages
2,102
Location
Katy, TX
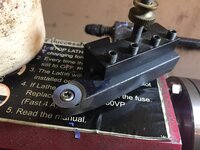
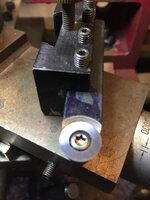
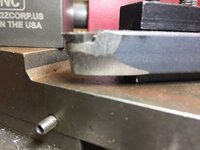
The carbide inserts designed for use on various metals have a dull radiused cutting edge to give them strength for cutting metals without chipping. It leaves an awful finish on wood and plastics. So, I made this holder for a round carbide insert designed for woodworking. I used 1/2" square bar and turned the pocket for the insert on the metal lathe holding the bar in my 4 jaw chuck with one jaw removed. Probably not the safest way but allowed me to machine the tapered hole for a good tight fit of the insert. I then used my belt sander to grind some relief in the bar below the insert. I'll have to give it a try on different materials tomorrow, I'll post some pictures and a review. Took about an hour, the next one should take about half the time. If I decide to make more, I will likely make a holder for the square rod that works like a fly cutter holder but holds it flat.

Let me know if you're interested in more detail on how I did this.


Danny


Sent from my iPhone using Penturners.org mobile app
 
Last edited:
Signed-In Members Don't See This Ad

More4dan

Member
Joined
Mar 17, 2016
Messages
2,102
Location
Katy, TX
Mobile app not letting me post pics.
 

Attachments

  • D3D96797-CD47-45E8-994F-4A9CC00F267C.jpeg
    D3D96797-CD47-45E8-994F-4A9CC00F267C.jpeg
    269.6 KB · Views: 419
  • 4596BE01-06A6-4572-A89F-4EDCF7E3DEFE.jpeg
    4596BE01-06A6-4572-A89F-4EDCF7E3DEFE.jpeg
    205.8 KB · Views: 420
  • 5A5943AC-FEC7-4B46-AA32-C6146A152904.jpeg
    5A5943AC-FEC7-4B46-AA32-C6146A152904.jpeg
    176.6 KB · Views: 373

magpens

Member
Joined
Feb 2, 2011
Messages
15,913
Location
Canada
Well done, Danny !!!

Yes ... I am very interested in more detail on how you achieved this ... please !

For starters, what is the diameter of the carbide cutter ?
 

1shootist

Member
Joined
Dec 2, 2018
Messages
818
Location
Frisco,Tx
Yes sir definitely interested in more detail .

I started making your negative rake tool holder for the metal lathe the other day, as soon as this cold I caught lets go of me I'll get back at it.

Before I bought a mini mill I used a mill attachment vise on my lathe to perform mill duties. Cuts are limited but it does work. Youtuber Steve Jordan has some helpful videos on making one.

Thank you Danny for sharing !!

Russ
 

More4dan

Member
Joined
Mar 17, 2016
Messages
2,102
Location
Katy, TX
Here is my first test of my new tool. Who's afraid of Inlace Acrylister? I started with a rectangular cross section piece of inlace acrylister to rough turn round between centers.

B511F6CD-EF92-449D-983C-EA01399AD6B2.jpeg


Here are a couple progressive shots. Making 20 thou. cuts and using the power feed at about 2000rpm.

9E0442D9-1830-4CC9-B2E2-8654E15DA323.jpeg
ED3BE715-ADDF-4CAB-86CF-663A950A4EA5.jpeg
09390E1B-06EB-4D56-AA21-5EE7FBD822F3.jpeg


The first time I've seen ribbons consistently come off of Inlace Acrylister.

8297CEFA-ED2D-40D1-BA35-83E5CEFD75D5.jpeg


And the final view with no sanding, just a bit of car polish.

3C7BCBAC-08A3-46C0-AE4F-73F965EC1197.jpeg


It works better than I hoped. The $2 carbide insert from www.banggood.com preformed very well!

Danny
 
Last edited:

More4dan

Member
Joined
Mar 17, 2016
Messages
2,102
Location
Katy, TX
Yes sir definitely interested in more detail .

I started making your negative rake tool holder for the metal lathe the other day, as soon as this cold I caught lets go of me I'll get back at it.

Before I bought a mini mill I used a mill attachment vise on my lathe to perform mill duties. Cuts are limited but it does work. Youtuber Steve Jordan has some helpful videos on making one.

Thank you Danny for sharing !!

Russ

Thanks Russ, I bought the parts to make a mill attachment for my lathe. I just haven't had the time to finish building it. Thanks for the lead on Steve Jordon's videos.
This new attachment gives me almost the same finish as the negative rake one but also allows higher depth of cut for roughing to dimension.

Danny


Sent from my iPad using Penturners.org mobile app
 

More4dan

Member
Joined
Mar 17, 2016
Messages
2,102
Location
Katy, TX
Here is roughly how I built the tool. I'll take some pics for the next one.

I cut a ~3" length of 1/2" square bar. I drilled hole through with a #29 bit and tapped for m4 x 0.7 screw. The hole was drilled ~1\4" from the end centered on the bar.
I then mounted the bar in a independently adjustable 4 jaw chuck with one jaw removed. I used a center in my tailstock to adjust the bar in the chuck using the screw hole for centering. I'm sure a self centering 4 jaw would work with a jaw removed and the screw hole drilled on the lathe. I really clamped down on the jaws on the sides of the bar.

Use an end mill with the same diameter as the bottom of your insert. Drill a hole with the end mill slightly deeper than the thickness of the insert. This will leave a flat surface for the insert to sit securely.

Set the compound slide to match the side angle of the insert, 30 degrees for mine. You will now be boring a tapered hole using the compound to make the cut and the cross to adjust the depth of cut with the carriage locked in place. Use a small boring bar, start just inside the hole where the cutter just touches the top edge. Turn the cross to move the cutter toward you slightly to set the depth of cut. Now use the compound to make the tapered cut. Keep advancing making cuts until the boring bar just touches the bottom of the milled hole.

The bar will NOT be held very securely in the 3 of 4 jaws in the chuck. Turn slowly and stay out of the line of fire if it were to release. A better way would to make a jig on a mill that resembles a fly cutter with a 1/2" slot but without the angle to mount the square bar for machining. One could also make a chamfering tool that is the same dimensions as the insert.

I then sanded the front edge about 2/3 around down to the diameter of the bottom of the cutter, essentially till there isn't a lip at the front and sides of the holder.

I'm sure there are lots of ways to do this especially if you have a mill. This is just the way I did mine. Proceed at your own risk., I'm not responsible for your safety, yada yada ...

Danny


Sent from my iPad using Penturners.org mobile app
 
Last edited:

rsieracki

Member
Joined
Dec 14, 2017
Messages
164
Location
Illinois
Would you be interested in making some to sell? Ive been contemplating a similiar project but i havent the time to make as many pens as I'd like let alone to play machinest.

Sent from my SM-G892A using Tapatalk
 

More4dan

Member
Joined
Mar 17, 2016
Messages
2,102
Location
Katy, TX
Thanks for posting. I'm going to try and make one.

PM if you have any questions. The hardest part is making a tapered hole to the same dimensions of the insert. For wood and plastic turning, I'm guessing the side loads are pretty low and the screw would be sufficient on its own to hold the insert without the taper to supply support.

Post pics and comments on what you come up with.

Danny


Sent from my iPhone using Penturners.org mobile app
 

More4dan

Member
Joined
Mar 17, 2016
Messages
2,102
Location
Katy, TX
Would you be interested in making some to sell? Ive been contemplating a similiar project but i havent the time to make as many pens as I'd like let alone to play machinest.

Sent from my SM-G892A using Tapatalk

I'm sure we could come to terms. What size insert will you be using?

Danny


Sent from my iPhone using Penturners.org mobile app
 
Last edited:

magpens

Member
Joined
Feb 2, 2011
Messages
15,913
Location
Canada
@More4dan

I have a suggestion which just came to me as I was studying your method ...

If you start out with the intention of making two of these, then you can begin with a 6 to 7 inch piece of square stock with the center point accurately marked. . Then drill and tap two screw holes either side of the center point. . You can hold the 6 to 7 inch piece easily against the face of a 4-jaw chuck using all 4 jaws. . Same method as yours to do the tapering of each hole ... just slide the square stock to one side or the other. . When finished with the tapering you can cut the two pieces apart with a bandsaw and then tidy things up on a grinder or sander. . What do you think ?

Care has to be taken that the boring bar does not strike the chuck jaws, but your method requires that care just the same.

I am not sure that tapering the hole is really necessary, although that does help relieve some horizontal stresses when you are turning.
A round cutter tightly screwed down to a flat surface of the square stock should work in most cases that we encounter in turning pens.

Thanks for raising this subject, Danny.
 

More4dan

Member
Joined
Mar 17, 2016
Messages
2,102
Location
Katy, TX
@More4dan

I have a suggestion which just came to me as I was studying your method ...

If you start out with the intention of making two of these, then you can begin with a 6 to 7 inch piece of square stock with the center point accurately marked. . Then drill and tap two screw holes either side of the center point. . You can hold the 6 to 7 inch piece easily against the face of a 4-jaw chuck using all 4 jaws. . Same method as yours to do the tapering of each hole ... just slide the square stock to one side or the other. . When finished with the tapering you can cut the two pieces apart with a bandsaw and then tidy things up on a grinder or sander. . What do you think ?

Care has to be taken that the boring bar does not strike the chuck jaws, but your method requires that care just the same.

I am not sure that tapering the hole is really necessary, although that does help relieve some horizontal stresses when you are turning.
A round cutter tightly screwed down to a flat surface of the square stock should work in most cases that we encounter in turning pens.

Thanks for raising this subject, Danny.

Great suggestion, I will be trying this very soon. I'll let folks know how it works.

Danny


Sent from my iPad using Penturners.org mobile app
 

More4dan

Member
Joined
Mar 17, 2016
Messages
2,102
Location
Katy, TX
Following Mal's suggestion for mounting the square rod in the chuck worked great! Here are pics and procedures. I'm turning on a 7x10 mini lathe and had to remove the chuck shield and the shaft it attaches to make clearance for the spinning bar.
0E2E6711-BACC-4BD8-8F1B-2624515E1302.jpeg

I then drilled the screw hole with a #29 drill for a m4 x 0.7 tap. Next I used a 23/64" end mill set up in an ER32 chuck in my tail stock. Drilled just deeper than the insert.
9115BD0E-730B-4756-94D3-4A8E93E7A22F.jpeg

Next I set my compound to 30 degrees to match the insert taper. Used a small boring bar to taper the hole until the taper side just meets the bottom of the 23/64" hole.

5FCFA57F-6E2E-4C7E-837A-7426C4257013.jpeg


I then slid the bar down to drill the second location following the same procedure.

3255E546-2B4C-4249-9FEC-7CA75F233FDF.jpeg

Here is the bar fully machined for two holders.

1B0BC68C-AAC7-4CB5-A8C0-EED1E14B0685.jpeg

Now I cut the bar in half on my metal band saw. Then I ground the front of each holder on my homemade 2 x 72 belt sander/grinder until the front and sides were even with the bottom of the insert. I the adjusted the angle on the grinder and added a 7 degree relief angle on the front and both sides.
0940A7AE-48E6-47A1-B704-A0D2E0D11233.jpeg
BCDA9312-9433-4D3A-B67C-BDA86BAD1196.jpeg


The completed lathe holders designed for 12mm round carbide woodworking cutters. The bar is 1/2" with a cutting height just under 1/2".

9725A451-1AB2-46FC-AECB-CC125A105188.jpeg
FFFFDC7A-535B-4953-9A27-CA56B33E930C.jpeg


Thanks again Mal, great suggestion on setting up a safer clamping method and turned out to be quicker to set up too.

Let me know if you have any questions or PM me if you would like one made for you.

Danny
 

magpens

Member
Joined
Feb 2, 2011
Messages
15,913
Location
Canada
Those look really great, Danny !!! . Very well done !!! . Thanks very much for showing the detailed pictures ... very helpful and interesting.

I think you should go into the business of making and selling these !!! :) ;)

Let me know if you do, and I'll be the first to order !!!
 

More4dan

Member
Joined
Mar 17, 2016
Messages
2,102
Location
Katy, TX
I am taking orders for the 12mm round carbide holder for use on a metal lathe. It will come with a carbide insert, screw, and matching Torx screw driver. PM me if interested.

Thanks,

Danny


Sent from my iPhone using Penturners.org mobile app
 

More4dan

Member
Joined
Mar 17, 2016
Messages
2,102
Location
Katy, TX
rsieracki had a question about making a negative rake version with the round carbide insert. So I made one this afternoon and tested it against the flat version for finish. Here is the result.
04C35F30-CFA5-4144-AD5C-290F8E986A40.jpeg
656DBD63-A6EA-41B2-BDF5-7FB51774B9AC.jpeg

And now the results on some scrap AA.
44E3E90A-CF1F-4924-8DB9-A38C11D0C93F.jpeg


I can't tell the difference in the finish. Left is normal and right is negative rake. As turned with no sanding and a bit of car polish.
Danny
 

Don Rabchenuk

Member
Joined
Aug 18, 2015
Messages
670
Location
Middleburg, FL
Got my carbide holder yesterday. Very well made. Thank you for this. Now all I have to do is take down all the Christmas decorations so I can get my shop back and try this out.
 

Curly

Member
Joined
Nov 20, 2010
Messages
4,828
Location
Saskatoon SK., Canada.
An alternative for holding the bar. Lots of metal lathes come with a faceplate that is drilled and tapped plus has slots in them. They are used with clamps or bolts to hold odd shapes for turning. The bar could be held on one and have enough clearance to use a regular turning tool to cut the insert recess without the risk of hitting a chuck jaw. The one that came with my lathe is 10" in diameter and there are lots of aftermarket ones but I don't know if there are any for a mini lathe.

So far I have only used my diamond tool holder with HSS round stock for that kind of cutting and it works very well. Swarf can be ribbons like yours or like the finest hair. The only downside to metal lathes for turning like that is the process is so slow. Yawn. :)
 

More4dan

Member
Joined
Mar 17, 2016
Messages
2,102
Location
Katy, TX
An alternative for holding the bar. Lots of metal lathes come with a faceplate that is drilled and tapped plus has slots in them. They are used with clamps or bolts to hold odd shapes for turning. The bar could be held on one and have enough clearance to use a regular turning tool to cut the insert recess without the risk of hitting a chuck jaw. The one that came with my lathe is 10" in diameter and there are lots of aftermarket ones but I don't know if there are any for a mini lathe.

So far I have only used my diamond tool holder with HSS round stock for that kind of cutting and it works very well. Swarf can be ribbons like yours or like the finest hair. The only downside to metal lathes for turning like that is the process is so slow. Yawn. :)

Thanks Curly, I'll have to look for a plate to fit my mini lathe.


Sent from my iPad using Penturners.org mobile app
 

More4dan

Member
Joined
Mar 17, 2016
Messages
2,102
Location
Katy, TX
I had someone ask if it was possible to make a similar tool that would fit a 3/8" holder and another asked if I could make one for a 7" mini lathe with a standard post. It would require a cutting edge 0.300" from the bottom of the tool.

I started with 3/8" square bar and machined and ground the bar using the same method described above. They worked great. The one with a 0.300" cutting height required me to finally get around to adding a DRO to my tail stock. I'll do a separate write up on the DRO.

37476183-9ED6-44C5-BF29-734E2FF9F158.jpeg
B2EAE145-68EB-4252-8418-1311372D1E88.jpeg
2293D5F0-AF3A-4251-86FD-E6A0EA67352B.jpeg

The DRO is attached with only magnets making it easy to remove, changing tooling in the tail stock, and relocating to my wood lathe. The dimensions for the tool holder were spot on (+-0.001").

Danny
 

magpens

Member
Joined
Feb 2, 2011
Messages
15,913
Location
Canada
@More4dan

Danny ... is some of your latest post in reference to my requirements ? . I dropped the ball due to end-of-year/begin-of-year stuff ... sorry.
 

PBorowick

Member
Joined
Sep 23, 2019
Messages
264
Location
Portland, Oregon
I have made myself a couple of carbide lathe tools and I had the same concern about having a shoulder for the carbide insert to laterally bear on. Since I didn't have tools to create a shoulder accurately I ground down to the depth I wanted, roughed up the bar with 80 grit, cleaned it really well and then seated the carbide bit (coated with a little wax) into a bed of JB Weld. Perfectly tight fit and I have haven't broken one loose in a year of turning.
 

More4dan

Member
Joined
Mar 17, 2016
Messages
2,102
Location
Katy, TX
I have made myself a couple of carbide lathe tools and I had the same concern about having a shoulder for the carbide insert to laterally bear on. Since I didn't have tools to create a shoulder accurately I ground down to the depth I wanted, roughed up the bar with 80 grit, cleaned it really well and then seated the carbide bit (coated with a little wax) into a bed of JB Weld. Perfectly tight fit and I have haven't broken one loose in a year of turning.

Very cool way of fitting to the shape of the insert. For turning woods and resins the shoulder is likely overkill but a must for turning metals. Thanks for the share.

Danny


Sent from my iPad using Penturners.org mobile app
 

PBorowick

Member
Joined
Sep 23, 2019
Messages
264
Location
Portland, Oregon
Not a problem, glad I could contribute a little to this conversation! I really want a metal lathe.....but I haven't figured out why yet.....
 
Signed-In Members Don't See This Ad

Bryguy

Member
Joined
Jun 9, 2013
Messages
970
Location
New Hampshire
Danny, After seeing your original post about negative rake carbide tools I've made a negative rake tool for my magic skew and two tools (onefor plastic, one for wood) for my metal lathe. I plan on giving them each a try today. Thanks for the inspiration.
 
Top Bottom