Wmcullen
Member
Wood Badge Beads
Part 1 of 2
In Scouting, Wood Badge beads recognize adults' accomplishments in key leadership training courses.
They aren't hard to make.
But when you're giving them out you sometimes need a lot of them... and having a process is helpful.
This is mine.

Step 1: Marking
These Wood Badge beads are made from 3/8" hardwood dowels in two sizes: Small (7/8"); and Large (9/8").
I begin by drawing a straight line along the length.
Hint: My router table has a trench, which is perfect for drawing this guiding line.

Distances along the guideline are marked at 7/8" or 9/8" depending on if I'm making "small" or "large" beads.
Step 2: Drill 1/8" holes
I use my drill press and a dowel centering jig to drill on the marks.

Step 3: Shape top and bottom indents

Using a 1/2" Rounding bit in my router table, I set up guides and stops so all the cuts are the same.
I take a little bit of material off the top and bottom by placing the dowel in a trenched guide.
The guide has a rivet (not seen) that the drilled holes fit onto. This holds the dowel exactly in place.


Step 3: Cut Beads Apart

I designed 3D-printed jigs to hold the dowel while I use a pull saw to separate the pieces.
It takes just a moment.


Step 4: Easy Sanding
Instead of hand sanding each piece, I throw them all into a rock tumbler with some sandpaper.
About 6-12 hours later, all the sharp edges are smooth.
This doesn't save time but does save effort when I have dozens to make.
Step 5: Blacken Tips
Some people use a wood burner but a Sharpie does a fine job getting the tips black.

Step 6: Notching

A triangle file can add the final element to the bead: a notch on each end.
Hint: if I'm trying to work quickly I use the edge of my grinding wheel.

Step 7: Making the Necklace
I use 39.5" of 2mm cowhide leather cord for each necklace.
It is folded in half and closed with an overhand bend a few inches from each end.
The beads are placed on the tips and each cord is finished with an overhand knot.

Summary
A few years ago I volunteered to make Wood Badge beads for a group of adults in our Scouting program. An internet search produced some helpful guidance, but I still needed to work out the specifics on my own. It's not rocket surgery but when you need to make these beads, you typically need to make a lot of them. Finding other people's shortcuts was helpful and I wanted to share my lessons learned.
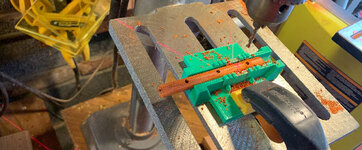
3D-Printed Jigs
I have included two obj files for my jigs in the attached "WBbeadJigs.zip" file. These help me easily cut the pointed ends for small (7/8") and large (9/8") beads. I printed them out of PLA and did not expect them to last long. Surprisingly, they've made about 200 beads. I clamp the jig into my bench vise and work carefully.

Part 2
Sometimes I try to take Wood Badge beads to "the next level." I'll try to write this up and post soon.
Thanks for looking,
Cullen
Part 1 of 2
In Scouting, Wood Badge beads recognize adults' accomplishments in key leadership training courses.
They aren't hard to make.
But when you're giving them out you sometimes need a lot of them... and having a process is helpful.
This is mine.
Step 1: Marking
These Wood Badge beads are made from 3/8" hardwood dowels in two sizes: Small (7/8"); and Large (9/8").
I begin by drawing a straight line along the length.
Hint: My router table has a trench, which is perfect for drawing this guiding line.
Distances along the guideline are marked at 7/8" or 9/8" depending on if I'm making "small" or "large" beads.
Step 2: Drill 1/8" holes
I use my drill press and a dowel centering jig to drill on the marks.
Step 3: Shape top and bottom indents
Using a 1/2" Rounding bit in my router table, I set up guides and stops so all the cuts are the same.
I take a little bit of material off the top and bottom by placing the dowel in a trenched guide.
The guide has a rivet (not seen) that the drilled holes fit onto. This holds the dowel exactly in place.
Step 3: Cut Beads Apart
I designed 3D-printed jigs to hold the dowel while I use a pull saw to separate the pieces.
It takes just a moment.
Step 4: Easy Sanding
Instead of hand sanding each piece, I throw them all into a rock tumbler with some sandpaper.
About 6-12 hours later, all the sharp edges are smooth.
This doesn't save time but does save effort when I have dozens to make.
Step 5: Blacken Tips
Some people use a wood burner but a Sharpie does a fine job getting the tips black.
Step 6: Notching
A triangle file can add the final element to the bead: a notch on each end.
Hint: if I'm trying to work quickly I use the edge of my grinding wheel.
Step 7: Making the Necklace
I use 39.5" of 2mm cowhide leather cord for each necklace.
It is folded in half and closed with an overhand bend a few inches from each end.
The beads are placed on the tips and each cord is finished with an overhand knot.
Summary
A few years ago I volunteered to make Wood Badge beads for a group of adults in our Scouting program. An internet search produced some helpful guidance, but I still needed to work out the specifics on my own. It's not rocket surgery but when you need to make these beads, you typically need to make a lot of them. Finding other people's shortcuts was helpful and I wanted to share my lessons learned.
3D-Printed Jigs
I have included two obj files for my jigs in the attached "WBbeadJigs.zip" file. These help me easily cut the pointed ends for small (7/8") and large (9/8") beads. I printed them out of PLA and did not expect them to last long. Surprisingly, they've made about 200 beads. I clamp the jig into my bench vise and work carefully.
Part 2
Sometimes I try to take Wood Badge beads to "the next level." I'll try to write this up and post soon.
Thanks for looking,
Cullen