White spots on cultured marble (fauxstone & simstone)

Signed-In Members Don't See This Ad

ndep

Member
Joined
Jan 23, 2021
Messages
46
Location
USA
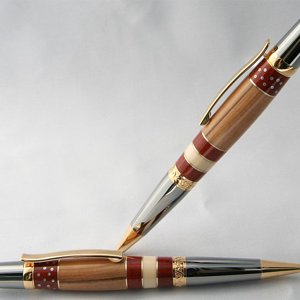
Sometimes (but not always), I find tiny white spots when I turn cultured marble (fauxstone & simstone)

I turn at 3500 RPM using negative rake carbide tips on Easy Tools.

After using my tools, I sand using 5 papers from 150 grit up to 600 grit; then I wet sand with micromesh.

At that point, on close inspection, I can see the following:

(a) Little white spots that dot the surface of the blank
(b) Almost all of them are round
(c) They are tiny, maybe 0.2mm in diameter
(d) They break the surface; i.e., when I rotate the blank under bright light I can see that the spot is a hole in an otherwise smooth surface.

I haven't found a good way to correct the problem after the fact.

I welcome all suggestions on how to deal with this!
 
Signed-In Members Don't See This Ad

Fred Bruche

Member
Joined
Feb 11, 2018
Messages
975
Location
Philadelphia 19146
Sounds like small bubbles in the blank that get filled with residues during the sanding process.
I don't see a way to correct after the fact.
Be extra careful to wipe the blank after each grit, use a toothbrush with some liquid to flush out the sanding residues, denatured alcohol for example but clean water should work as well. What you could do also early on is to "finish" the turned blank with medium viscosity CA glue, which should fill these spots. Or a combination of both approaches.
 

1080Wayne

Member
Joined
Feb 5, 2006
Messages
3,344
Location
Brownfield, Alberta, Canada.
Think your best bet would be CA immediately after 600 grit dry . Compressed air to blow most of the dust out of the holes , then DNA or water , a couple coats of thin CA , followed by medium CA .
 

leehljp

Member Liaison
Joined
Feb 6, 2005
Messages
9,326
Location
Tunica, Mississippi,
When it balls up as you said, that is often a sign of too much friction and heat. Slow it down to below 1000rpm on finishing, and use light touch on sanding. It could be either or a combination of both.
 

ndep

Member
Joined
Jan 23, 2021
Messages
46
Location
USA
Sounds like small bubbles in the blank that get filled with residues during the sanding process.
I don't see a way to correct after the fact.
Be extra careful to wipe the blank after each grit, use a toothbrush with some liquid to flush out the sanding residues, denatured alcohol for example but clean water should work as well. What you could do also early on is to "finish" the turned blank with medium viscosity CA glue, which should fill these spots. Or a combination of both approaches.
In terms of "finishing" the blank with CA, would you apply the CA after turning but before all sanding?
 

ndep

Member
Joined
Jan 23, 2021
Messages
46
Location
USA
When it balls up as you said, that is often a sign of too much friction and heat. Slow it down to below 1000rpm on finishing, and use light touch on sanding. It could be either or a combination of both.
I turn with carbide at 3500 RPM, but I sand / polish at 500-700 RPM.
 

leehljp

Member Liaison
Joined
Feb 6, 2005
Messages
9,326
Location
Tunica, Mississippi,
I turn with carbide at 3500 RPM, but I sand / polish at 500-700 RPM.
Good, that leaves heat build up that is melting the sanding dust into balls. Can you wipe the little white balls off? Or are they stuck to the blank? Plastic, acrylic will do that with heat build up as it melts the sanding dust. This is usually cured by a technique change. That said, sometimes a single batch of cast blanks can be softer than other batches (and still be hard) and for that one batch, it presents a problem of melting at a lower temp, or at least more prone to melting in situations as you have - than others.

Edit in: With practice, and a very sharp tool, one can turn most acrylic like blanks (and wood too) to the point it has a very very smooth surface in which little to no sanding is needed. Sometimes this works out the best method in tricky situations.
 

1080Wayne

Member
Joined
Feb 5, 2006
Messages
3,344
Location
Brownfield, Alberta, Canada.
For the compressed air, do you think this will suffice: https://www.amazon.com/gp/product/B08S6XDJ96/
I have a large shop compressor and have never used a product like that , so don`t know the answer .

Think your first step should be to confirm that you have holes rather than dust balls , by probing with the point of a needle . If dust balls , follow Hank`s advice . If holes , try the air . Getting wet dust or dust slightly fused from frictional heat out , is very difficult .

Sometimes , it is possible to get lucky by using a flood application of very thin CA , which dries slow enough that the CA has time to dissolve the dust , making it invisible . That can be done using craft foam as the applicator , strip about an inch wide , CA bead across the entire width , applied to the underside of the blank turning at slow speed .
 

ndep

Member
Joined
Jan 23, 2021
Messages
46
Location
USA
Good, that leaves heat build up that is melting the sanding dust into balls. Can you wipe the little white balls off? Or are they stuck to the blank? Plastic, acrylic will do that with heat build up as it melts the sanding dust. This is usually cured by a technique change. That said, sometimes a single batch of cast blanks can be softer than other batches (and still be hard) and for that one batch, it presents a problem of melting at a lower temp, or at least more prone to melting in situations as you have - than others.

Edit in: With practice, and a very sharp tool, one can turn most acrylic like blanks (and wood too) to the point it has a very very smooth surface in which little to no sanding is needed. Sometimes this works out the best method in tricky situations.
They appear to be pits in the surface of the finished blank. I know this because when I reflect light off the pen blank, the pits are obvious.

Here's my general approach:
(a) I turn at 3500 rpm to get the shape roughly right. I usually leave extra material on the blank because I have overshot a few times and removed too much.

(b) I sand at 80 to 150 grit to get the final shape how I want it. This is a lot of sanding, which I have done a bit more quickly by applying pressure which generates a fair amount of heat (enough that it is uncomfortable to the touch)

(c) I do regular sanding up to 600 grit and then polish with micromesh pads.

For the above, what would you change?
 

leehljp

Member Liaison
Joined
Feb 6, 2005
Messages
9,326
Location
Tunica, Mississippi,
You have going for you what works OK for you. Keep expanding your experience.

As for me, I rarely use 320 except when for a rare reason I want to sand to close to size. But probably 95% if the time I turn to size with a sharp tool. If I do use sandpaper, I normally start off with 400 and sometimes 600 when I do use sand paper. The reason is the lower grits leave scratches corresponding in depth to the roughness of the sandpaper grit itself. I find it some what wasting time for me - to sand with courser grits and then have to sand out the scratches with finer grits.

One difference in our approach is I enjoy the journey of making a pen, so the quickness is not an issue with me. Well it is in a way. I make sure I have sharp tools and turn to shape with a smooth surface so that it needs little or no sanding. I have been doing this for process for about 13 years now, so it is not something new or even difficult to do. Where you spend time using sand paper to get it to shape, I spend a few seconds honing the tool and turning to shape and size. I do segmenting, and sanding causes lots of problems with segments, especially when metal and wood are used. Sharp tools was my method to eliminate sanding on segments, and it works on wood and cast material too.

Here is my first pen that I did not use any sanding on the wood or metal, all is from a sharp scraper.

I did use micro mesh 6000, 8000, 12,000 on the finish. I put a thick layer of finish as measured with calipers so that when it I do turn and MM it, the MM will not sand through to the wood. I used the scraper to make the finish smooth from one end to the other and then used the high end MM and polish.

Hope this helps.
 
Last edited:
Top Bottom