Whiskey barrel blanks

Signed-In Members Don't See This Ad

sorcerertd

Member
Joined
Sep 30, 2019
Messages
3,335
Location
North Carolina, USA
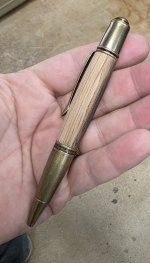
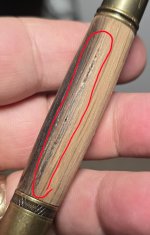
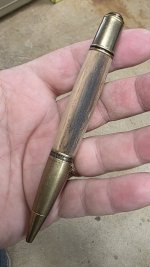
My question applies to more than just the whiskey barrel staves, but it's the most unstable type of material that I want to work with at the moment. The pen below was made with a stave from Maker's Mark. There are two things that I'm seeking advise with here.

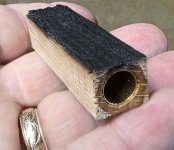
  1. Stabilizing - The finished barrel didn't retain the texture I was looking for. In fact, I scored it with some 40 grit after turning it just to put some texture back in it. Here's what I did with the blank:
    a. "Stabilized" the charred side with thin CA.
    b. Put a thin strip of wood against the charred side to offset the hole while drilling. It was not glued to the side of the blank because I didn't want to have to remove it without damaging the focal point, but held firmly in place by the pen jaws.

  2. Drilling - Even with the stabilization, it cracked a little with the wall being so thin, and I still was left with less of the char than I wanted.
    As far as the crack, the glue bond between the tube and wood held it together, but I really would like to drill it so that the wall is thinner on the charred side. It's obviously much more likely to crack that way. I even used a monarch grande instead of a regular sized sierra style so the barrel would have more thickness to it.

I do also have a stadium seat blank that I'd like to drill the same way to retain some of the paint. At least the seat is curved more sharply to make it more doable, but I still have to drill the walls quite thin! Also, the stadium blank cost enough that I really don't want to mess it up. I've watched a couple Youtube videos and they don't address stabilizing or supporting the thin walled side. I'd rather not make a really bulbous pen if I can avoid it.

* On an unrelated note: I had the idea that making a barrel style mini pepper mill from some staves would be pretty cool. I doubt that the charring would flavor the pepper much, but the idea is intriguing.
1746491905805.jpeg

1746491795802.jpeg1746491835649.jpeg
 
Signed-In Members Don't See This Ad
Just a thought…You could always get a mini butane torch and re-char one side after you turn it.
I did think of that. It feels a little like cheating, but may be something I need to resort to. It's still a legit stave either way, right? I do have a few types of torches, but the little kitchen torch will make quick work of it. It's not like I'm making much creme brulee with it 🤣
 
Just a thought…You could always get a mini butane torch and re-char one side after you turn it.
I refer to this as "moving the char" - it helps convince me that I'm not cheating - that much, after all, it's the same blank, same wood, just a slightly different area that has been charred. - 😁 Dave
 
I think you did very well to get that much char showing . As to `moving the char` , I would consider it to be a fairly minor ethics deviation , compared to what passes for a circuit board blank these days .
Thanks, Wayne. That's a good point. Maybe one day I will attempt to bend a circuit board around a tube, too.
 
So... if you really want to preserve the char, how about casting the burnt/charred stave in clear alumilite resin so that it is slightly off center. Then when you drill and turn it, you will have the char preserved under the clear resin.

Disclaimer: I do not pour resin, but it works for other materials, why not this?
 
I've been trying to turn antler lately and found that the through hole position can be manipulated by using that technique of placing the piece off center and reversing the position of the Jacobs chuck and the dead center. Basically you offset the charred side so that it doesnt get turned.
I use an actual centerdrill to create the start and end points for the drill.
This is exactly how I have drilled antler. I'm still afraid that the oak will crack more easily than the antler.

@d_bondi, that's fair, but I don't work with resin at all, either. That would be a good way to stabilize it. Keeping the natural feel is preferred.
 
Not sure which videos or instructions you've watched on this. Michael Hardin has a video on the Stadium Pen Blanks site that walks you through his process. I used it to do a pen that used wood from my grandparents barn. I promised Michael at the MPG I would write something up about it and it still sits on my to do list. End of school and graduation stuff for my oldest have really been rough on my schedule much less my day job being busier than normal too.

I used a set of steps that were generally similar to what you outlined up above. I would say that the least amount of sanding you can do on the surface you're trying to preserve the better off you are. That helped my pen preserve more of the patina

I'll try to get something posted in the next day or two along with some photos.
 
This is exactly how I have drilled antler. I'm still afraid that the oak will crack more easily than the antler.
If you have enough of the stave left over it doesn't hurt to try. Hold the piece with the flat 'sides' of the blank when you drill it and go slow. Peck and go technique.
Once you get it drilled then the tube should provide stabilization to the blank. Just take your time and not rush the turning. Perhaps use a skew as it slices a bit easier into the wood and turn it as fast as your lathe will turn to minimize the air gap time on the cutter.
 
Last edited:
If you have enough of the stave left over it doesn't hurt to try. Hold the piece with the flat 'sides' of the blank when you drill it and go slow. Peck and go technique.
Once you get it drilled then the tube should provide stabilization to the blank. Just take your time and not rush the turning. Perhaps use a skew as it slices a bit easier into the wood and turn it as fast as your lathe will turn to minimize the air gap time on the cutter.
I'd even consider sanding it to a basic round on the belt sander first.
 
I did a video on this exact process. It is posted on my blog page at Stadium Pen Blanks.

Saving the original painted surface on your finished pen!


Back
Top Bottom