DrD
Member
Turning/Finishing Pen Blank to Pen Component Dimensions
Someone had asked about knowing how much thickness is added to the pen barrels by applying a CA coating. That was a question I wanted answered. There are many, many variables which impact any such answer. Thus, your mileage will vary.
I designed a simple experiment, controlling as many variables as possible. The answer to the question though will most certainly vary from one technique to the next, and more importantly will vary with your ability to consistently execute your particular technique. All this includes such things as type of CA, type of accelerator, technique used for application of both, type of sanding medium, length & pressure of application of sanding medium – just to name a few.
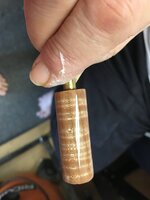
For this exercise I took a scrap blank and glued (2 part epoxy) it to a length of 7mm brass tube as seen in the attached photo. The end opposite my hand is the "A" end, the middle is "B" and the end next to the extended tube (end I am holding) is "C.'
Step 1 With the lathe set to ~1700 rpm, the turned pen blank was first dry sanded with Abranet 320, MirlonRed (~360 grit) and Mirlon Gray (1500 grit). The sanding is done on the lathe. For radial sanding, the lathe is turning; the lathe is stopped and the mandrel is turned by hand through 360 degrees for longitudinal sanding, followed by dust removal with a cotton rag before advancing to the next grit.
Step 2 Next the lathe is turned down to ~360 rpm and the CA is applied following the materials and methods shown in the Craft Supplies USA blog "Applying a CA Finish". In short, using a blue shop paper towel I first apply 2 coats of thin CA, followed by 10 coats of medium – or as CSUSA says, Pen Finish. In between each coat of CA the blank is lightly sprayed with a quick burst of accelerator.
Step 3 Sanding out the CA by sanding, following the procedure outlined in step 1. The lathe is turned back up to ~1700 rpm. The gloss is completely removed by wet (water) sanding with Mirlon Red, followed by Mirlon Gray. Remenber to remove the watery swarf before moving to the next grit, and sand radially and longitudinally. If any shiny spots remain repeat the sanding with the Mirlon grits before advancing to the MicroMesh pads. Because I inspect all my finished barrels with a 20x lighted loupe, I start with 1500 MM and go all the way thru 12,000 MM, radially and longitudinally sanding, and removing swarf between each grit.
Step 4 Final polishing begins with apply 3 separate coats of 20/20 Plastic Polish, buffing each on the lathe with clean cotton cloth with the lathe running at ~1700 rpm. Next is the application in the same manner of 3 coats of Renaissance Wax. Finally, the inspection with the loupe. For those of you familiar with statistical process control (spc), the loupe inspection is unnecessary because the preceding steps are designed to ensure no noticeable sanding marks.
As you can see, in this case after all is said and done the applied CA coat adds 0.005" to 0.008" thickness to the uncoated turned & sanded blank. Again, your mileage may vary. By way of example in this case, if the od of my Receiver Connector Nib was 0.674", I would turn that end of the blank to ~ 0.668". Or stated differently, in this case the CA added ~0.006" in thickness to the barrel. I hope this helps.
Someone had asked about knowing how much thickness is added to the pen barrels by applying a CA coating. That was a question I wanted answered. There are many, many variables which impact any such answer. Thus, your mileage will vary.
I designed a simple experiment, controlling as many variables as possible. The answer to the question though will most certainly vary from one technique to the next, and more importantly will vary with your ability to consistently execute your particular technique. All this includes such things as type of CA, type of accelerator, technique used for application of both, type of sanding medium, length & pressure of application of sanding medium – just to name a few.
For this exercise I took a scrap blank and glued (2 part epoxy) it to a length of 7mm brass tube as seen in the attached photo. The end opposite my hand is the "A" end, the middle is "B" and the end next to the extended tube (end I am holding) is "C.'
Step 1 With the lathe set to ~1700 rpm, the turned pen blank was first dry sanded with Abranet 320, MirlonRed (~360 grit) and Mirlon Gray (1500 grit). The sanding is done on the lathe. For radial sanding, the lathe is turning; the lathe is stopped and the mandrel is turned by hand through 360 degrees for longitudinal sanding, followed by dust removal with a cotton rag before advancing to the next grit.
Step 2 Next the lathe is turned down to ~360 rpm and the CA is applied following the materials and methods shown in the Craft Supplies USA blog "Applying a CA Finish". In short, using a blue shop paper towel I first apply 2 coats of thin CA, followed by 10 coats of medium – or as CSUSA says, Pen Finish. In between each coat of CA the blank is lightly sprayed with a quick burst of accelerator.
Step 3 Sanding out the CA by sanding, following the procedure outlined in step 1. The lathe is turned back up to ~1700 rpm. The gloss is completely removed by wet (water) sanding with Mirlon Red, followed by Mirlon Gray. Remenber to remove the watery swarf before moving to the next grit, and sand radially and longitudinally. If any shiny spots remain repeat the sanding with the Mirlon grits before advancing to the MicroMesh pads. Because I inspect all my finished barrels with a 20x lighted loupe, I start with 1500 MM and go all the way thru 12,000 MM, radially and longitudinally sanding, and removing swarf between each grit.
Step 4 Final polishing begins with apply 3 separate coats of 20/20 Plastic Polish, buffing each on the lathe with clean cotton cloth with the lathe running at ~1700 rpm. Next is the application in the same manner of 3 coats of Renaissance Wax. Finally, the inspection with the loupe. For those of you familiar with statistical process control (spc), the loupe inspection is unnecessary because the preceding steps are designed to ensure no noticeable sanding marks.
A | B | C | |
| Prior to Coating (1) | 0.679" | 0.668" | 0.665" |
| After CA Coating (2) | 0.687 | 0.675 | 0.674 |
| After Sanding (3) | 0.684 | 0.674 | 0.673 |
| After Polishing (4) | 0.684 | 0.674 | 0.673 |
As you can see, in this case after all is said and done the applied CA coat adds 0.005" to 0.008" thickness to the uncoated turned & sanded blank. Again, your mileage may vary. By way of example in this case, if the od of my Receiver Connector Nib was 0.674", I would turn that end of the blank to ~ 0.668". Or stated differently, in this case the CA added ~0.006" in thickness to the barrel. I hope this helps.