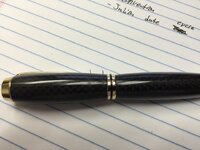
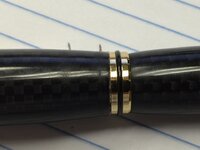
What am I missing with this finish?

Signed-In Members Don't See This Ad

bushwacked

Member
Joined
Aug 23, 2016
Messages
55
Location
Texas
So I have sanded from 220-12000 ... twice nice but I cant seem to get rid of these 2 lines ... Is it me or is it the blank? The rest of the pen looks great, but those 2 lines are killing me.

I have marked on the paper where the 2 lines are .. close to the center coupling piece
 

Attachments

  • IMG_9245.jpg
    IMG_9245.jpg
    160.8 KB · Views: 211
  • IMG_9246.jpg
    IMG_9246.jpg
    132.6 KB · Views: 216
Signed-In Members Don't See This Ad
Now I see this is your 4th post so I assume you are a newbie and not sure how much pen making experience you have. Welcome to the site and if you realize this statement then please ignore. I see you put the kit together. Now any finishing you do will have to dismantle the kit. You should always look and examine your finished blanks before assembly. It will save you problems later.

That does look like 2 marks that were not properly tooled. Various reasons and one was mentioned. Now trying to sand the marks away will take some doing or you can try taking the blank down a bit more using a good sharp tool and then repolishing. Otherwise you need to step down the grit before you get to MM pads. You may have enough material to do this without adding any CA but it may change the shape somewhat. That is a call you have to make. To me I like a bushing to bushing finish and do not like the humps.

Good luck and lesson learned. :)
 
Last edited:
It's hard to tell without knowing your complete sanding procedure.

I stop the lathe & sand laterally for each grit to remove circular sanding marks, then wipe the blank with denatured alcohol (DNA) or acetone to remove all larger grit particles before going to the next grit.

If you do that, they might be tool marks & you just didn't start with a coarse enough grit or they might just be wood characteristics. You might be able to tell by looking at it through a loupe or magnifying glass. Being an old fart, I do all my turning while looking through a 5x lighted magnifier. If it looks acceptable through that thing, it will look great to the naked eye.

Frankly, it's hard to see those marks in your photos, so I wouldn't worry about them too much. Us woodworkers always know where every little flaw is even when no one else can find any.
 
If you sand enough to remove the marks there will be a step between the blank and hardware. To fix you will want to put a few layers of CA (cyanoacrylate Glue) on the pen in order to have the two match when you re-polish. So firstly you will need to disassemble the pen (Harbor Freight Transfer Punches) and remount the barrel in the lathe to apply the CA, sand and polish. You aren't the first to do this and most definitely won't be the last. :wink:
 
I am just expanding on what has already been stated. The lines that are visible were caused by cutting deeper at those two points than the surrounding area. You may have experienced tool chatter, which when it happens, will very rapidly cause the tool to dig deeper. The depth of the "lines" is beyond what can reasonably be sanded away. The fix will require pen disassembly, and further turning. But you do not want more of the same, as you work at the fix. The most probable cause is a tool that is not sharp enough, or otherwise improperly ground/sharpened. The RPM speed of turning can also be a factor. Turning technique may also be the culprit. You will need to experiment to find the answer. If you have some scrap material, perhaps an off cut of the same material, you can work out the answer, then attempt rework of this pen. Happy turning...do not give up, as you are already close to being where you need to be!
 
Thanks guys! After your responses I am going to chalk it up to a dull tool. I had turned several pieces before this one... Guess it is time to go back and sharpen.

I just assembled it because it was for me and I knew it was messed up. I will disassemble it and start with a lower grit and try to get it worked out over the weekend.

Thanks!
 
Shining a light at low angle across the pen will show scratches you will not see with an overhead light.

Cheap abrasives have cheap specs and will be much more likely to have oversized abrasive pieces in the mix. Take extra care when switching to not-cheap-abrasives like micromesh because the numbers do not necessarily mean the same outcomes between sources.

A really good finish takes care and consistency.
 
Highly recommend Abranet for sanding . A range from P120 to P800 should cover everything you need - 400 to 800 , when you get good with a skew - , then you can go to green Micromesh if you want more gloss . Good tips above on use of low angle light , cleaning blank between grits and using all grits made by the same company . Also good practice to keep grits separate from one another .

Be aware of the difference between European (P series) and Ansi (US) grade sandpapers . They are pretty much the same up to about 220 - 240 , then the European grades are closer together , so P600 is approximately the same as Ansi 400 . There is a good reference table in the library on this subject .
 
Last edited:
I will look into more grits for the Abranet ... I have the 400 grit that I used before I go to MM

Guess I will be getting more
 
Abranet is great - I use it a lot. I also like the Mirka Goldflex sandpaper.

For micromesh, I prefer the sheets over the individual pads. I cut them into strips about 1" wide & 3" long.

Just a few more ideas.
 
Back
Top Bottom