Water slide decals

Signed-In Members Don't See This Ad
This is the method I have used on several hundred pens.
I print decals using my inkjet printer and let the decal set overnight. Then I spray two coats of clear Krylon and let it set overnight between each coat. Then I apply the decal to the blank that has about 6 coats of CA which has sat overnight then sanded and polished up to 12000. After applying the decal it sits overnight and then about 6 more coats of CA which sit overnight and then sanded and polished up to 12000 and Beale buffed.
 
+1 on Larrys post. I also cut as close to the image as possible to get rid of as much as possible of the decal paper..

Lin

I didn't mention that but it's a good point. When cutting the decal I also try to round all corners. Also if your logo has "legs" don't try to cut between them, cut around them. If you go to my website you can get a better idea of what I am talking about.

Handcrafted Theme Pens by Larry
 
I applied a decal to a pen once, back in 2015.

It was an acrylic pen ... I sanded and micromeshed it up to 12,000 grit, then polished with Plast-X, but did NOT apply wax ...

I then printed 4 copies of the decal I wanted, just to be sure I got a decent print, using my inkjet printer.

I sealed the decal page with the Testor's sealer spray, waited an hour.

I cut out the decal, lightly rounding the corners ... and let it soak in some lukewarm water for about 1 minute while I prepped the blank ...

To prep the blank, I turned the lathe on lowest speed and wiped the blank with Minwax Stain"n'Seal (boiled linseed oil is in there). I turned the lathe off, and then applied the decal, working all the bubbles out from underneath with gentle touches of a Q-tip soaked in the Minwax ... I also covered the entire decal surface with a very thin layer of the Minwax. I put on a pair of latex gloves and put a dot of superglue on a finger, smeared it all around the decal, making sure to get all the edges. I repeated this a few times, using a fresh area of the glove for each application, to ensure it went on as smooth as possible ... after the 3rd application, I let it cure for 20 minutes.


I came back to it, and turned the lathe on low speed again, applied Minwax for the last time and applied CA 5 more times. I let it sit for 20 minutes. I then sanded the CA back with 1000 grit, using water, and then progressed up through micro-mesh again, polished with Plast-X and gave it a coat of Turtle Wax Hard Surface.


To date, it's still the only pen I've made with a decal that was successful ... and I hear that it's still very much appreciated.
 
I use decals quite a bit, but have found that I have the most problem when trying to place decals on acrylic. If I use clear decal paper the design usually blends in too much and can't be seen. If I use white decal paper there is white all around the text and is too difficult to cut around the letters. I've even tried adding color to text and using clear decal paper, but it still doesn't work. Any recommendations? Seems like the ideal material is light colored wood to use decals. Any ideas are greatly appreciated..
 
This is how I apply Testors Waterslide decals to wood, acrylic and antler.
Works great for me.

Les
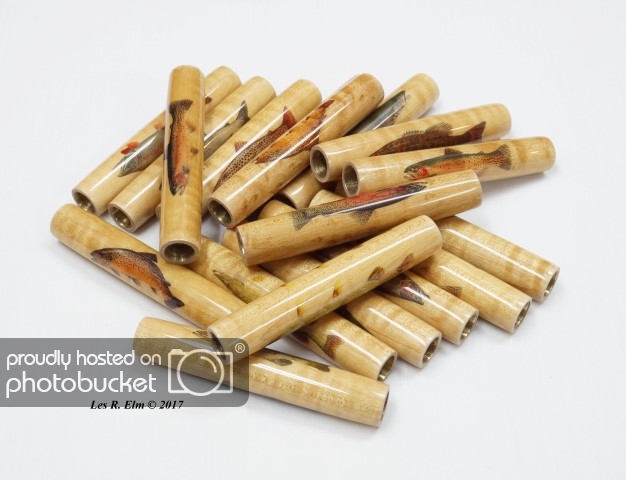
DSC04451%20Custom.jpg
 

Attachments

This is how I apply Testors Waterslide decals to wood, acrylic and antler.
Works great for me.

Les

DSC04451%20Custom.jpg

Those look really, REALLY good. From what I can see, in your photo, there doesn't seem to be any hint of the decal paper's borders. That's what I was concerned about, when I ventured into trying them out for myself. I don't remember where I to mine from, but they are decal papers for my laser printer. My printer only prints with black ink, but that's ok - because my aim was only to personalize my pens with the customer's names ( if so desired/requested).

I've not had the chance to test the decal papers out, as yet, but am anxiously looking forward to doing so.

By the way, your finish on those blanks look awesome. CA?
 
Les - Another excellent write up. Covers the whole process you use very well.

Thank you for the time and effort.
 
This is how I apply Testors Waterslide decals to wood, acrylic and antler.
Works great for me.

Les

DSC04451%20Custom.jpg

Absolutely super Information. I don't know HOW I missed noticing your attached file, yesterday. But what you've shared is very valuable to me, and your thoughtfulness is very much appreciated.
 
This is the method I have used on several hundred pens.
I print decals using my inkjet printer and let the decal set overnight. Then I spray two coats of clear Krylon and let it set overnight between each coat. Then I apply the decal to the blank that has about 6 coats of CA which has sat overnight then sanded and polished up to 12000. After applying the decal it sits overnight and then about 6 more coats of CA which sit overnight and then sanded and polished up to 12000 and Beale buffed.

Got any photos?

Les
 
Thank You so much for this information. I live on the Fl Coast and have been trying to make saltwater fish pens. Yours are amazing! Thank You for the explicit details.
 
To tag onto the previous question, what brand do you find works best? Also, I read the posts and about everyone said they use ink jet? Is that for a reason? Would a laser printer be better? Worse? Thanks for the interesting topic!
 
Back
Top Bottom