VOTE -- Pen Stand, Box, Display Contest Test

Signed-In Members Don't See This Ad

Vote for your Favorite Box, Stand or Displays

  • Entry 1

    Votes: 23 36.5%
  • Entry 2

    Votes: 6 9.5%
  • Entry 3

    Votes: 10 15.9%
  • Entry 4

    Votes: 12 19.0%
  • Entry 5

    Votes: 13 20.6%

  • Total voters
    63
  • Poll closed .

KenV

Member
Joined
Oct 28, 2005
Messages
4,720
Location
Juneau, Alaska.
Time to vote!!!

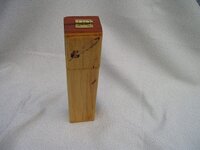
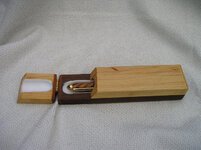
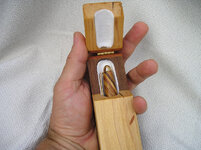
There were 5 excellent entries. Vote for your single pick for best Stand or Box or Display.

Voting will close on Friday and there will not be a second round unless there is a tie in the top 3 positions. If that happens the field will be narrowed to the top three scores and voting will proceed to a second round.
 
Last edited:
Signed-In Members Don't See This Ad

KenV

Member
Joined
Oct 28, 2005
Messages
4,720
Location
Juneau, Alaska.
ENTRY 1

Desk pen base- PR cast of petrified shark's teeth, starfish and shells.
Wall Street III pen- PR cast of sand, shark's teeth, and sea horses.
 

Attachments

  • image1.JPG
    image1.JPG
    75.5 KB · Views: 275
  • image2.JPG
    image2.JPG
    50.5 KB · Views: 257

KenV

Member
Joined
Oct 28, 2005
Messages
4,720
Location
Juneau, Alaska.
Entry 2

Made out of maple and walnut. Key feature is the 'flip top' brass hinge that allows the user to easily to remove or insert their writing instruments in the Pen stand. Ideally one would display the pen case in the upright (vertical) position and thereby give it a column effect. However if one desires to have the case in the horizontal position then that will work as well. I used the now very popular NEJE laser to show off a design on the face of the flip top door. The pen stand is finished with boiled lined oil to maintain the natural look of the lumber. As a final touch, I lined the pen stand with a white felt liner so as to protect the pen as it's inserted in the "protective" stand.
 

Attachments

  • Image1.jpg
    Image1.jpg
    280.5 KB · Views: 278
  • Image2.JPG
    Image2.JPG
    102.4 KB · Views: 268
  • Image3.JPG
    Image3.JPG
    105.6 KB · Views: 269

KenV

Member
Joined
Oct 28, 2005
Messages
4,720
Location
Juneau, Alaska.
Entry 3

It's a solid white oak pen case. I lined the bottom with green felt to give it a good background to the pen as it
is displayed under a glass 'double' cornered frame. Standard brass hinges (rear) and a small but well secured brass lock at the front to keep the case well secured. The pen box is capable of displaying up to three(3) pens by changing the bridge configuration but in this instance I have chosen to display a 'single' pen. Since the top frame contains clear glass, the end user has the option of removing the pen postcard and simply choosing to clearly display the pen(s) within the pen case.
 

Attachments

  • Image1.JPG
    Image1.JPG
    50.3 KB · Views: 276
  • Image2.JPG
    Image2.JPG
    48.4 KB · Views: 276
  • Image3.JPG
    Image3.JPG
    64.1 KB · Views: 289

KenV

Member
Joined
Oct 28, 2005
Messages
4,720
Location
Juneau, Alaska.
Entry 4

Celtic Pen Stand


Mesquite body, red oak knot segmented in. Cross-drilled before turning--and ended up with something that looked like a rook from a chess set
 

Attachments

  • Image 1.jpg
    Image 1.jpg
    176.9 KB · Views: 255
  • Image 2.jpg
    Image 2.jpg
    144.5 KB · Views: 261
  • Image 3.jpg
    Image 3.jpg
    169.5 KB · Views: 258

KenV

Member
Joined
Oct 28, 2005
Messages
4,720
Location
Juneau, Alaska.
Entry 5

The historic wood pen is cedar, but I don't have alot of it, so I used non-historic cedar for the stand - a 1 inch plank I picked up at Menards. I started with a 3x3 square and drilled an angled 11/32 hole to receive the pen. I got a head start on a circle by cutting the corners off on the band saw. I then marked center on the bottom with a punch and mounted it on the lathe, "between centers" style, with the dead center going into the center punch, and some double stick tape on the good side pressing up against a mandrel saver (acting as a live center). I turned it round embellished the sides with a little bit of shaping and burned couple of lines with wire for interest. I finished it with Mylar's Cellulose Sanding Sealer and sanded through 600. Using one of the little $100 1500mw lasers I engraved the logo and text. I put a final coat of the Sanding Sealer on the engraved part to protect the burned bits. A couple of rubber bumpers on the flat bottom made it nice and stable on a desk or counter.
 

Attachments

  • Image 1.jpg
    Image 1.jpg
    240.5 KB · Views: 278
  • Image 2.jpg
    Image 2.jpg
    325.3 KB · Views: 292
Top Bottom