Ultem and brass fountain pen.

Signed-In Members Don't See This Ad
See more from Oliver X

Oliver X

Member
Joined
Jun 12, 2021
Messages
68
Location
Pacific Northwest
IMG_0199.jpgIMG_0197.jpgIMG_0198.jpgIMG_0200.jpgIMG_0201.jpgIMG_0203.jpg

I have for you fine folks today some terrible photos of my latest pen. I'll try to keep the essay short. :)

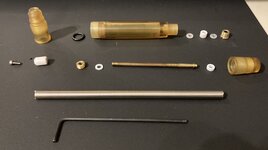
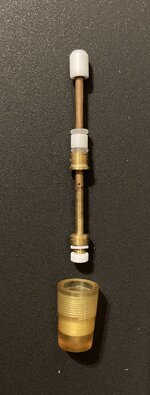
The pen is based fairly closely on the Sailor Pro Gear King of Pens which donated the nib unit. I had previously made another pen for this nib, but I didn't much care for the balance. I made it too long and too back heavy. This one is dimensionally very close to the original pen, but about 1/4" longer in the barrel and an 1/8" longer in the cap. Sailor King of Pens are available in all sorts of colors and various materials in prices from around $600 up to around $7,500 depending on material and finish. With the exception of the 600 piston filling pens made for Sailor's 95th anniversary in 2006, all of them are cartridge/converter pens. If you want more ink in the pen you need to either hack together a larger cartridge or get a custom pen made by someone other than Sailor. Also the converter only holds .5ml. This pen holds around 3ml and is configured as a Japanese style eyedropper with a shut off valve.

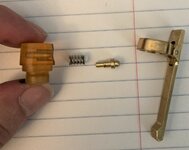
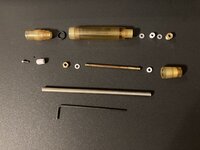
The pen was made from Ultem plastic and brass, primarily, with a few small pieces of PTFE for the valve plug, o-ring spacers and bearings for the rod inside the blind cap. There are a few other small parts, various o-rings, a spring from an old printer, a stainless pin for the clip, and a 2-56 screw for the valve plug. Everything else was made on my tiny Sherline lathe and mill. All but the 2-56 threads were single pointed.

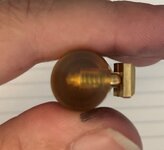
Overall, I'm happy with how it turned out even though it's still pretty crude in many respects. I'm not sure how I feel about the clip in general and it's not very refined. I don't like how the internal threads show white on the outside of the plastic, but I didn't try to polish them for fear of washing them out. (I made this for myself, so function was far more important than anything cosmetic, but I still wanted it to look nice. I don't like making excuses about my work.) The interface in the section for the housing nipple was bored about a thou larger than I wanted and I knew I'd likely need a gasket to prevent ink from getting around the housing inside the section. I haven't made that gasket yet, so there's ink seeping down the threads. It's unsightly, but it won't leave the interior of the pen, so the fix will wait for now. I'm not wholly sure I can make a section that won't have that problem, so I'm not going to make a new section. ...But I also don't like the few extra turns of threads inside the section that show through, so I might. Same for the internal threads on the cap for the finial. I could have hidden those completely behind the band, but I didn't think that far ahead. I did think about it with the trim and threads at the bottom of the cap, though, and that part came out better than I expected. I also didn't line up the nib with the clip which I meant to do.

Anyhow, not sure I kept that short, but if you read it and have any questions or comments, fire away. In light of recent discussion, I will say I'm completely open to feedback and welcome your opinions. I don't make pens for sale and I'm posting this here to spark discussion as much as anything.
 
Signed-In Members Don't See This Ad

Oliver X

Member
Joined
Jun 12, 2021
Messages
68
Location
Pacific Northwest
THat is gorgeous pen. I'm impressed with what you've accomplished on your Sherline equipment. Well done.
Thanks. I've had the little lathe and mill for a couple decades. They're really not bad for inexpensive, hobby machines so long as you work within their limitations.
 

Pierre---

Member
Joined
Jun 10, 2012
Messages
415
Location
France
A great craftsmanship indeed Oliver!
I find the clip very interesting - even if still not really convincing aesthetically, in my opinion. Would you share some more pics or drawings showing the spring, or the spring action, if you have some? And the valve and its screwing system?
In fact, many items are interesting in this pen. 😊
What is the thread size of the kop nib unit by the way?
 
Last edited:

Oliver X

Member
Joined
Jun 12, 2021
Messages
68
Location
Pacific Northwest
A great craftsmanship indeed Oliver!
I find the clip very interesting - even if not really convincing aesthetically, in my opinion. Would you share some more pics or drawings showing the spring, or the spring action, if you have some? And the valve and its screwing system? In fact, many items are interesting in this pen. 😊
What is the thread size of the kop nib unit by the way?
Congrats!
Thanks. I didn't make any drawings or even notes as I made this, but I took the clip assembly apart and took some pictures. The valve I didn't get better pictures of as I'm not quite ready to drain the pen. I'll follow this up later in the weekend. The valve assembly is pretty typical of the style. The plug is a simple truncated cone made from teflon and held in with a screw at the bottom of the rod. The plug mates with a cone cut into the back of the section. The packing at the back consists of two o-rings with a short spacer in between and a brass screw with a hole through it to keep everything in place and properly compressed. The rod has a flange near its end inside the blind cap. The flange is sandwiched between two teflon bearings and held inside the cap with another brass screw, headless this time, bored through for the rod to pass. The rod is held fairly closely inside the cap, but can spin inside it so that it won't spin inside the pen. I had an issue with a previous pen with a slightly different style of valve plug that incorporated an o-ring at the sealing surface. Due to the grippiness and compliance of the o-ring it would unscrew the plug inside the reservoir off the end of the rod. In a belt and suspenders sort of solution, I changed it at both ends, so now it's no longer grippy at the tip nor does it spin when the blind cap is turned to open the valve.

The threads for the KOP nib unit are M9.5 x .5.
 

Attachments

  • IMG_0204.jpg
    IMG_0204.jpg
    289.9 KB · Views: 97
  • IMG_0207.jpg
    IMG_0207.jpg
    372.2 KB · Views: 91

Oliver X

Member
Joined
Jun 12, 2021
Messages
68
Location
Pacific Northwest
Nice work!
I find the clip the most interesting. I think I need to work on this. I have never liked the look ultem, it's the color.
The clip was a fun challenge. It didn't quite turn out how I imagined, but then I also didn't have a clear picture of what I was going for when I started cutting metal. That would have helped. I'll probably try something completely different for the next one.

Ultem is pretty nice to work with. It cuts easily, it's not very squirmy for plastic, there's no obnoxious smell. But, yeah, it's **** yellow. :/
Very nice. I like the clip, I've thinking about a spring loaded clip. Well done.
Thanks. You should give it a go.
 

sorcerertd

Member
Joined
Sep 30, 2019
Messages
2,695
Location
North Carolina, USA
That looks like a lot of hours went into it. I'm truly impressed with all the work, including that you built the ink tank into it like that. To me, the clip is innovative. At least, I've never seen one with a spring like that. Just curious, when it comes to maintenance, does it disassemble so you can replace the o-rings if needed?

The color of the ultem gives it an antique look and goes well with the brass, especially if the brass picks up a patina. It probably looks a better in person or under better lighting. You mention not liking how the threads look white, but I have to chuckle a little at my first thought regarding that leak around them - teflon tape. Talk about white, huh?
 

Oliver X

Member
Joined
Jun 12, 2021
Messages
68
Location
Pacific Northwest
That looks like a lot of hours went into it. I'm truly impressed with all the work, including that you built the ink tank into it like that. To me, the clip is innovative. At least, I've never seen one with a spring like that. Just curious, when it comes to maintenance, does it disassemble so you can replace the o-rings if needed?

The color of the ultem gives it an antique look and goes well with the brass, especially if the brass picks up a patina. It probably looks a better in person or under better lighting. You mention not liking how the threads look white, but I have to chuckle a little at my first thought regarding that leak around them - teflon tape. Talk about white, huh?

It does have quite a bit of time in it, I'm not sure how much, but I made it over the course of a week or so. It does disassemble completely with the use of a hex wrench and hollow screwdriver. The clip is about the only part that I wouldn't disassemble as the pin is press fit. I'm not sure if it looks better in person. :) it doesn't look bad, but it's a bit rough around the edges with the very minimal polishing and all that. It certainly feels solid, though, which isn't conveyed in pictures. The thought of using teflon tape on it made me shudder a little. The only reason I let that little leak go is because there's nowhere for the ink to go except between the section and the housing. It's sealed at the bottom, so it won't leak out. It hasn't even crept to the end of the threads after a week of use so I doubt it'll go further. I'll still make a gasket for it just to keep it cleaner, but it's almost entirely cosmetic. I think I'll make my next pen from something opaque. :)
 

Pierre---

Member
Joined
Jun 10, 2012
Messages
415
Location
France
Thanks for this very interesting informations Oliver.
When the pen is drained, if you have time to make pics of the disassembled pen, I would be very appreciative. Transparent material is good to see what you are doing, but for sure it would be easier with an opaque stuff ...
 

sorcerertd

Member
Joined
Sep 30, 2019
Messages
2,695
Location
North Carolina, USA
It does have quite a bit of time in it, I'm not sure how much, but I made it over the course of a week or so. It does disassemble completely with the use of a hex wrench and hollow screwdriver. The clip is about the only part that I wouldn't disassemble as the pin is press fit. I'm not sure if it looks better in person. :) it doesn't look bad, but it's a bit rough around the edges with the very minimal polishing and all that. It certainly feels solid, though, which isn't conveyed in pictures. The thought of using teflon tape on it made me shudder a little. The only reason I let that little leak go is because there's nowhere for the ink to go except between the section and the housing. It's sealed at the bottom, so it won't leak out. It hasn't even crept to the end of the threads after a week of use so I doubt it'll go further. I'll still make a gasket for it just to keep it cleaner, but it's almost entirely cosmetic. I think I'll make my next pen from something opaque. :)
I like how this is translucent in that we can see how it all was done and it's easy to see your ink level. I'm sure there are a lot of ways to go with that regarding materials, though. It's certainly beyond my current skillset no matter the material.
 

Oliver X

Member
Joined
Jun 12, 2021
Messages
68
Location
Pacific Northwest
Thanks for this very interesting informations Oliver.
When the pen is drained, if you have time to make pics of the disassembled pen, I would be very appreciative. Transparent material is good to see what you are doing, but for sure it would be easier with an opaque stuff ...
I've attached a few pictures. All the parts, minus the cap, spread out more or less in order and one showing all the internal parts assembled outside the pen plus the two tools required for assembly. The brass shaft has certainly discolored more than I expected in the short amount of time it's been inked. I may replace it with a stainless or titanium shaft down the road.

I took a couple pictures of the gasket I made to sort out the leakage inside the section but I ended up remaking it twice and then changing my approach entirely. I bored the section out partially and bushed it with a piece of black acetal. I didn't take pictures because I just wanted to get it done at that point.

Hope this has been informative.
I like how this is translucent in that we can see how it all was done and it's easy to see your ink level. I'm sure there are a lot of ways to go with that regarding materials, though. It's certainly beyond my current skillset no matter the material.
I'm not a fan of not knowing how much ink I have. 😊 On the other hand, transparent and translucent materials aren't very forgiving. My next one will be better. Or opaque.
 

Attachments

  • D0766D1A-B1BC-4298-BA20-7137F5786220.jpeg
    D0766D1A-B1BC-4298-BA20-7137F5786220.jpeg
    201 KB · Views: 96
  • 5F01CE56-2576-48D4-BEF7-90907CD58AD0.jpeg
    5F01CE56-2576-48D4-BEF7-90907CD58AD0.jpeg
    458.6 KB · Views: 95
  • 5618D9F3-0E15-4567-8122-FF3B646F92FC.jpeg
    5618D9F3-0E15-4567-8122-FF3B646F92FC.jpeg
    279.1 KB · Views: 93

Pierre---

Member
Joined
Jun 10, 2012
Messages
415
Location
France
Many thanks for your pics Oliver, be ready to be copied if you allow it!
What is the use of the spacer between the o-rings in the top of the barrel?
 

Oliver X

Member
Joined
Jun 12, 2021
Messages
68
Location
Pacific Northwest
You're quite welcome. No worries about copying. The design has been in the public domain for a century. It's based on the Japanese pens that were in turn based on the De La Rue "Onoto the Pen" models, which were plunger/vacuum fillers that were imported to Japan about a century ago. The self filling part was ditched, but they kept the shut off valve. I use the collective "Japanese" in this context as there were many who copied it and was possibly as ubiquitous in Japan as the cartridge pen is now. The Pilot Custom 823 is an improved version of the original concept with the self filling intact while the Namiki Emperor is one of the best known contemporary examples of a Japanese eyedropper pen. The Taiwanese company Opus 88 makes quite a few models in this style. There's a number of variations in how they are put together. So, that's a long winded way of saying there's little to steal from me that was not borrowed from someone else.

As for the spacer, it's simply to separate the two o-rings and give them a flat surface to compress against. It also helps the rod remain coaxial to the barrel when unscrewed. Not completely necessary, but works for me. There's quite a bit of variation in how these things are put together. Namiki (Pilot) pens have a spring inside the blind cap/knob so the the rod length can vary slightly and still make complete contact and not be compressed.The arrangement of parts at the back of the pen is quite variable between makers. I typically err on the side of easy to machine and easy to service.

I look forward to seeing your take on this.

Oliver
 
Top Bottom