SteveG
Member
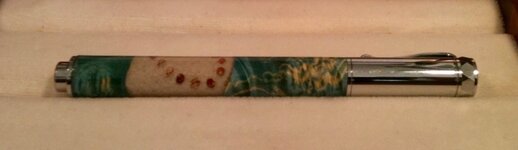
I mentioned this process in another thread and was asked to post a tutorial. I am working from memory, presenting something I did about four years ago. The pen photo is not the best, but all that I had. :frown: This pen photo was cast with highly treasured Hawaiian Ni'i'hau shells, set in the form of a shell lei against a beach sand background. There was not enough depth available in the standard Zen kit, so I stepped down the tube size to an 8mm tube. This is the smallest tube that would accommodate the RB refill. It provided just enough depth to cast the small shells and sand.
The process:
1. By trying different tube sizes, I was able to find tube diameters that would nest nicely. I recall having to sand one of the tube segments slightly to get it to fit inside the next size up. The step-down tube segments were each about 3/8" in length.
2. I used epoxy to glue the tube segments together. This proved to be strong enough. Note that I did sand the normally-pressed-in kit components to a slip fit, then epoxied them in. This was done to avoid stressing the step-down glue joints.
3. The tube joint glue-up was set in a V-grove block to cure, ensuring straightness of the tube assembly. The overall length was made slightly over-size so the tube assembly could then be sanded back to the exact length of a standard Zen tube.
4. For this pen, I glued the two precut wood blank segments in place with the 'show' ends sanded square and smooth. Then the exposed 8mm tube was coated with sand, followed by gluing on the shells. Once everything was cured, I partially wrapped the area of the sand/shells in a 'U' shape with some heavy paper, and did a no-pressure clear cast.
5. The blanks made this way all worked fine, with no failures. I was cautious to not over tighten the tailstock when turning, keeping in mind the tube glue joints.
Comments: The step down could have been accomplished by turning/drilling a small filler piece from hardwood or brass. Also, the brass (tube segments or filler piece) could have easily be soldered instead of using epoxy. I eased the internal end of the 8mm tube prior to assembly to make it easier to insert the refill. This process can easily be adapted to a number of component sets, but a pen cap would need close attention to internal clearance requirements. My personal preference is for the Zen to be turned straight, no bulge. I did in fact turn the blank with a slight increase along the length (save the shells margin) that is not noticeable visually.
Oops, photos disappeared...will fix.
Last edited: