Turning between centers

Signed-In Members Don't See This Ad

Chasboy1

Member
Joined
Jan 11, 2019
Messages
180
Location
Morristown, NJ
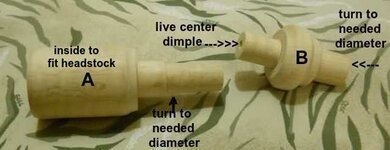
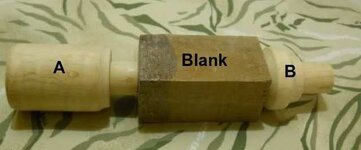
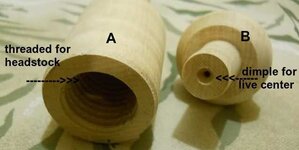
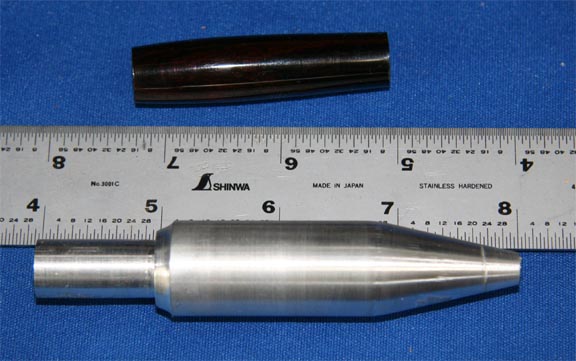
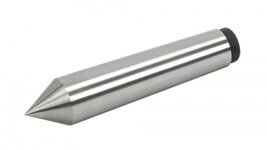
Hi Folks, I've seen lots of recommendations of turning between centers.
This is not a problem for me if I'm using wood, but with acrylic I have to admit I'm a big lost. With a Shopsmith, I don't have a chuck or collet on the drive side. (I do have a Nova chuck on the way)
However, what would I do if I didn't get the Nova chuck?
 
Signed-In Members Don't See This Ad

leehljp

Member Liaison
Joined
Feb 6, 2005
Messages
9,314
Location
Tunica, Mississippi,
I don't know exactly because I don't know what you have. "Necessity is the mother of invention."

I had a problem with CA consistently lifting off the end of the turned blank when separating the bushings from the blank on oily wood. It was plum aggravating. Two people on this forum had mentioned in the previous 6 months about a strange method of not using a mandrel, just a drive center and a live center with the blank between. It wasn't even named TBC at the time, in fact no name. I was overseas at the time and didn't have quick access to a "drive center".

I dreamed up what was needed and turned a drive center (out of a short aluminum rod) that I stuck into a drill chuck on my lathe.


View in Gallery

It worked!

There are some special bushings that need 60° live and drive (dead) centers but unless you have these specific bushings, most any live center & drive center will do.
 

dogcatcher

Member
Joined
Jul 4, 2007
Messages
2,359
Location
TX, NM or on the road
I used a method to make game calls that was similar to TBC without a mandrel. So here is an idea, your spindle is 5/8 diameter. Drill a block of wood, 2x2x4, from the 2x2 end with a 5/8" hole 1" deep. On the end you drilled, drill and tap for a 1/4-20 set screw. Mount the block on your spindle, turn round, then taper the front to a 1/2" diameter, then drill to fit a small piece of pen mandrel. It should sort of look like the PSI TBC set up.

The piece on the right https://www.pennstateind.com/store/PKMBCM2.html

This will wear out, so plan on making more as needed. Have access to a metal lathe, make one out of steel.
 

Shock me

Member
Joined
Dec 5, 2010
Messages
159
Location
Boerne, TX
Lately, I've been trying this: https://www.exoticblanks.com/Turn-Between-Centers-Mandrel-System-Shopsmith.html in its mt #2 version. You mount conventional bushings onto short lengths of mandrel rod at each end. No need for special TBC bushings which can be hard to find sometimes. So far, after maybe 25 turnings I'm pretty happy. At first, I was concerned by some "play" when the blank is mounted onto just one side, but when I bring in the tail stock side, it all tightens down and is very well centered.
 

magpens

Member
Joined
Feb 2, 2011
Messages
15,913
Location
Canada
Charles,

You most likely have been using a mandrel up till now. . The mandrel needs to be driven.

Sometimes to drive a mandrel you grip it with a chuck, but if you don't yet have a chuck, I would assume that your mandrel has a Morse Taper arbor that fits into your headstock spindle. . Some arrangements have the mandrel threaded and screwed into the arbor. . That thread is often a standard 1/4" thread (either National Coarse or National Fine). . So instead of screwing the mandrel into the arbor, you could screw a 1/4" bolt into the arbor. . If you sharpen the other end of the bolt (after removing the head) you can use that to drive your turning stock. . It would be best to machine the sharp point rather than just grinding it.

I have used that method for years.

Without knowing exactly what the headstock configuration of your lathe consists of, it is a little hard to make a concrete suggestion, but I hope that some idea comes to you.

You will never regret making the transition to turning between centers (TBC).

Let us know what you come up with. . Getting the chuck will be a bit help.
 
Last edited:

Chasboy1

Member
Joined
Jan 11, 2019
Messages
180
Location
Morristown, NJ
What a great collection of ideas and references!
In one's introductions to a forum, a person rarely covers all bases. I'm a former Metals teacher and wannabe engineer. I like to use that as an excuse for my exacting questions. :)
Dogcatcher is correct. My Shopsmith has a 5/8" spindle with a flatten side for setscrews, which are required for all attachments. I have a 1/2" drill chuck and a 'regular' drive center for lathe work. As I mentioned I have a 4 jaw chuck on the way which will help immensely.
I'm presently using a 7mm mandrel made for the Shopsmith spindle, and some of you may remember my concerns about vibration, with the resulting advice to switch to TBC.
What I didn't understand is how the blanks would be held in place. From the info provided here, and some other reading I did earlier today regarding a 'mandrel saver, apparently the
application of pressure from the (in my case) quill, to the blank, ending at the live center is what holds the blank it place for turning. Is that correct?
It also seems that there are a variety of tapered point implements I could make that would also work...does that relieve one of having a bushing for every pen in creation? I have 2 new pen kits, one is the 'Princeton" which is only one piece anyway.
 

Shock me

Member
Joined
Dec 5, 2010
Messages
159
Location
Boerne, TX
If I understand you correctly, that's not quite right. TBC usually starts with a dead center at the headstock- a 60 degree conical taper which drives the blank and a live center, also 60 degree conical at the tail stock quill. You can simply press these cones into the brass tubes and turn, and lots of people who are way better than me do just this and swear by it. It doesn't work well for me because I habitually overtighten my quill and doing so you can easily distort the tube end and/or crack the blank if you're turning it very thin at the ends. But if you do it this way, you are correct that you don't need bushings at all. I think most TBCers use TBC bushings which don't necessarily need to be specific to the kit, but must be specific to the tube diameter and ideally smaller than the diameter you are turning to. My experience is that these are not so widely available as conventional mandrel bushings. You also can use conventional bushings between the centers, but this doesn't work so well in my hands either.
 

magpens

Member
Joined
Feb 2, 2011
Messages
15,913
Location
Canada
Charles,

Yes, it is the pressure from the tailstock (through the live center) which you rely on. . That pressure is significant because it "creates" the frictional force at the drive center which keeps your workpiece turning. . Now, having said that that pressure is significant let me add that it is often cranked up to a level that is not really necessary. . So you have to be careful not to make it excessive ... just enough to keep the workpiece turning while you are shaping it. . "Play it by ear", if you know what I mean. . Too much force can reduce the life of the bearings at both ends.

And, yes, to your question about the bushings. . When turning between centers, you actually do not need any bushings whatsoever. . You CAN use bushings but if you do, then you are negating some of the advantages of the TBC technique. . With the "pure" TBC technique (without bushings), you do your sizing through careful and frequent measurement using digital calipers. . Be mindful that there are some "hybrid" TBC techniques which do incorporate bushings as an aid to sizing.

You would realize that when you use a mandrel and bushings you have similar longitudinal pressure and this pressure is transferred from your lathe headstock and tailstock through the steel bushings to the turning workpiece. . The mandrel acts only to stabilize everything and keep it all on the same axis of rotation but the force (or pressure) is through the bushings. . Without the bushings, the force is applied between the driving center (or dead center) at one end directly to the workpiece and the live center (in the tailstock at the other end). . You crank up the force with the tailstock and the headstock reacts with an equal and opposite force in the opposite direction.

If you use a "mandrel saver" it plays a role in transferring force too.

It's all basic physics which you would know.

To acknowledge Gregory's warning ... without any bushings whatsoever, the application of force by the two centers (to the glued-in brass tube internal "corner" at both ends) is more concentrated. . With excessive force you certainly can damage the brass tube and the blank material which is glued around the brass tube. . You don't want that to happen. . You need to "get the feel" for how much force is necessary for the blank to spin and how much puts you in the "danger zone". . It is important to take it easy and "get the feel". . Keep your cuts very light until you do. . It is not that difficult and it is well worth developing the skills for this technique.

However, I would disagree with Gregory where he says " I think most TBCers use TBC bushings" ... I'd say most don't use bushings at all.
 
Last edited:

leehljp

Member Liaison
Joined
Feb 6, 2005
Messages
9,314
Location
Tunica, Mississippi,
If I understand you correctly, that's not quite right. TBC usually starts with a dead center at the headstock- a 60 degree conical taper which drives the blank and a live center, also 60 degree conical at the tail stock quill. You can simply press these cones into the brass tubes and turn, and lots of people who are way better than me do just this and swear by it. It doesn't work well for me because I habitually overtighten my quill and doing so you can easily distort the tube end and/or crack the blank if you're turning it very thin at the ends. But if you do it this way, you are correct that you don't need bushings at all. I think most TBCers use TBC bushings which don't necessarily need to be specific to the kit, but must be specific to the tube diameter and ideally smaller than the diameter you are turning to. My experience is that these are not so widely available as conventional mandrel bushings. You also can use conventional bushings between the centers, but this doesn't work so well in my hands either.

The 60° is not necessarily required. A 60° tail stock IS a requirement in the little cup in the end of a mandrel, or with special 60° machined bushings, but if using normal (made for mandrel) bushings for TBC, it (60° drives) is NOT required, Some angle is required and 60° will most certainly do, but that specific angle is not a necessity. Look at the pict I posted in post # 2. that was the first drive center photo posted on this forum 11 or 12 years ago. It is not 60°, and it worked with using bushings made for mandrel use. it even has a blunted end on the nose cone.

I agree with you on the use of bushings to get things started and rounded. I tend to flair the ends of the tubes if I don't use bushings at the beginning. As soon as I am ready to apply finish (after measuring with calipers for sizing) I take the bushings off and finish.
 
Last edited:

MDWine

Member
Joined
Mar 22, 2005
Messages
2,690
Location
Manassas Park, Virginia, USA.
. . . With a Shopsmith . . .

A tip'o the hat to a fellow Shoppy owner.
I started out on my Shopsmith, but got a good deal on a Jet 1724. It is nice to turn and cut without tearing down equipment... but I love my Shoppy!!

It seems you've found the "converter" to thread that chuck onto the Shopsmith... You're gonna love it!
 

Chasboy1

Member
Joined
Jan 11, 2019
Messages
180
Location
Morristown, NJ
Again, thank you all. I'm enjoying this discussion immensely, partly because I feel like I'm on the same page with everyone.
Just an aside regarding typical lathes for this work, back in the 80's, in their 'infinite wisdom' the school district I worked for followed the trend of reducing Industrial Arts/Vocational programs. They held an auction for everything in the 'heavy' machine shop. There was a collection of roughly 10" South Bend lathes and I bought one for $35. I thought about it for about 10 minutes and then took back my bid, wondering how could I possibly get that down my basement stairs!!
I now have a friend with an even bigger turret lathe who would give it to me, but again, without a garage, I even less of a place for it.
So, I will continue adapting, using the the old Mark 5. It's amazing how fast material can be removed with a good file (or angle grinder) and 1000 rpm!
 

dogcatcher

Member
Joined
Jul 4, 2007
Messages
2,359
Location
TX, NM or on the road
Since you have a drill chuck, you can use the shank of a letter C sized still bit in your drill chuck. Cut the shank off and leave about 1/2 to 3/4 exposed in the drill chuck. This is the same as the PSI set up in the above link I posted where you still use bushings. Use a 60 live center in the tailstock.

That should get you started. Since you have access and apparently know your way around metal lathes, I will suggest you make your own bushings. Plenty of ideas out there.
 

magpens

Member
Joined
Feb 2, 2011
Messages
15,913
Location
Canada
You made a mistake by not going through with the South Bend purchase !!! ;( . Many of us "cut our teeth" on those !
 

Chasboy1

Member
Joined
Jan 11, 2019
Messages
180
Location
Morristown, NJ
You made a mistake by not going through with the South Bend purchase !!! ;( . Many of us "cut our teeth" on those !

Probably one of my biggest bonehead moves. I should have put it in my garage instead of worrying about it being in the basement. :frown:
 

Chasboy1

Member
Joined
Jan 11, 2019
Messages
180
Location
Morristown, NJ
Folks, thanks for all the info, but I need to clarify something in my head. I bought my first 8 kits from Woodturninz and last 2 from Exotic Blanks. All required a 7 mm mandrel, all of the bushings and tubes were 7mm. I get the impression that for kits requiring a larger hole/tube, one buys bushings that still have 7mm holes but step up the diameter to fit a larger tube. Is that correct so far?
Now, after reading many of the recommendations here, I'm under the impression that one does not need kit specific mandrels or bushings, by using some kind of tapered drive center in concert with a live tail center?
 

Charlie_W

Member
Joined
Nov 16, 2011
Messages
5,918
Location
Sterling, VA USA
Folks, thanks for all the info, but I need to clarify something in my head. I bought my first 8 kits from Woodturninz and last 2 from Exotic Blanks. All required a 7 mm mandrel, all of the bushings and tubes were 7mm. I get the impression that for kits requiring a larger hole/tube, one buys bushings that still have 7mm holes but step up the diameter to fit a larger tube. Is that correct so far?
Now, after reading many of the recommendations here, I'm under the impression that one does not need kit specific mandrels or bushings, by using some kind of tapered drive center in concert with a live tail center?

Correct....and correct!

Dead center in headstock.....liver center tailstock.
You will need digital calipers to measure the blank as you go to get the proper diameter and match the pen hardware.
 
Last edited:

leehljp

Member Liaison
Joined
Feb 6, 2005
Messages
9,314
Location
Tunica, Mississippi,
Charles,

I had the same questions the first time I used TBC (I called it mandrel-less) but I didn't have anyone around to guide me. I couldn't get my mind around it so I just started hooking things up - Tail stock, head stock, and with bushings on a single blank and pulled the tail stock up . . . and dog gone it - it started working! And it worked well! I was amazed, and it was far more simple than using mandrels.
 

magpens

Member
Joined
Feb 2, 2011
Messages
15,913
Location
Canada
Charles,

Charlie W. said it all ... all you need is the "dead center in headstock ..... live center in tailstock."

Fit the tubed blank between those two centers, apply just enough pressure from the tailstock, switch on the lathe and start turning. . Friction from the dead center contact with the brass tube does the turning. . No more bushings !! .. no more mandrel !! .. YAY !!!

(I think I said the same thing in an earlier post !! :biggrin::wink:(
 

More4dan

Member
Joined
Mar 17, 2016
Messages
2,102
Location
Katy, TX
Folks, thanks for all the info, but I need to clarify something in my head. I bought my first 8 kits from Woodturninz and last 2 from Exotic Blanks. All required a 7 mm mandrel, all of the bushings and tubes were 7mm. I get the impression that for kits requiring a larger hole/tube, one buys bushings that still have 7mm holes but step up the diameter to fit a larger tube. Is that correct so far?
Now, after reading many of the recommendations here, I'm under the impression that one does not need kit specific mandrels or bushings, by using some kind of tapered drive center in concert with a live tail center?


One of these with Morse Taper to match your lathe's head stock. Usually a Morse Taper #2 for wood lathes some smaller lathes use a #1 taper.

Danny


Sent from my iPhone using Penturners.org mobile app
 

Attachments

  • IMG_1668.JPG
    IMG_1668.JPG
    26.3 KB · Views: 144

More4dan

Member
Joined
Mar 17, 2016
Messages
2,102
Location
Katy, TX
Only problem is he has a Shopsmith, there is no Morris Taper to stick a dead center in.


My mistake, never seen a Shopsmith. He could use a rod that fits the hole in the head stock and just use a file to make a 60 degree point while it spins. My first dead center was made this way holding a 1/2" rod in my chuck.


Sent from my iPhone using Penturners.org mobile app
 

Chasboy1

Member
Joined
Jan 11, 2019
Messages
180
Location
Morristown, NJ
Only problem is he has a Shopsmith, there is no Morris Taper to stick a dead center in.

Right, which is why dogcatcher suggested the #C drill. I don't have any letter drills, so I will use the next size up, which I'm sure I have.
Where did the dimensions for letter drills come from anyway?
 

magpens

Member
Joined
Feb 2, 2011
Messages
15,913
Location
Canada
Letter drill sizes came about as an extension (increased size) of the number drill sizes. (smallest = #80; largest = #1) . Nobody wanted to have to deal with "0" and negative numbers as sizes got bigger.

Now, the number drills starting (smallest) at #80 and increasing in size up to #1 (bass ackwards, if you ask me) came about ... I am told or read ... in relations to wire sizes. . There were very many different "scales" of wire sizes. . Eventually, a standard was reached and that is what we now have. . What were the wire sizes used for ? . Who knows ... that info is lost in the history of the Industrial Revolution, I guess.

A #80 drill is 0.0135"; #1 is 0.228"; A is 0.234"; and Z is 0.413" . . Why did those sizes start and end where they did ? . Who knows that either ... but that is what we are stuck with.

Why am I bothering to write this ? . Dunno that either ... except that it is very windy here, my roof is creaking, and I can't sleep .... :confused::biggrin::eek::cool::mad::mad::mad:
 
Last edited:

brailsmt

Member
Joined
Dec 6, 2018
Messages
102
Location
Kansas City, MO, USA
I just worked with Brian from TBCbushings.com to get a set of TBC bushings that I can use with multiple kits, aka they are non-kit specific. Brian was really easy to work with, and I recommend contacting him for a set all your own. Once I get them, I will report back, but his TBC adapter bushings are amazing.
 

leehljp

Member Liaison
Joined
Feb 6, 2005
Messages
9,314
Location
Tunica, Mississippi,
I just worked with Brian from TBCbushings.com to get a set of TBC bushings that I can use with multiple kits, aka they are non-kit specific. Brian was really easy to work with, and I recommend contacting him for a set all your own. Once I get them, I will report back, but his TBC adapter bushings are amazing.

Michael,

When you get started with TBC, if you don't mind, do a write-up of your experiences. It sure helps when we see write-ups from someone who just got started vs someone who looks back on it several months or years down the road.

When we moved overseas for work there in the mid '80s, we were told "take photos in your first three months; after that, the new culture will be common place and you won't remember what is unique!"

Same with new experiences.

Thanks.
 

magpens

Member
Joined
Feb 2, 2011
Messages
15,913
Location
Canada
This works for me.

Les

This article is well done and should be brought to the attention (as it has in this instance) of all pen turners who wish to move to TBC.

I am going to try to remember to do this when I am in a position to do so.

Thank you, Les, for this post and for preparing this very useful article.
 

magpens

Member
Joined
Feb 2, 2011
Messages
15,913
Location
Canada
Hmmmmm ... how do you "tag" ... not a process I am familiar with on the IAP website.

Or maybe the "tagging" is done by the browser ... shows how much I don't know !!! :rolleyes:
 

brailsmt

Member
Joined
Dec 6, 2018
Messages
102
Location
Kansas City, MO, USA
Michael,

When you get started with TBC, if you don't mind, do a write-up of your experiences. It sure helps when we see write-ups from someone who just got started vs someone who looks back on it several months or years down the road.

When we moved overseas for work there in the mid '80s, we were told "take photos in your first three months; after that, the new culture will be common place and you won't remember what is unique!"

Same with new experiences.

Thanks.

Great idea. I've been doing it between centers for a few weeks now, but I'm using Brian's TBC adapter bushings with regular bushings. I think I'll try to type something up today with how things are going so far.
 

dogcatcher

Member
Joined
Jul 4, 2007
Messages
2,359
Location
TX, NM or on the road
These are old pictures of a TBC system I used to turn game calls. I added some notes to the pics to explain the operation. The same system can be used for pens. To make this system, I would take a 6" long blank, thread one end for the headstock and turn between centers, then cut the long piece in the two pieces in the picture.

Since the OP has a drill chuck, the C bit shank would be part A, and he has access to a metal lathe, I would make part B with a C bit sized extension and create my own version of the PSI TBC system.
 

Attachments

  • TBC 1a.jpg
    TBC 1a.jpg
    73.9 KB · Views: 148
  • TBC 2.jpg
    TBC 2.jpg
    70 KB · Views: 155
  • TBC 3.jpg
    TBC 3.jpg
    72.3 KB · Views: 144

Chasboy1

Member
Joined
Jan 11, 2019
Messages
180
Location
Morristown, NJ
Update: I found an old broken bit slightly larger than a C size. I was out of pen kits but had 2 coffee scoop handles to make, which do not require a through hole. One I made using the new Nova chuck and the live center in the tail stock and it proceeded without drama, tho' it did result in a bit more waste than I would have liked. I was being cautious providing for security of the blank thru the process.
On the second, I used the drill bit/drive center and the live center. It ran pretty well, and I had much less waste, partly because I did not go deep with the center drill on the tail end. However, there was a good amount of skipping due to the pressure I could exert from the Shopsmith's quill. It just doesn't have the ability to exert the same amount of pressure a tail stock feed can. Despite the skipping, I completed the project and it came out very nice.
I'm about to turn a "Princeton" kit which requires a 2 1/4" (rough) blank and would like to use the same method with the drill but I'm concerned about skipping. I DO have the bushing kit for that pen.
Is there something I can do with the tapered end of that drill so it will 'grab' the bushing better? Perhaps dress it with rough sandpaper?
I'm also trying to adapt to my new carbide cutters. They do cut faster and more reliably, I'm still trying to get the right tool rest heights in relation to the blank and 'feed angle' of the tool itself. They are massive compared to my old ones. My concern is when in particular I'm using the square tip that, once I get past the initial roughing stage, I get a sound that resembles that of a chip-out occurring with my old tools. When I stop the machine, 90% of the time I find no chips, but the sound worries me that I'm not making a clean cut. I tried reverting to my old tools, but now their usefulness is limited. Any advice appreciated!

attachment.php
 

Attachments

  • D5E7406D-31B1-45E8-87F5-8CB3CEB61F1E.jpg
    D5E7406D-31B1-45E8-87F5-8CB3CEB61F1E.jpg
    259.4 KB · Views: 170
Last edited:
Top Bottom