Turning between centers- tips and hints

Signed-In Members Don't See This Ad

Woodchipper

Member
Joined
Mar 15, 2017
Messages
5,209
Location
Cleveland, TN
I watched a couple of YT videos on woodturning. One was done with TBC. He stopped the blank to show that it would stall even though the headstock turned. I found a dead center I didn't recall buying. I already have a 60 degree live center. LIke to do some TBC and asking for helpful hints, tips, suggestions, etc. Thanks.
 
Signed-In Members Don't See This Ad

RunnerVince

Member
Joined
Dec 18, 2019
Messages
288
Location
Ogden, UT
I watched a couple of YT videos on woodturning. One was done with TBC. He stopped the blank to show that it would stall even though the headstock turned. I found a dead center I didn't recall buying. I already have a 60 degree live center. LIke to do some TBC and asking for helpful hints, tips, suggestions, etc. Thanks.
1. Don't overtighten your tailstock. Despite the brass tubes, you can still crack a blank pretty easily.
2. I like to coat the tips of my dead center and live center with some sort of lubricant to keep CA from sticking. When I remember, of course.
3. I find I get much better results with calipers than I do with any sort of bushing, even with a TBC setup. The bushings just aren't that accurate.
4. If you don't already, I suggest gluing the endgrain of your wood blanks prior to finishing. I take the blank off the lathe, put a few drops of CA on a paper towel, and give each end of the blank a quick twist on the paper towel. Hit it with some activator, put it back on the lathe, and continue with the finishing/polishing. This generally keeps the gunk of finishing (especially any black metal dust from the dead center/live center/bushings) from impregnating the end-grain, which can sometimes show on the edge of the blank after assembly.
 

leehljp

Member Liaison
Joined
Feb 6, 2005
Messages
9,326
Location
Tunica, Mississippi,
I am dumbfounded over the "stalling" or "slipping" of a blank in TBC, and the splitting. A few people do it and get away with that. But TBC, for most people, should NOT be done without using the bushings, UNTIL the finishing stage with CA. Taking bushings off and even putting them on under TBC doesn't take but 5 or 6 seconds at the most. Once the turning down to size with bushings is done, THEN take the bushings off for finishing.

"Stalling" without bushings YT videos shows that the operator doesn't know what he is doing - UNLESS the operator is trying to show that bushings SHOULD be used for turning to size, and then taken off FOR finishing.

Using TBC without bushings to get started is not much different than trying to use a stick shift without using the clutch. Doesn't make sense.
 

Woodchipper

Member
Joined
Mar 15, 2017
Messages
5,209
Location
Cleveland, TN
"Stalling" was used to show that a catch wouldn't cause the digging and gouging normally seen. I have had catches that almost ruined a nice piece of wood. I discovered I have a kit but no bushings. Woodcraft is 30 miles away and just not feasible to pick up one set of bushings.
 

RunnerVince

Member
Joined
Dec 18, 2019
Messages
288
Location
Ogden, UT
Using TBC without bushings to get started is not much different than trying to use a stick shift without using the clutch. Doesn't make sense.
I have to respectfully disagree here. I've found the bushings to be at best good for gettings you close to final diameter. I don't trust that they truly match the pen kits, and they only get worse if you accidentally hit them with sandpaper or CA while doing a finish. Your calipers don't lie.

If I have the bushings, I do use them (on my mandrel for ease of use) because it allows me to hog off the majority of the material without having to constantly stop to check if I'm close (i.e., brain in off mode). But once I'm down to that last 1/16th, I switch to TBC and ditch the bushings. Calipers and patience are the way to go from then on out. If I don't have the bushings, or don't want to dig them out, I just go straight to TBC and calipers, especially for single-body pens.

I know that bushings just work for some people. And I know they just don't for others, myself included. To each his own.

Then again, I normally spend about two hours start to finish on a pen -- a good bit of that being turning off some material, then stopping the lathe and checking with calipers. So if you're wanting to to go into production mode, I may not be the guy to listen to.
 

leehljp

Member Liaison
Joined
Feb 6, 2005
Messages
9,326
Location
Tunica, Mississippi,
I have to respectfully disagree here. I've found the bushings to be at best good for gettings you close to final diameter. I don't trust that they truly match the pen kits, and they only get worse if you accidentally hit them with sandpaper or CA while doing a finish. Your calipers don't lie.

If I have the bushings, I do use them (on my mandrel for ease of use) because it allows me to hog off the majority of the material without having to constantly stop to check if I'm close (i.e., brain in off mode). But once I'm down to that last 1/16th, I switch to TBC and ditch the bushings. Calipers and patience are the way to go from then on out. If I don't have the bushings, or don't want to dig them out, I just go straight to TBC and calipers, especially for single-body pens.

I know that bushings just work for some people. And I know they just don't for others, myself included. To each his own.

Then again, I normally spend about two hours start to finish on a pen -- a good bit of that being turning off some material, then stopping the lathe and checking with calipers. So if you're wanting to to go into production mode, I may not be the guy to listen to.
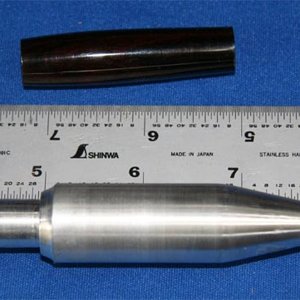
We are saying the same basic thing. Notice that I said: ". . . using bushings TO GET STARTED. I highlighted in bold your words (for getting you close to the final diameter) - that is precisely what I mean by using the bushings to get started. ONCE one gets Close To Size (finished size) then take them (bushings) off and use directly between centers, or TBC.

My statement on comparing to using a stick shift without "using the clutch" was a comparison of turning to round without using bushings - which causes too much slippage for most people, along with cracking on the ends of the blank. Therefore, bushings should be used (by most) to get started. (The reason I said "by most" is that there are a few who use TBC from start to finish without using bushings. If they can do that consistently, more power to them. I am not at that skill level.

OH, and I agree with you on the use of calipers. The purpose of bushings is to hold the blank and prevent it from spinning until the blank is round and close to finished size. Of course, calipers determine that precisely. There are some guys that have made their own bushings to hold the blank to get to size. They do not rely on the bushing's shoulder size to determine the final size, and they shouldn't. Bushings get nicked and sanded and it doesn't take more than making a dozen pens for a bushing to loose its original diameter that many measure by. Not good!

The first drive center used in TBC on this forum:

I had considerable trouble with separating bushings from oily ebony after CA finish. Removing the bushings caused the CA to crack or lift on the ends of the oily blanks, creating what looked like white cloudiness under the ends. (It was not cloudiness but CA that lifted up off of the finished blank itself. That was around 2007 or so. That solution above was what later became known as TBC.
 
Last edited:

RunnerVince

Member
Joined
Dec 18, 2019
Messages
288
Location
Ogden, UT
We are saying the same basic thing. Notice that I said: ". . . using bushings TO GET STARTED. I highlighted in bold your words (for getting you close to the final diameter) - that is precisely what I mean by using the bushings to get started. ONCE one gets Close To Size (finished size) then take them (bushings) off and use directly between centers, or TBC.
Apologies, I completely misread your comment.
 

Woodchipper

Member
Joined
Mar 15, 2017
Messages
5,209
Location
Cleveland, TN
Bringing this to the top for further discussion. I bought a new kit from Woodcraft and discovered (too late) that the kit takes a one-of-a-kind bushing set. Finished diameter is 0.398 but a couple sets I found are just a bit undersized. I have several bushing sets that I can measure and get close and then break out the calipers. Have a bunch of Slimlines or odd tubed blanks I can experiment on. Wife says: "Those are expensive kits so don't screw them up." Don't have a clue why she said that.
BTW, the new kit was on display at the store. Here are the details: https://www.woodcraft.com/products/woodriver-medical-care-click-pen-kit.
My daughter is an NP and works with a friend, an NP, and a doctor that is their backup. Got kits in chrome and gunsmoke.
TIA to all who will reply.
Edit: Looking at the previous posts, I realized I have a huge piece of HDPE I rescued at the recycling center a few years ago. It was being tossed by a mechanical contractor just down the road. Might see if they have any more. Have made a set of bushings and several spacers from it. Just what I need...another project.
 

Woodchipper

Member
Joined
Mar 15, 2017
Messages
5,209
Location
Cleveland, TN
OK, after several minutes rummaging through the shop, bushings, HDPE thingies, etc. I have found that I need the bushings as the kit is new and there are no others that are interchangeable. I'm needing some more acrylic/synthetic blanks so I'll need to make another trip to Chattanooga. Considering another mandrel as the one I have has the long shaft. Will look at another one as recommended by a pen maker; https://www.woodcraft.com/products/whiteside-pro-pen-mandrel-2-mt#product-details. My present mandrel is OK but feel that there would be less flex with the pro pen mandrel. Thanks to all for replying.
 
Top Bottom