Turning a crystal wand?

Signed-In Members Don't See This Ad

Skie_M

Member
Joined
Aug 7, 2015
Messages
2,737
Location
Lawton, Ok
Anybody ever worked with crystals and other translucent minerals on their lathe before?

I got a request from a friend to work on something for her and a group of her friends who are into aura healing, and she already got me the materials to work with: Selenite sticks.

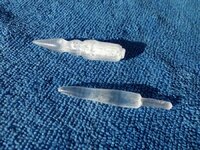
Selenite is an extremely soft mineral ... a crystalline growth similar to sugar in that it cleaves extremely easily along it's grown axis, only while salt cleaves in a cubic formation on all 6 faces, this has 6 faces that cleave and 2 opposing faces that break. Selenite stick formations can be extremely long, and vary in width, and easily break along their long axis along all 6 faces, and while it is harder to break it across the length, it's still weak enough that a child could snap a 1-inch thick 1-foot rod of it across their knee. It's a fairly fragile crystal indeed ...

As a crystal formation, it is used as a wand tip fairly often in occultist and spiritualist rituals. It is also commonly used in aura healing. It has very little aura of it's own and serves as a focus or focal point for the other crystals in the arrangement, helping to amplify and aim at whatever the user is working towards ... I'm not a spiritualist or anything myself, just giving you guys some background.


It's very pretty, but it's so very soft that no matter how I try to mount it on my lathe, I'm going to need a glue block to hold it, and using any kind of tools on it is serious overkill. I'm talking even ONE catch, the tiniest, and the entire crystal formation shatters and comes apart. I can't grip this stuff with any of my chucks ... the pressure needed to hold it makes it literally fall apart. So, I rough sanded a 4-inch long stick (she gave me a 10-pack of these, roughly 1/2 to 3/4 inch roughly squarish pieces) so that it had a somewhat round area in the bottom section, and drilled a somewhat matching hole in a spare chunk of spalted pecan. (Yes, sacrilege ... but it was originally firewood and it was a triangular chunk that was left over from turning a goblet.) Some superglue got it to hold still for me so that I could get it spinning on it's long axis roughly centered.


So ... now I have it mounted on the lathe, and I took sandpaper to it .... well, 120 grit abranet. I love this stuff. I don't love this Selenite ... It turns into extremely fine white powder that goes all over. Also, my dust collector (vacuum cleaner) needs an upgrade .... or at the very least, a replacement. The filter is clogged and in need of cleaning, lol! I have the shape pretty much finalized like I need it, and so I tried to sand it for finishing.

Here's where I'm running into a problem ... I got it up to 1000 grit (used 1000 grit paper after the 400 grit abranet), and then switched to micro-mesh. It's so soft it simply grabs the micromesh grit off the pad and embeds it right in the crystal! I cleaned it off using 91% isopropyl (scared to touch it with acetone, I have no idea what it might do), and still had to sand it back with 1000 grit to finish cleaning the micromesh grit off, and then I wiped it with alcohol again.

I want it to be a crystal clear wand tip, so I can't use the micro mesh because that will mess it up .... currently experimenting with coating it at 1000 grit with CA and seeing if I can polish that up, but I have no idea if that will be acceptable to my friends or her group ... I'll have to ask, next time I see her.

Does anybody out there have any tips or tricks that could help me make this process work better?
 
Signed-In Members Don't See This Ad

Skie_M

Member
Joined
Aug 7, 2015
Messages
2,737
Location
Lawton, Ok
UGH! ... and while parting that first wand tip off the lathe, I lost the lower 1/3 of it!

I used the sharpest and thinnest cutting tool I have to carefully part it off the glue block and a very minor catch made the bottom 1/3 of it fly apart as it came off the lathe .... at least the CA coating kept it from propagating through the entire crystal.


I'm definitely gonna need some new tips and tricks up my sleeve to get this project done!
 

1080Wayne

Member
Joined
Feb 5, 2006
Messages
3,344
Location
Brownfield, Alberta, Canada.
Well , speaking from absolute zero experience . I suspect you should use all of the intermediate grades of sandpaper . You used P400 Abranet , then went to 1000 ANSI ? Quite a difference . Abranet is also available in P600 , P800 and P1000 . From there I would go to 1500 , 2000 and 2500 ANSI wet (can`t remember , there may be a 1200 also) . Hopefully the grits would be held by the same adhesive system as your 1000 grit . 2500 should give a pretty good gloss . Perhaps a wax polish after that ?
 

Skie_M

Member
Joined
Aug 7, 2015
Messages
2,737
Location
Lawton, Ok
Mmm ... I started from 120 abranet and went up to 400 ... don't have any between 400 and 1000, but doubling the grit seems fine in my experience. I do have some 600 grit paper somewhere around here, but the problem I'm having isn't with these lower sandpaper grits ... it's the micro-mesh.

I usually go from 400 to 1000 when sanding my wood projects right before my finishing process, and the micromesh takes jumps like 4000 - 6000 - 8000 - 12000. The major issue with the micromesh is that I cannot use it wet... this stuff is water soluble.


I'm gonna turn another wand tip and see how far I can get ... I have 5 of these Selenite sticks left, and 2 partially successful turnings to show for the 5 that are gone so far.

Well, the one that I just finished up might work ok ... not all of the base totally fell apart, so I could still use that for mounting on the tip of a wand and still have nearly 2 inches exposed. My first partial success has a crack running right up through the middle of the crystal and a dirty looking inclusion on one side, it's just not good enough.

I'll have to experiment with parting off using an ultra-thin tool made from a broken hacksaw blade and hope that will work.


As for how the polish went .... applied CA, sanded to 1000 again and hit it with Plast-X just to see how it would look ... I skipped all the micromesh and wet sanding I would normally do. For all the work I did on it, it still looks like it has surface cracks all over the crystal's surface, as the CA didn't fully penetrate it. I have no idea if this stuff could be stabilized. Perhaps I should try soaking a stick in some kind of oil like BLO? Under close examination, the crystal structure looks like a very straight bundle of clear nylon threads ... like cow horn, only crystal clear. Sometimes single strands come loose. They are somewhat flexible, but also fragile.


edit:
Also ... I should mention .... CA does NOT bond very well to this stuff! The CA is far stronger, and this stuff is extremely fragile. I'm not even sure how well the CA surface coat will hold up over time.
 
Last edited:

1080Wayne

Member
Joined
Feb 5, 2006
Messages
3,344
Location
Brownfield, Alberta, Canada.
Re parting off . Have you considered using the hacksaw to saw it off with the lathe running at low speed ? Might work best with the teeth scraping as opposed to cutting ? Not all hacksaw blades are created equal . Think you would want the narrowest kerf and finest teeth . Put the blade under high tension to minimize flex when sawing . Do it very slowly to keep heat down . Think I would leave the last !/8 to 1/4 inch to do by hand .

Re CA finish . Moisture helps cure CA . The crystals have some moisture associated with them , which might have been used by the CA , leading to the surface cracks . Don`t know if that water would be removed by the vacuum during stabilization , by the heat curing it , or not at all .
 

Akula

Member
Joined
May 27, 2007
Messages
1,036
Location
seabrook, texas, USA.
I've made a few "wands" for Harry Potter fans. I did get some requests for minerals to be included....I cast them in clear resin and turned.
 

Skie_M

Member
Joined
Aug 7, 2015
Messages
2,737
Location
Lawton, Ok
I've made a few "wands" for Harry Potter fans. I did get some requests for minerals to be included....I cast them in clear resin and turned.

Were these minerals simply floated in the resin or did you actually turn the resin away to get to the mineral to work it?


I have several hacksaw blade pieces that are around 5 - 6 inches long. I take some scrap material and wrap/glue it around one side to make a handle ... I always make it so that the teeth scrape in reverse rather than rake for their cutting action, for lathe use.

My usual method is to get the toolrest up close, flip the hacksaw blade UPSIDE DOWN and rest the spine on the toolrest, and then lower the back end to make contact with the item to start the cut.

I haven't been able to try it yet, because I gave up on waiting for the CA to cure last night (this morning at 7 am, still not cure ... been waiting over an hour???).... I'll check again in a bit and see if it's finally cured. I might just have it in a pretty sealed-up little area and it needs an air hole or something.

If anything removes ALL the moisture from these crystals, they will crack badly and pretty much be reduced to dust ... they have to maintain a moisture content. My plan is to totally seal them in CA to prevent the need to maintain their moisture content externally, and hope it stays in a decently stable environment.

I'm not using any kind of vacuum stabilization (yet) ... the CA doesn't heat up THAT much, while curing... the crystal is pretty cool to the touch while I work it. I'm spinning these crystals at about 3600 RPM (max speed) and using Abranet to shape it from the start, and finishing up with the 1000 grit paper.


Oh, I just realized that the sun is shining for the first time this week.... lemmie get my camera out! :)
 

Skie_M

Member
Joined
Aug 7, 2015
Messages
2,737
Location
Lawton, Ok
Ok ... got weird looks from people driving down the street, till I offered to take their pictures too! :)


attachment.php


The lower one is the second one, and is quite a bit closer to what I had wanted to accomplish, but as you can see the entire back 1/3 went bye bye ...

The upper one was my first one ... the pressure of holding it in my 3-jaw chuck cracked it right up the center, and it had some inclusions that you can see on top.

I'm trying to make these optically clear, but I don't know if it will be possible with this material ... still gonna try my best.

My friend doesn't mind a bit, that I'm going through these so fast ... she told me she paid $1.75 for the lot of 10 on ebay, + shipping that was shared with 3 other items, so it's fairly cheap stuff. She told me that these are for Reiki Healing or something ... hope I spelled that right.
 

Attachments

  • crystal.jpg
    crystal.jpg
    328.7 KB · Views: 549

maxwell_smart007

Lead Moderator
Staff member
Joined
Aug 4, 2007
Messages
6,711
Location
middle of nowhere in the great, white North
Just FYI, from the gypsum MSDS: Effects Resulting from Inhalation:
Gypsum may contain trace amounts of free crys
talline silica. Prolonged exposure to respirable free silica can aggravate other
lung
conditions and cause silicosis, a disab
ling and potentially fatal lung disease.
Exposure to gypsum dust may cause irritation
to the moist mucous membranes of the nose, throat, and upper respiratory system.
It
may also leave unpleasant deposits in the nose.
 

Skie_M

Member
Joined
Aug 7, 2015
Messages
2,737
Location
Lawton, Ok
Yeah, I didn't like the dust ... I cleaned up the filter in my vacuum cleaner yesterday evening and had to wait for it to dry, but I should be good to go for now.
 

bmachin

Member
Joined
Jul 28, 2013
Messages
613
Location
Owensboro, KY
Don't know if it would make a difference, but I saw one lady on line recommending foam-backed fine drywall sanding blocks. Got me thinking that maybe Abralon might get you really close. It goes to 4000 grit and is foam backed. At that point maybe you could buff?

Really beyond my ken but thought I'd take a shot.

Bill
 

Dale Lynch

Member
Joined
Dec 12, 2011
Messages
1,819
Location
Hastings,NE
After reading what you've done,a couple ideas came to mind.

Make a 2" deep jamb chuck to hold your piece.Being soft and brittle take extra care on the fitting.Glue it in with hot melt or thick CA on the seam.

Since it gets grabby during wetsanding,make a contured sanding block and adhere the paper to it.

You don't say which CA you used,I'm assuming standard hard cure.I suggest a rubber tuoghened CA,it comes in clear as well as black.It does not become as brittle when cured.It should help with the overall stability with a good .025"-.050" coat,done in multiple applications not all at once.

By the sound of it I thing you could probably part it of with some sanding cords.Be safer and far less aggresive than any toothed blade or chisel.Build a a cradle to catch the wand when it parts off so that you can use both hands while parting.
 

Skie_M

Member
Joined
Aug 7, 2015
Messages
2,737
Location
Lawton, Ok
If the sticks are round you may want to try a collet chuck.

The pieces come squarish-rectangular and are irregularly shaped pieces ... none of them are remotely round. I take them to my sander to try to shape one end round enough to put into my glue block so that I can spin it on it's long axis. Any attempt to use a chuck has generally ended in disaster or failure ... my first success was only partial, as it ended up with a full width crack down the center of the piece. I had it in my 3-jaw chuck with 2 wraps of paper towel around it to help me hold it without crushing it .... it's that fragile!


After reading what you've done,a couple ideas came to mind.

Make a 2" deep jamb chuck to hold your piece.Being soft and brittle take extra care on the fitting. Glue it in with hot melt or thick CA on the seam.
Hot-melt sounds like a good idea ... I'm wanting to make at least 2 inch long wand tips, so I've been securing 1 inch deep to leave 3 inches out for working material, but the glue block I've been using has a hole in it to help me secure the material so yeah ... I'm already using a jamb chuck then.

Since it gets grabby during wetsanding, make a contured sanding block and adhere the paper to it.
Can't wet-sand it... it's just such a soft material that it grabs the grit right off the micromesh pads! I tried my micromesh sheets too, but it does the same thing and leaves a dirty mess on the surface of the crystal that has to be sanded back off... using a contoured sanding block might work alright, but she and I both prefer the hand made free-hand style and look.

You don't say which CA you used, I'm assuming standard hard cure. I suggest a rubber toughened CA,it comes in clear as well as black.It does not become as brittle when cured. It should help with the overall stability with a good .025"-.050" coat,done in multiple applications not all at once.
Well, it's not the CA causing the problem, it's the material being far too brittle all on it's own. I do have some CA Gel and some rubberized CA that I received recently, but neither of those would make a good exterior finish. The hot glue will probably do the trick for me to hold it in the glue block!

By the sound of it I thing you could probably part it of with some sanding cords. Be safer and far less aggresive than any toothed blade or chisel.Build a a cradle to catch the wand when it parts off so that you can use both hands while parting.
I'ld have to have something made of foam ... if it hits ANYTHING hard it'll break, but I may have a slightly better idea already...

Thanks for your insight, I'll see where I squirreled away my glue gun... that may help a lot just with securing it in place, and then an application of heat should release it without the need to part it off! :)


I should probably also mention .... ANY pressure along the long axis will split these crystals along their hexagonal bonds extremely easily... I can NOT turn this between centers... then again, I might be able to if I fit my live center with a SECOND jamb chuck? (yes, I just thought of that while typing this...) Every attempt to use some machinery to cut these crystals smaller has resulted in many more resulting pieces than desired .... (took a piece to my band saw, intending to make 2 pieces ... I got 7 irregularly much smaller pieces).

I DID manage to drill a 1/8" hole down the long axis of a very small chunk (left over from the bandsaw mistake), and I put it on my bead mandrel, intending to get in some practice working with this material. Just as I tightened the nut a tiny bit to keep it from spinning, it developed a crack I couldn't see .... it flew apart before I even got it round. I still haven't found the other half...


Side note ... this stuff would make an awesome "icicle" decoration, if it weren't so brittle and hard to finish!
 
Last edited:

Dale Lynch

Member
Joined
Dec 12, 2011
Messages
1,819
Location
Hastings,NE
So I understand better about the sanding.IS the grit being removed from the paaper backing?Or its it the slurry created?

Gonna have to argue with rubber toughed CA not being good for a exterior finish.I use Hyperbond thin flex CA on my pens. which has some rubber in the formulation.Not sure of the percentage though.it Polishes crystal clear even at for mentioned thicknesses.
 

Skie_M

Member
Joined
Aug 7, 2015
Messages
2,737
Location
Lawton, Ok
Well, as I can't do any wet sanding with these things at all, there's no slurry ... it's just grabbing dark particles of grit right off the foam backed micromesh pads. I have no idea how or why, since I've sanded with these directly on wood before and they never did this before... It might just be that these pads are getting a bit old.

I've never actually tried using my rubberized CA for a finish coat ... I might give it a go one of these days. :)
 

Dale Lynch

Member
Joined
Dec 12, 2011
Messages
1,819
Location
Hastings,NE
Ok,now I understand.Those foam backed pads are pretty durable but I kave seen the abrasive come loose before. The foam breaks down and comes apart when it gets wrinkly from extensive use.Does it happen if you sand it lengthwise with the lathe off?
 

Skie_M

Member
Joined
Aug 7, 2015
Messages
2,737
Location
Lawton, Ok
I couldn't really tell ... the wand tip was already really messy with embedded grit at that point. I stepped back to 1000 grit to get down through it and washed the last of the grit off with 91% isopropyl alcohol.


I'm pretty sure this stuff doesn't dissolve on contact with water ... but I've been told to never let them sit in water, as they WILL do it over time. I might try some wet-sanding later, but I'm a bit leery of things that could melt while on my lathe .... my motor is directly below the spindle, and most minerals are formulations of salts or oxides, both of which are generally electrically conductive to some degree, especially in water. I don't have a setup that guarantees water stays away from my motor just yet .... I do have a foam sheet I lay down over the lathe ways and are held in place with magnets, though, and that helps a lot when wet sanding to keep things clean and rust-free.


In any case, I took a step back from this project ... the superglue issue was bothering me. Currently working with some white alabaster or soapstone ... I'm starting to think that the massive block I got first was not alabaster as was thought, but a large block of soapstone. It's soft enough that I can easily carve it with my fingernails ... while all the alabaster I have gotten since then is several orders of magnitude harder .... the Italian blue alabaster is pretty much on par with marble!

Anyways .... back to carving a white tree out of white soapstone? It's pretty, to say the least ... :)
 

Skie_M

Member
Joined
Aug 7, 2015
Messages
2,737
Location
Lawton, Ok
Ok ... the second jamb chuck idea seemed like it might work, but no go ... the shear forces involved between the faceplate and the live center to get it up to speed cracks the crystals (the twisting that occurs while the live center lags behind before it can catch up). Just powering the lathe on at the lowest speed cracked it.

Gonna go with a jamb chuck just on the spindle side, and secure with hot glue... hope and pray!
 
Top Bottom