trying Glu Boost, hoping it is the magic elixir so many claim, but will be happy if it can cure my 2 major issues with CA

Signed-In Members Don't See This Ad

MyDadsPens

Member
Joined
Nov 10, 2019
Messages
59
Location
Corning, New York
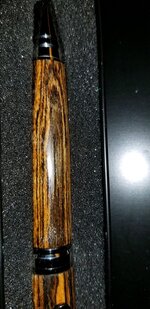
I have a favorite Bocote cigar pen I made two years ago, I used it once or twice a week for a year. I haven't used it in 8 or 9 months, but when I removed it from the pencase it has developed hazing and a few spots. With microscope inspection the spots are areas where the CA seems to have flaked off, all of the spots are over open grain/pore spaces. These were not there after finishing -if they were they would have filled with the buffing paste (i have plenty that do that, dam old bifocal eyes)

So anyway, just moved ALL my CA to the wife's craft room. I was using the hobby lobby brand CA, with 40% off coupons it was less than $4 a bottle.

I purchased a starter kit of Glu-Boost, I think it was more expensive than my first lathe

I would love it to be as magical as some people say, but in honesty my two biggest needs for pen finishing are
  • ability to fill grain (I hate the CA and dust process, and it doesn't always work anyway)
  • no ghosting or haze under the CA

I was already at wits end with the 40% of CA pens that ghost or leave micro pores for the buffing paste, having 2 different pens ghost up after a year of use was the final straw for CA for me

I'll report my Glu boost experience here after a few pens
 

Attachments

  • 20210904_005917.jpg
    20210904_005917.jpg
    337.2 KB · Views: 149
Signed-In Members Don't See This Ad

jttheclockman

Member
Joined
Feb 22, 2005
Messages
19,082
Location
NJ, USA.
I wish you better luck but to me you still need to work on your technique. There are a ton of videos on the net regarding CA finish. Have no idea what CA that is but all CA is NOT the same. When you say lifting that is different than hazing or cloudy. That photo shows white sanding dust. Bacote is an oily wood so care needs to be taken when first starting the finishing. Wipe the blank with acetone. Do not use DNA or mineral spirits use acetone. Please. Allow the blank to dry completely before the first thin coat of CA. I like to use 3 to 4 coats of thin and then 3 to 4 coats of med. For filling ingrain. CA should build easily to do that. I will sand the thin down using 600 grit paper. Never below that. If you need to go below that then again your method needs work. Wipe the blank down and some use compressed air but never found it necessary. Then after the sanding I make sure I go lengthwise to take out scratch pattern. Make sure you do not sand through the layers because if you do you need to again build up with thin before moving on to med. Again not knowing the CA you are using and if using only one type then that is your first problem. Trust me. My go to CA and can not believe more people here do not use Sateliite city Hot Stuff CA. It is great stuff. Never had a problem with it. But you go ahead and try glubost but again need to follow instructions. Good luck.
 

studioseven

Member
Joined
May 6, 2014
Messages
793
Location
Wisconsin
I love using Bocote but I have found it to be very porous and thus difficult to finish. From your picture it doesn't appear that the CA flaked off. I suspect that there were some pits in the blank that filled in when sanding and then covered with CA. I would think the same results could occur with Glu Boost. John offers excellent tips in applying both CA and Glu Boost. Don't give up and let us know how it goes.

Seven
 
Joined
Feb 25, 2010
Messages
1,798
Location
webberville, mi
JT is right on his points - esp re working on technique. Wondering, also if you're wet sanding after you build up a sufficient thickness of CA. It's kind of a pain but it keeps down the CA dust (bad) and lets you know when to stop (as soon as you see a "slurry" start to build),
IMHO building the CA to a point where you've got the pores filled plus some to allow for surface leveling is a key, too.
I was a skeptic at first but Glu Boost is now my go to CA. It's not without effort but does provide a nice finish.
Good luck!
 

JohnU

Member
Joined
Jan 31, 2008
Messages
4,923
Location
Ottawa, Illinois
Gluboost, in my opinion Is a great product but it's not magic. You still have to apply and finish it properly. Another thing to remember is not all woods are equal. In my process I like to wipe the wood off with denatured alcohol or acetone before applying the finish. Woods like bocote, olive woods and cocobolo are very oily and need to be wiped down throughly before the finish. I think you will do fine, just remember when using gluboost you don't need to apply a thick layer and then sand most of it off like with other brands. Mark Dreyer (10 min to better pen making) and Ed Browns (at Exoticblanks) have some great videos on using gluboost, as well as one I made for Gluboost on their website video collection. Good Luck!
Good luck!
 

PatrickR

Member
Joined
Apr 8, 2017
Messages
1,423
Location
Rural America
I switched from mercury to gluboost. Side by side the gb goes on and dries smoother. You have to watch the prices, Ive seen it for almost double some places. Buy directly from them or rockler. "micro pores" would suggest to me that the layer is too thin and/or insufficient sanding. Definitely clean well before the first coat. If you use DA allow it to dry completely as it does contain a small amount of water.
 

penicillin

Member
Joined
Feb 27, 2019
Messages
1,036
GluBoost is not magic elixir. It is just CA. It has the same basic properties as other CAs. It is a better CA, but it is still CA.

GluBoost is the best CA pen finish that I have found so far. For me, GluBoost makes it easier to get reliable, repeatable CA finishes compared with other CA brands. That's all. Nothin' to see here - move along.
 

TonyL

Member
Joined
Mar 9, 2014
Messages
8,904
Location
Georgia
Agree with all of the above. I switched from Mercury to GB, now back to Mercury. After you hone your process, you find the CA that is right for you.
 

NJturner

Member
Joined
Dec 4, 2006
Messages
155
Location
New Jersey, USA.
Just one quick safety note - skin does not stop absorption of Acetone into your body - it passes right through your skin and settles in your kidneys. BE SURE to wear good nitrile gloves when using acetone. Is a good
Safety idea for lots of things, but especially when handling acetone.
 

MyDadsPens

Member
Joined
Nov 10, 2019
Messages
59
Location
Corning, New York
Thanks for all the suggestions, I have never thought of bacote or olive wood as oily woods, so I have never wiped with acetone. So far my success rate with olive and bacote is the highest (over 90%) My lowest success rates are cocobolo, purpleheart, and bloodwood. But my back story part 1 is I have been doing lathe pens for 3 or 4 years, probably around 250 pens. My first 80 or 90 pens were all lacquer finished and 98% success rate, only failures were 2 or 3 sand throughs while buffing. Then a friend wanted to learn pen making so I went to his place with walnut blanks and spray can of lacquer. BUT he had already purchased the stickfast starter kit and he wanted to try that. We both did 2 pens and completely finished with buffing the pens that session - the lacquer pen I showed him took the longest to spray the 10 coats and was going to need to cure 2-3 weeks before wet sand and buffing. That unfortunate day, and those two god forsaken walnut pens. have been my undoing. I immediately bought the same stickfast starter kit and have spent most of the last 2 years making around 150 pens with CA finish and about a 60% success rate. Oh and that friend is no longer a friend ;)

Glu boost is going to be my last CA attempt. My original complaints with lacquer were that it was:
  • expensive
  • time consuming
  • weather dependent
  • and needed long cure time before wet sand and buffing
But considering the low success rate I get with CA, AND the high cost of glu boost in reality I am now thinking the only true advantage I get to CA is the quicker cure time
 

MyDadsPens

Member
Joined
Nov 10, 2019
Messages
59
Location
Corning, New York
Oh and yes what I call ghosting is some kind of lifting of the CA, I have had it happen months to years after application, but I have also noticed it right after wet sanding - I almost never wet sand any more for that reason. I either dry sand or damp sand
 

PatrickR

Member
Joined
Apr 8, 2017
Messages
1,423
Location
Rural America
The first CA i used as a finish was stickfast with terrible results. I dont have an answer to your problem as I have not had the issue but it sounds as if there is moisture trapped under the finish. I dont remember ever putting a finish on without first cleaning the blank with DA, allow plenty of time for it to fully evaporate and blast with compressed air to drive any out. Also let the CA dry overnight before finish sanding.
I have experimented with many finishes and will switch back and forth as I feel. I like lacquer but use it as a dip finish. It solves a lot of the drawbacks you mention. As long as you can keep any dust off of it before it dries there is no need for any sanding or polishing and blushing can be controlled with a retarder. I have never been happy with aerosol lacquer.
 

jttheclockman

Member
Joined
Feb 22, 2005
Messages
19,082
Location
NJ, USA.
The first CA i used as a finish was stickfast with terrible results. I dont have an answer to your problem as I have not had the issue but it sounds as if there is moisture trapped under the finish. I dont remember ever putting a finish on without first cleaning the blank with DA, allow plenty of time for it to fully evaporate and blast with compressed air to drive any out. Also let the CA dry overnight before finish sanding.
I have experimented with many finishes and will switch back and forth as I feel. I like lacquer but use it as a dip finish. It solves a lot of the drawbacks you mention. As long as you can keep any dust off of it before it dries there is no need for any sanding or polishing and blushing can be controlled with a retarder. I have never been happy with aerosol lacquer.
I use Deft spray lacquer all the time and never have a problem. Used on a few pens especially if I want a satin finish and never a problem. It is my go to finish on my birdhouse ornaments because you can top coat many coats and there is no polishing needed after.
 

MyDadsPens

Member
Joined
Nov 10, 2019
Messages
59
Location
Corning, New York
I like the look of lacquer right off the drying rack, but I don't like the feel as much as the CA. But after a moderate damp sanding 2 weeks after the lacquer dries (like French polish) then it feels lust like a CA pen. I started using my HVLP system just like I would for furniture, but quickly decided that was too much hassle and waste (especially cleaning). So I switched to rattle cans, usually Minwax or Watco (always glossy finish). $12 a can (which does about 6-10 pens) seemed too expensive when I first switched to hobby lobby CA. But at $40+ for the Glu boost I think that will be more cost per pen then lacquer
 

MyDadsPens

Member
Joined
Nov 10, 2019
Messages
59
Location
Corning, New York
Just finished a batch of pens using Glu Boost for the first time. My first impression:
I wish Glu Boost made a liquid stripper​

Other impressions:
Pros:
the bottles and the caps are nice
I got more sprays out of the small accelerator can than I thought

Cons:
overall Glu Boost seemed to me to be almost identical to stickfast but cost me $10 more
the open time did seem slightly better than stickfast (and much better than standard CA) BUT I felt that for a lot of the extended open time Glu boost was sticky and pulled fibers out of my applicator, and when I switched to plastic bag applicators - it seemed to get stickier (like it was reacting with the bag) and this created lots of ridges and blobs on my pens

My two biggest issues with regular CA are ghosting (lifting) under the CA and tiny pores the CA doesn't fill (which my old bifocal eyes don't see until the holes fill up with buffing paste)
I did 7 pens - Bocote, purple heart, cocobollo, shesham, black palm, swamp oak, leopardwood
I got horrible ghosting on the purpleheart and leopardwood
unimpressive grain filling on the bocote, black palm and oak (I expect open grain woods like oak to be difficult, but the bocote took 8 coats before all grain seemed filled)

I will add more details on my application procedures and pictures of the issues soon
 

jrista

Member
Joined
Aug 12, 2021
Messages
2,222
Location
Colorado
How long are you spending applying the GB to the blank? It shouldn't take all that long, before you spritz it with accelerator and move onto the next coat. Seems if things are getting sticky, you may be "sticking" to the spreading process too long?

I've recently been experimenting with Doctor's Woodshop Pens Plus finish. Its a big bottle of very clear walnut oil, DNA, shellac (basically sine juice), but also contains microcrystalline wax. So far, I've found this finish to be AMAZING!! The bottle seems expensive, at ~$20, but its GARGANTUAN compared to the average bottle of the various types of CA glue effective as a wood finish. It takes a relatively tiny amount of this big bottle to finish a pen blank or two. The walnut oil is very clear compared to, say, Mahoney's walnut oils (which have that darker golden-brown color), this stuff is a very very very light yellow, almost totally clear. At first I wasn't sure how it would hold up, but once the finish fully cures, its really quite incredible.

I know you are looking at CA finishes...but, if you just cannot quite get the CA finish technique down, it may be worth looking into the Pens Plus stuff. It is incredibly easy to apply, has no real smell that I could detect, is all safe compounds overall and seems to be incredibly durable. I've had no issues at all with any peeling or separating, cloudiness, or anything like that. Anyway...since you seem to be put off of the CA...here's a potential alternative for you.
 

MyDadsPens

Member
Joined
Nov 10, 2019
Messages
59
Location
Corning, New York
Thanks for the suggestion jrista. In my furniture work I have always avoided wax or friction type finishes because I have watched them seem to disappear after a few months or years. with furniture I guess its easy to reapply wax every year or so but i worry that people wont on a pen
 

jrista

Member
Joined
Aug 12, 2021
Messages
2,222
Location
Colorado
Thanks for the suggestion jrista. In my furniture work I have always avoided wax or friction type finishes because I have watched them seem to disappear after a few months or years. with furniture I guess its easy to reapply wax every year or so but i worry that people wont on a pen
This particular stuff seems to be more like a floor hardwax, which are durable for decades...
 

MyDadsPens

Member
Joined
Nov 10, 2019
Messages
59
Location
Corning, New York
here are some first round images. Notice the almost 70% ghosting on the purpleheart (but strangely enough the top blank had no ghosting)

In image 2 notice the shiny spots and the dust filled pores (after sanding the CA level) suggesting Glu Boost did a poor job of grain filling

For application procedure I followed PSI directions for a few pens - but after large blobs and ridges, switched to applying with lathe off and using paper towel instead of bags
2021090295225411.jpg
Part0.jpg
 

jrista

Member
Joined
Aug 12, 2021
Messages
2,222
Location
Colorado
here are some first round images. Notice the almost 70% ghosting on the purpleheart (but strangely enough the top blank had no ghosting)

In image 2 notice the shiny spots and the dust filled pores (after sanding the CA level) suggesting Glu Boost did a poor job of grain filling

For application procedure I followed PSI directions for a few pens - but after large blobs and ridges, switched to applying with lathe off and using paper towel instead of bagsView attachment 316670View attachment 316671
I'm still curious how long you are spending with the applicator against the wood... Should only be a couple of seconds...longer, and yeah...you could start grabbing fibers, gumming up, etc.
 

MyDadsPens

Member
Joined
Nov 10, 2019
Messages
59
Location
Corning, New York
I made over 75 pens with hobby lobby CA (a traditional CA) i applied with lathe on, and as with traditional CA you have just a few seconds to apply or the applicator sticks right to the blank ---so I have become pretty good at applying quickly with just one motion. Part of the appeal and a reason I purchased Glu Boost is I thought I could go much slower and really work the liquid into the wood - several youtube videos show people applying it slowly lathe off and rubbing it back and forth. When I tried this with paper towel I got all kinds of fibers in my finish and when I try this with baggies it seems to get gooey quickly (within 4 or 5 seconds and then it gives me a lot of ridges and blobs or a very rough texture as seen in this blank. Humidity seemed average that day, but it was windy, I will try lathe off and foam or baggie application again with less wind
2021090295181725.jpg
 

PatrickR

Member
Joined
Apr 8, 2017
Messages
1,423
Location
Rural America
I apply CA very liberally with no real friction. There is no reason to try and force it into the wood. since you are experiencing grabbing, clumping etc. I would try putting it on heavier. I use a small piece of paper towel, soak it and then drip ca where it meets the spinning blank. Using the towel to spread it without using any real pressure. I think you may be using too little glue and too much friction.
 

leehljp

Member Liaison
Joined
Feb 6, 2005
Messages
9,314
Location
Tunica, Mississippi,
WHEN the pores are still showing as not filled, it just means that you have not applied enough CA or Glue Boost. Any thought that one or two or three single applications should cure it is not the fault of the CA or Glue Boost. It is as John T suggested in the 2nd post - it is a technique problem. The magic is not in the finish or sand paper or tools but in experience. If two or three coats don't fill the holes, then too little is being applied. Applying CA or Glue Boost requires enough experience to learn when to apply a lot and when to apply less.

This might be a time to go back to regular CA and get some medium or thick. When I started and I found that the pores were not filled, I moved up to medium and thick. After a little experience, I learned how to fill the pores with thin, and I moved away from thick and mostly I do not use medium that much anymore. It takes experience and feel.

I often suggest for new users to get a piece of 2x4 and cut into a dozen blanks. Spend time learning to turn until the "feel" of the tool becomes a part of you. The object is not to make a pen, but to learn what it takes to make and finish a pen. Learning to know what "feel" of the tool, feel of the tool on the wood. Then the same with sand paper. There is no need to start with 220 SP, that is what the tool is for. Starting to sand with 320 is ok, but when one has the correct "feel" of the tool and the blank, there will be no need to start with anything less than 400 SP.
The next thing to do is practice, practice practice applying CA. Learn to apply it thickly, learn to apply it thinly. Learn the "feel" of applying and the feel of how much is being applied.

THEN one will have the tools and experience to make a pen without these problems. it is a matter of experience, trying and trying again. Learning the techniques. Get the feel and the experience. Light spots and grain showing are not a result of bad CA or finish.
 
Last edited:

jrista

Member
Joined
Aug 12, 2021
Messages
2,222
Location
Colorado
I made over 75 pens with hobby lobby CA (a traditional CA) i applied with lathe on, and as with traditional CA you have just a few seconds to apply or the applicator sticks right to the blank ---so I have become pretty good at applying quickly with just one motion. Part of the appeal and a reason I purchased Glu Boost is I thought I could go much slower and really work the liquid into the wood - several youtube videos show people applying it slowly lathe off and rubbing it back and forth. When I tried this with paper towel I got all kinds of fibers in my finish and when I try this with baggies it seems to get gooey quickly (within 4 or 5 seconds and then it gives me a lot of ridges and blobs or a very rough texture as seen in this blank. Humidity seemed average that day, but it was windy, I will try lathe off and foam or baggie application again with less windView attachment 316689

I just did my first CA finish in at least a year. I'm convinced these kinds of issues are a technique issue.

I had some problems with my first pens, usually CA separation from the blank, however i'm quite sure that was because I was not allowing my first layers to soak into the wood...I was accelerating them immediately. This time around, I allowed the first couple of thin CA to soak in, without accelerator. I then did a couple more thin and the rest medium. This is all with Mercury Flex right now.

With those last two thin and the first couple medium layers, I started to get some similar issues. Fibers getting grabbed into the glue, a slight spot of blush, and at the ends it was getting a bit rough. Within about 2 seconds the glue started to get grabby/sticky. That was when I remembered a video I had watched sometime spring or early summer last year. The applicator needs to be lubricated while in contact with the blank. I started out tonight with just glue on the paper towel...however after remembering that video, I realized I was forgetting to apply the glue from the bottle to the blank while I was applying with the paper towel!

Once I started adding glue while wiping, all the issues vanished. The glue stopped getting sticky, stopped grabbing, stopped picking up anything and stopped blushing, and started applying properly. The applicator must be lubricated! If it is not, yes, it will stick and grab, and your finish will be terrible. I had to sand back once, after those second two layers of thin, because it looked terrible, but lubricating the applicator with more glue while applying definitely did the trick and gave me nice, clean, clear layers of glue. It also extends the amount of time you can apply. I was having problems within a couple of seconds...once adding more glue during application, I could have gone 5-10x longer. This extra time allows you to fully apply glue to the entire blank, cleanly and smoothly.

The challenge for me now, is going to be to control how much additional glue I add while applying. I spent more of both the thin and medium Mercury Flex (which is expensive stuff!) this time around, and I think I can get away with adding a lot less glue during application next time.

I'll share a photo as soon as my camera batteries recharge. Its not a perfect quality finish yet. I will need to disassemble the pen and do a few more rounds of sanding at higher grits to fully polish out the remnant scratches that appeared once I was in more direct light inside. But overall, for my first CA finish in over a year, its pretty nice. I am still not a fan of the plastic look for my wood pens, but compared to my original CA finishes, this one is pretty good. And these issues are definitely technique issues...lubricate during application!
 
Top Bottom