Top barrel not snug enough on transmission - help

Signed-In Members Don't See This Ad

Ron7413

Member
Joined
Nov 15, 2019
Messages
7
Location
The Great State of Texas
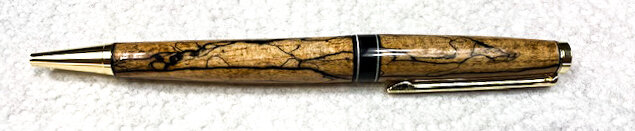
Hi! -- I've made about 10 pens so far and am still learning. Here is a pen I made yesterday. It is a modified slimline with the center band glued to the top barrel. The problem I'm having is that the top barrel does not have a snug fit onto the transmission. So when I rotate the transmission to the closed (pen retracted) position I can easily continue rotating the barrel which causes the grain to get mis-aligned. Is there any easy way to snug-up the fit between the top wood barrel and the transmission? FWIW, the brass tube in the top barrel does extend through the center band. Thanks!


IMG_8513-2.jpg
 

Attachments

  • IMG_8513-2.jpg
    IMG_8513-2.jpg
    97.1 KB · Views: 36
Signed-In Members Don't See This Ad

Monty

Group Buy Coordinator
Joined
Mar 4, 2005
Messages
8,367
Location
Pearland, Texas, USA.
I've had some success, using a pair of pliers to gently squeeze the top portion of the transmission and make it slightly out of round so that will snug the transmission up to the top tube
 

Edgar

New Member Advocate
Staff member
Joined
Feb 6, 2013
Messages
6,900
Location
Alvin, TX 77511
You can put some CA glue on a q-tip and wipe the inside of the tube with it. Let it dry completely (overnight). One light coat is usually enough to fix that sort of problem, but sometimes a second light coat might be needed.
 

egnald

Member
Joined
Jun 9, 2017
Messages
3,212
Location
Columbus, Nebraska, USA
I'm not sure I understand how the indent dimples would make the top barrel fit snugger. I would think the dimples would have to be proud of the transmission surface (an 'outtie') rather than an indent (an 'innie'). What am I missing?
It has to do with how metal stretches and deforms because of the impact. It gives you a result similar to what you would get from shot peening a surface. You get dimples, but it also raises the metal slightly around the dimples as the compressive forces not only stretch the metal downward but also push it outward around the point - and since it can't push outward because of the rest of the metal it pushes upward around the dimple.

See how the material that is shot peened is "raised" in the photo below. - It kind of works like that, but only around the individual spots.

I hope that helps. - Dave

Peened surface (raises the surface)
Capture2.jpg


Capture1.jpg
 

its_virgil

Member
Joined
Jan 1, 2004
Messages
8,146
Location
Wichita Falls, TX, USA.
It has to do with how metal stretches and deforms because of the impact. It gives you a result similar to what you would get from shot peening a surface. You get dimples, but it also raises the metal slightly around the dimples as the compressive forces not only stretch the metal downward but also push it outward around the point - and since it can't push outward because of the rest of the metal it pushes upward around the dimple.

See how the material that is shot peened is "raised" in the photo below. - It kind of works like that, but only around the individual spots.

I hope that helps. - Dave

Peened surface (raises the surface)
View attachment 360870

View attachment 360869
Thanks Dave...much better than I could have explained.
 

Ron7413

Member
Joined
Nov 15, 2019
Messages
7
Location
The Great State of Texas
It has to do with how metal stretches and deforms because of the impact. It gives you a result similar to what you would get from shot peening a surface. You get dimples, but it also raises the metal slightly around the dimples as the compressive forces not only stretch the metal downward but also push it outward around the point - and since it can't push outward because of the rest of the metal it pushes upward around the dimple.

See how the material that is shot peened is "raised" in the photo below. - It kind of works like that, but only around the individual spots.

I hope that helps. - Dave

Peened surface (raises the surface)
View attachment 360870

View attachment 360869
Thanks, Dave, for taking the time to respond and providing such a great explanation. I understand the idea now. Thanks again - Ron
 

Mike

Member
Joined
Oct 23, 2022
Messages
302
Location
Albuquerque
It has to do with how metal stretches and deforms because of the impact. It gives you a result similar to what you would get from shot peening a surface. You get dimples, but it also raises the metal slightly around the dimples as the compressive forces not only stretch the metal downward but also push it outward around the point - and since it can't push outward because of the rest of the metal it pushes upward around the dimple.

See how the material that is shot peened is "raised" in the photo below. - It kind of works like that, but only around the individual spots.

I hope that helps. - Dave

Peened surface (raises the surface)
View attachment 360870

View attachment 360869
Dave, you are awesome.
Taking your time for posts like this one have really added to my general knowledge bank.
And I am not poking fun. I know sometimes this kind of communication can be misconstrued for a joke or sarcasm.

Thanks,
Mike
 

Ron7413

Member
Joined
Nov 15, 2019
Messages
7
Location
The Great State of Texas
Use one of these and place a few "dimples" on the transmission. (spring loaded punch)
View attachment 360867
Don and Dave - I tried to place a dimple on the transmission using a spring-loaded punch, but it jammed the transmission. I believe the dimple is preventing the threaded inner barrel from moving up and down. I wound up pulling out the transmission and then putting a new transmission in. I then put some thin CA glue in the upper brass tube as suggested by Edgar and that seems to have worked.
Dimple_jam.jpg
 

egnald

Member
Joined
Jun 9, 2017
Messages
3,212
Location
Columbus, Nebraska, USA
Don and Dave - I tried to place a dimple on the transmission using a spring-loaded punch, but it jammed the transmission. I believe the dimple is preventing the threaded inner barrel from moving up and down. I wound up pulling out the transmission and then putting a new transmission in. I then put some thin CA glue in the upper brass tube as suggested by Edgar and that seems to have worked. View attachment 360905
I'm really glad you got it working.
 

Mike

Member
Joined
Oct 23, 2022
Messages
302
Location
Albuquerque
I am thinking that if you want to dimple an unsupported tube, you need a punch with a very thin point and a 4 ounce hammer. Then tap lightly. My automatic punches like that are adjustable, but even on lightest setting leave a pretty good mark. A tight fitting hardwood dowel would also help, but with the transmission inside there, wouldn't fit.
Glad you got it fixed.

Mike
 
Top Bottom