Tips for tapping threads?

Signed-In Members Don't See This Ad

spindlecraft

Member
Joined
Apr 6, 2014
Messages
56
Location
Philipsburg, PA
Hi again,

Apologies if this has been asked a thousand times, and for posting so much lately - but as I continue my journey into kitless pen making, I find I am continually hitting stumbling blocks.

I'm having trouble cutting nice, clean threads on the outer tenon of the pen body.

I am using an M10x1 triple start die, as well as a die holder setup from Hinze. I am on a wood lathe,as a metal lathe is not quite in my budget at the moment, and I'm doing the following:

1) I turn down the tenon to be 13.0mm which I double and triple check with digital calipers.

2) I cut a slight relief at the back of the tenon.

3) I am using BLO as a lubricant and keeping everything well lubricated as I cut the threads.

4) I'm taking it nice and slow, doing a few rotations forward, then a slight rotation back to clear the threads.

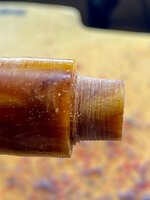
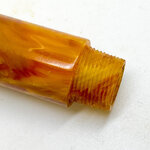
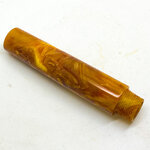
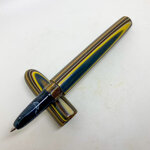
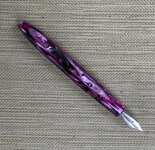
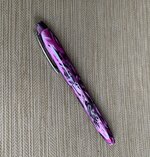
With that procedure, I am getting results that look like the attached images. That is to say, messy-looking, barely there, gnarled looking threads.

Now... since then, I've started to do the following:

- Turning down to slightly below 13mm (about 12.8mm)
- Cutting a slight bevel at the front of the tenon to make starting the cut a little easier

These two things have noticeably "helped", but I still am not super happy with the threads I am getting.

As far as I can tell, I am doing the same things as what I've watched a few guys on YouTube do, but just not getting nearly as good of results. Could it be I just got a bum die? Or do I need to be backing out of my cut completely to clear out every trace of "ribbon" before progressing with my cut? The matching tap cuts inner threads really well. It's just the outer threads that are giving me problems. Any suggestions on what I could be doing better?

Thanks so much in advance!

B855EF0B-A621-42CA-81AC-07F302E81016.jpeg
95E7B7F4-2164-4EC9-A70D-6CB55D24FF14.jpeg
 
Signed-In Members Don't See This Ad

Penchant 4

Member
Joined
Jun 23, 2018
Messages
322
Location
Great Lakes Area
"... doing a few rotations forward, then a slight rotation back to clear the threads." MIGHT be a part of the problem. Try half a rotation and then back off. Yes, it will be slower; but may help. A thicker lubricant might help...try cooking oil. Check the die to be sure the cutting surfaces are in good condition?

Good luck!
 

Jans husband

Member
Joined
May 4, 2020
Messages
273
Location
Doncaster England
It certainly looks like the tenon next to the shoulder is much bigger than at the start of the thread.
I"m no expert-as my previous posts on taps and dies show, but the tenon needs to be the same diameter as the outside diameter of the die, in your case 10mm, with a short chamfer at the end just to get things going. I had to experiment with tapping a lot of spare blank ends before wasting a full blank.

I use WD40 as a lubricant.

My current problem with kitless threads is more to do with the internal thread of the section! Just can't seem to get that right. The videos make it look so easy!

Best of luck
Mike
 

BigShed

Member
Joined
Feb 14, 2008
Messages
1,068
Location
Adelaide, SA, Australia.
I did a tutorial on threading some time ago for the IAP library but couldn't find it in there, the search function doesn't find it no matter which words from the title I put in so I have attached it here.

Maybe it has just disappeared in the mists of time!

Anyway, maybe there are some tips in there that will help you.
 

Attachments

  • Threading Tutorial.pdf
    698.5 KB · Views: 364

More4dan

Member
Joined
Mar 17, 2016
Messages
2,102
Location
Katy, TX
A couple of additional points from reviewing your pictures:

The tendon appears too large before threading and the die has sheared off the material. Do some test sizes on scrap.

The finish on the tendon before threading matters too. I will sand and polish before threading. It helps some.

The most important thing is the type of material you're threading. Again practice with some scraps.

I get better results running the thread to the end in one pass without backing up. Breaking chips with metal is sometimes required, it shouldn't be with plastic. Again test for your tools and materials.

Check the direction of your die and make sure the tapered section is facing the blank. Then reverse it after threading and run it again to ensure the threads are cut to the end.

I have found this site to be extremely helpful in picking threads and dimensions of tendons and drill sizes.


Danny

Sent from my iPhone using Penturners.org mobile app
 
Last edited:

monophoto

Member
Joined
Mar 13, 2010
Messages
2,542
Location
Saratoga Springs, NY
Danny has identified the critical points:

The tendon appears too large before threading and the die has sheared off the material. Do some test sizes on scrap.

- - -

Check the direction of your die and make sure the tapered section is facing the blank. Then reverse it after threading and run it again to ensure the threads are cut to the end.

The overall diameter of an M10x1 thread is 10mm. Starting with a tenon that is larger than 10mm means that you are trying to remove more material with the die than it is designed to handle. The starting diameter of the tenon should be close to the intended final diameter of the thread, or in this instance, 10mm.

Also, dies are designed to produce a slightly tapered thread, which is what you want when threading metal in a machining application. But for pens made of fragile plastic, you need threads that are uniform from one end to the other. Hence, the recommendation to initially thread the tenon with the tapered side of the die facing the tenon, and then reverse the die and run it back over the threads to even them out.

And I think his suggestion of doing some practice threads sounds like advice based on much practical experience.
 

duncsuss

Member
Joined
Jun 29, 2012
Messages
2,151
Location
Wilmington, MA
Please show a photo of the face of the die (the face with the etched size information) and either a photo or link to the die holder you're using.
 

jalbert

Member
Joined
May 17, 2015
Messages
991
Location
Louisville, KY
2) I cut a slight relief at the back of the tenon.

While not directly related to your question, I would strongly advise not doing this. A thread relief is unnecessary, and creates a weak point, as you have internal threads for the section running on the inside, and tolerances in that area are generally pretty tight. It also lends itself to poor aesthetics and flow between the section and barrel.
 

spindlecraft

Member
Joined
Apr 6, 2014
Messages
56
Location
Philipsburg, PA
There are a ton of helpful tips here for me to try out. I'm excited to give it another go with some of these tips in mind.

Pertaining to my original post, I made a mistake. It is not an M10 x 1 die. It is M13x.8. I apologize for the confusion. But, hopefully that clarifies things a bit.

I am going to give it another go tonight, and will let you guys know how it turns out!
 

darrin1200

Member
Joined
Mar 17, 2010
Messages
1,833
Location
Lyn, Ontario, Canada
If that is a triple start tap, one trick I have found is to run the tap and die three times, Turn it to a new thread start each time. I find that this helps to get a more consistent thread feel.
 

PenHog

Member
Joined
Jul 6, 2019
Messages
255
Location
Mississippi
A couple things:

- Cut a tenon slightly smaller, at say 12.7mm, and see if that improves things.
- It would be odd, but perhaps the screw in your die has been adjusted, perhaps to tighten the diameter?

As others have suggested, I suspect some experimentation will sort out the issue.
 

bmachin

Member
Joined
Jul 28, 2013
Messages
613
Location
Owensboro, KY
A little late to the party here but my thoughts/obsevations (some already mentioned):

1. Your tenon is obviously tapered--so much in fact that at the beginning of the thread it is barely (if at all) cutting but a decently formed thread is starting to appear near the shoulder. It may be that the end of the tenon is severely undersized. The alternative is that your die has been opened up by somebody--try backing out the adjusting screw to tighten it up. (You can only open a die from nominal with the adjusting screw not tighten it). Also, make sure that you have a uniform diameter--tough to do on a wood lathe. Try scraping it to final diameter with a skew.

2. I didn't see it mentioned anywhere above, but how are you holding your die? You best bet is a tailstock mounted die holder which can run from fairly inexpensive to a couple of hundred bucks. a cheap one will get the job done. Failing that, You can use the tailstock quill to keep a standard two handled die holder aligned. It can make a big difference.

For what it's worth,
Bill
 

Ironwood

Member
Joined
May 31, 2010
Messages
1,226
Location
Mackay. Australia
What is your blank made from ? Some materials thread better than others, if you are using polyester resin, this could be your problem.
 

duncsuss

Member
Joined
Jun 29, 2012
Messages
2,151
Location
Wilmington, MA
I just noticed that you didn't mention cutting a chamfer on the end of the tenon. This is important because it allows the die to start a partial thread (which requires less force) to get started, and then it can wind onto the tenon.

Like this:

Screen Shot 2020-09-20 at 8.50.56 AM.png
 

spindlecraft

Member
Joined
Apr 6, 2014
Messages
56
Location
Philipsburg, PA
Hi all. I wanted to give you guys some updates, and progress on my further attempts.

1.) I have been paying much closer attention to the diameter of the tenon in its entirety, to avoid any "tapering", and making sure that the tenon diameter is consistent for the entire length of it.

2.) I have started to sand & polish my tenon prior to cutting the threads.

3.) I have also started adding a slightly chamfer onto the tenon to help kick off the threading.

While all of these suggestions have been helpful, I am still not producing truly great results.

The thing that has helped me the most is when I went slightly below 13mm, to about 12.8 - 12.9mm. Doing that allows me to get some decent threads in place, and has provided me the best results thus far.

At this point however, I have two issues, that I am not sure how to navigate around.

a.) When I turn my tenon down to 12.9 - 12.8mm the tenon is too small in diameter to match the tapped female threads of the cap.

b.) When I start my tenon, the diameter is between 12.8mm - 13mm. After I have cut the threads, the diameter is only like 12.3mm. That seems like a lot of material is being ground off, beyond just the cutting of the threads. Is that normal?

One thing that I am thinking is, I might need some better digital calipers. The digital calipers that I have only show one decimal place...and so even though the calipers show a reading of 13.0mm, there is no way for me to know if it is 13.01mm, 13.09mm or any value in between. I have a sneaking suspicion that even though we're dealing with fractions of a millimeter here, that may be what is giving me some issues.

Can anybody else confirm or deny that this could be leading to my problem?
 

bmachin

Member
Joined
Jul 28, 2013
Messages
613
Location
Owensboro, KY
What size did you drill for your cap threads. Nominal diameter would be 12.2mm for 13-.8. A 31/64 fractional drill would be 12.3mm which should also work. If you use a 1/2 inch you'r probably way too large.

Do you have anything of a precisely known dimension that you can check your calipers against? Say something that you know is .250, .500, 1.000 +/- .005 inches. I tend to believe that you problem is not your calipers.. even cheap ones are surprisingly accurate. You don't need the second decimal place. Are you sure that the jaw faces are clean when you zero the calipers?

One other possibility is that you die is slightly undersized although I tend to doubt that it's the cause of your problem. You can open it up by screwing in the adjustment screw, although you can't gain too much.

My money is on the wrong hole size for the cap.

Bill

Edit: Just saw your point b. Try opening up the ie first.
 

bmachin

Member
Joined
Jul 28, 2013
Messages
613
Location
Owensboro, KY
I'm losing sleep over this. Silly me.:rolleyes:

I just measured a chinese 31/64 drill shank with a Mitutoyo digital caliper which I checked against a shop grade gage .5000 gage block (supposedly 4 millionths of an inch oversize). The caliper was dead on. The drill repeatedly measured .481 to .483. When I switched it to metric it measured 12.22 to 12.23. Nominal for 31/64 is .484 which is 12.3mm. Not sure, but I believe most drill run a couple of thou undersize. Anyway its a good way to check your caliper.

If you have a 31/64 drill you could use itas a gage pin to check your cap threads. Ideally it would be a nice sliding fit. If a 1/2" drill goes, you've got an oversize hole.

Just a couple of things you can check.

Bill
 

Curly

Member
Joined
Nov 20, 2010
Messages
4,828
Location
Saskatoon SK., Canada.
The shanks on many drill bits are not the same size as the drill's cutting edge. That's why you are getting smaller readings with your calliper.
 

bmachin

Member
Joined
Jul 28, 2013
Messages
613
Location
Owensboro, KY
The shanks on many drill bits are not the same size as the drill's cutting edge. That's why you are getting smaller readings with your calliper.
I'm aware of that and am not bothered by it. Was just pointing out to the OP that a Drill shank would be a good way to check the calibration on his caliper even though it may be off by a couple of thou.

The losing sleep comment was regarding trying to figure out his problem with the information at hand.
 

magpens

Member
Joined
Feb 2, 2011
Messages
15,913
Location
Canada
docboy52 said ...
"One thing that I am thinking is, I might need some better digital calipers. The digital calipers that I have only show one decimal place...and so even though the calipers show a reading of 13.0mm, there is no way for me to know if it is 13.01mm, 13.09mm or any value in between. I have a sneaking suspicion that even though we're dealing with fractions of a millimeter here, that may be what is giving me some issues."

I actually disagree . . politely, and all that !

I have used a lot of different calipers, both cheap and expensive. . I have never found any that are as "coarse" as you're thinking yours might be.
To be specific, if yours read 13.0mm, there is not much chance that the actual value could be somewhere between 13.01 and 13.09.
A more likely possible range would be 13.01 to just under 13.05; and anything in the range 13.05 to just under 13.09 would show as 13.1mm .

But bear in mind that the electronics that goes into such a measuring device is incredibly accurate even though the caliper price is low.
The cheapness is always in the mechanics of the calipers and possibly in the display. . Unlikely to be in the electronic chip.
Electronic chips are unbelievably cheap for what they do ... and they are not made with a variety of "accuracy" options because making such a variety would be more costly for the chip manufacturer (and ultimate consumer) than using the same chip for all.

Also bear in mind that 0.1 mm equates to very close to 0.004 inch. . ( Strangely I am not as comfortable with metric at this "smallness". )

So I think that the calipers you have would display accurately to within 0.05mm or 0.002inch

And while that is not super-accurate, I think it is adequate for measuring thread diameters on a pen.

bmachin said ...
You don't need the second decimal place.

You're probably right for the purpose of measuring thread diameters on a pen.
However, it would be very nice and fun to have that extra decimal place, and the incremental cost in the caliper set would not be much.
At the "cheap" tool store I most commonly go to, they sell metal calipers at about $15 which have a two decimal place display.
In fact, they don't have any calipers with a display that has only a single decimal digit. .
I prefer the $30 set because of the overall "feel".

Now that I have written this, I am not quite sure why I started ! . LOL !! . Perhaps it might serve some purpose !
 

spindlecraft

Member
Joined
Apr 6, 2014
Messages
56
Location
Philipsburg, PA
Wanted to give everybody a quick update.

After a lot of really great suggestions and trying pretty much all of them - I think the thing that did it was adjusting the screw on the die to open it up ever so slightly. I've attached some photos of last nights attempts. The first photo is when I left the die as it was when I purchased it. And once again, it cut up the tenon and left no good threads. I parted that tenon off, cut another one, and tried again with the die opened up a bit. I could "feel" the improvement immediately.

It's a bit short - but - after the die adjustment, I was able to successfully turn my first kitless pen body!!

Tonight, it's onto the cap.
 

Attachments

  • IMG_3294.JPG
    IMG_3294.JPG
    236.7 KB · Views: 250
  • IMG_3298_jpg.JPG
    IMG_3298_jpg.JPG
    411.2 KB · Views: 242
  • IMG_3299_jpg.JPG
    IMG_3299_jpg.JPG
    348.7 KB · Views: 256

spindlecraft

Member
Joined
Apr 6, 2014
Messages
56
Location
Philipsburg, PA
7933E457-53C2-4BEF-9028-FA4B37AE2C04.jpeg
Well.... it's not the prettiest thing in the world - but tonight I successfully turned my first pen section! There was a lot of jerry-rigging, improvising and figuring things out as I went - but at the end of the day, I have a working bespoke rollerball pen!

My next time around I will probably try to make the section a little shorter, taper and shape the point a little more, and see if I can figure out how to get the threaded bits to sit flush to the parts they are threading into without such a prominent relief cut at the back of the threads.

Once again, I thank everybody for their feedback and contributions in getting me to this point.
 

More4dan

Member
Joined
Mar 17, 2016
Messages
2,102
Location
Katy, TX
Very nice!!! Great job lining up the pattern. No small feat.

I usually turn the front section to slightly under the size of drill I use for the cap and the body to slightly larger than the OD of the threads. The does require the cap to have a larger ID than the body. But I think this looks more natural than the step from the body to the threads. Something to try.

Danny


Sent from my iPhone using Penturners.org mobile app
 

spindlecraft

Member
Joined
Apr 6, 2014
Messages
56
Location
Philipsburg, PA
Well - I'm off to the races now!! I think I finally have this process down. Here are a few more pics of various mismatched components I've made.
 

Attachments

  • 7E88DB99-0254-4787-AEB9-5B753A2B6AD1.jpeg
    7E88DB99-0254-4787-AEB9-5B753A2B6AD1.jpeg
    282.3 KB · Views: 238
  • 3257BE19-E898-44A6-9ABC-834E41BAEDCF.jpeg
    3257BE19-E898-44A6-9ABC-834E41BAEDCF.jpeg
    681.7 KB · Views: 238
  • EACDCADF-7C99-40B0-8AB7-4107BC73AE8E.jpeg
    EACDCADF-7C99-40B0-8AB7-4107BC73AE8E.jpeg
    331.5 KB · Views: 245

spindlecraft

Member
Joined
Apr 6, 2014
Messages
56
Location
Philipsburg, PA
Very nice!!! Great job lining up the pattern. No small feat.

I usually turn the front section to slightly under the size of drill I use for the cap and the body to slightly larger than the OD of the threads. The does require the cap to have a larger ID than the body. But I think this looks more natural than the step from the body to the threads. Something to try.

Danny


Sent from my iPhone using Penturners.org mobile app
Any chance you have a photo to show what you're describing here? I agree that something about my shape here is "off". A photo of whst you're describing however would be really helpful.
 

Wayne

IAP Library Manager
Staff member
Joined
Dec 14, 2006
Messages
851
Location
East Troy, Wisconsin, USA.
I did a tutorial on threading some time ago for the IAP library but couldn't find it in there, the search function doesn't find it no matter which words from the title I put in so I have attached it here.

Maybe it has just disappeared in the mists of time!

Anyway, maybe there are some tips in there that will help you.
Fred,

I'll get it into the library. May have lost it during the forum transition.

Regards,
 

More4dan

Member
Joined
Mar 17, 2016
Messages
2,102
Location
Katy, TX
Any chance you have a photo to show what you're describing here? I agree that something about my shape here is "off". A photo of whst you're describing however would be really helpful.
Something like this.
 

Attachments

  • 9A6ECEAA-D8E1-46E5-B09C-1DC00107B3D5.jpeg
    9A6ECEAA-D8E1-46E5-B09C-1DC00107B3D5.jpeg
    730.9 KB · Views: 179
  • 11A7D42D-D683-42F7-9516-F75A7A0CC654.jpeg
    11A7D42D-D683-42F7-9516-F75A7A0CC654.jpeg
    623.9 KB · Views: 175
Top Bottom