TG Design
Member
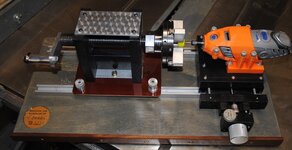
I was inspired by Bruce Robbins (aka BRobbins629) to build a device to machine square threads in pen caps and bodies. After reading through his "Incredible Threading Machine" tutorial, I decided to build a dedicated threading machine/fixture. (not sure what to call my version yet)
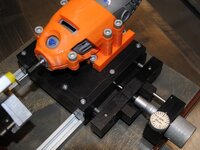
My plan is to use a Dremel and a 4 jaw chuck. The 4 jaw chuck is threaded 8TPI-1", I so purchased an 8TPI-1" rod and a couple of nuts. I mounted the threaded rod, nuts, and chuck in some Delrin. I made a turning handle and mounted that assembly to some t-track. I then mounted the Dremel and an linear positioner to the t-track. I found the Dremel holding fixture on Thingiverse and printed it out, that was a huge score!
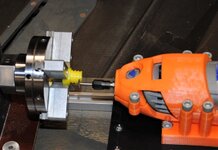
I tested the fixture with a scrap piece of acrylic (yellow in the pictures), per Bruce's guidance I added 0.040" to the caps ID to determine the bodies OD. Here is my formula: Body threads = Cap ID + 0.040". The micrometer on the linear positioner allows me to precisely touch (zero) the cap or pen body and then cut 0.020" deep threads. I slowly turn the crank and the Dremel bit #199 cuts the threads (0.010" increment steps). It's INCREDIBLE, now I know why Bruce named his version that. It's very smooth and the threads are very tight. I had to sand the external threads a little(maybe .002"), just a little fine tuning and rounded the first thread.
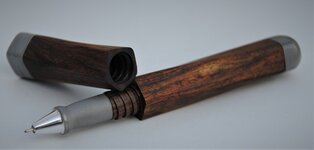
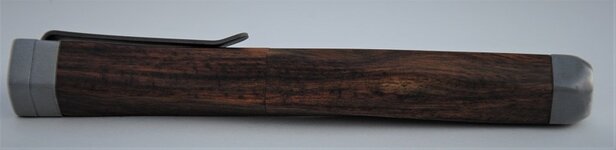
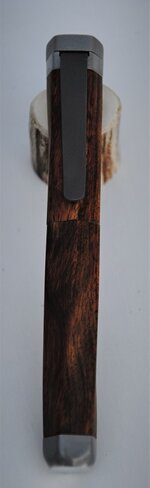
After successful threading of a piece of acrylic, I thought, "what about some wood threads?" This lead me to my first kitless pen, to be honest, it was not planned. I had a few kitless pen ideas running through my head, so after cutting some threads in some Cocobolo. (I used that because I know it's dense and assumed it would hold threads nice.) The threads turned out nice, after a little tuning I was able to get the grain to match once it was screwed together. That's the nice thing about a single thread, it stops in the same place each time.
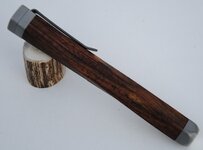
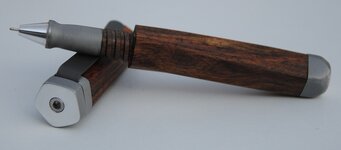
Why stop now? So I made a clip out of titanium, the pen top out of aluminum with a socket cap screw to hold the clip. I decided to put a 5 sided 1/4 twist on the body and made the section out of aluminum to hold a pencil tip roller-ball cartridge. The end of the pen is also aluminum. I bead blasted the aluminum and titanium to a matte finish and polished the very top and bottom. The 1/4 turn 5 sided twist encourages the pen to be rotated, this really makes the chatoyance of the Cocobolo to flip.
Lessons learned:
I need a small vertical mill; all the aluminum pieces were made by hand using a hacksaw, lathe, files, drill press, 6-32 tap and sand paper.
Sanding the aluminum next to the wood caused the aluminum dust to contaminate the wood. I put tape on the wood to keep it clean.
Titanium is not easy to work with, it does not cut or sand very well. White sparks!
Titanium does not cold form very well; I broke the first clip trying to bend a 90deg angle. Use a torch!
Just do it, you never know what you can create. This is not what I imagined my first kitless pen to look like, not too bad for not having any real plans, just trying to work out some proof of concepts.
Thank you Bruce for the inspiration!
Questions or comments welcome.
My plan is to use a Dremel and a 4 jaw chuck. The 4 jaw chuck is threaded 8TPI-1", I so purchased an 8TPI-1" rod and a couple of nuts. I mounted the threaded rod, nuts, and chuck in some Delrin. I made a turning handle and mounted that assembly to some t-track. I then mounted the Dremel and an linear positioner to the t-track. I found the Dremel holding fixture on Thingiverse and printed it out, that was a huge score!
I tested the fixture with a scrap piece of acrylic (yellow in the pictures), per Bruce's guidance I added 0.040" to the caps ID to determine the bodies OD. Here is my formula: Body threads = Cap ID + 0.040". The micrometer on the linear positioner allows me to precisely touch (zero) the cap or pen body and then cut 0.020" deep threads. I slowly turn the crank and the Dremel bit #199 cuts the threads (0.010" increment steps). It's INCREDIBLE, now I know why Bruce named his version that. It's very smooth and the threads are very tight. I had to sand the external threads a little(maybe .002"), just a little fine tuning and rounded the first thread.
After successful threading of a piece of acrylic, I thought, "what about some wood threads?" This lead me to my first kitless pen, to be honest, it was not planned. I had a few kitless pen ideas running through my head, so after cutting some threads in some Cocobolo. (I used that because I know it's dense and assumed it would hold threads nice.) The threads turned out nice, after a little tuning I was able to get the grain to match once it was screwed together. That's the nice thing about a single thread, it stops in the same place each time.
Why stop now? So I made a clip out of titanium, the pen top out of aluminum with a socket cap screw to hold the clip. I decided to put a 5 sided 1/4 twist on the body and made the section out of aluminum to hold a pencil tip roller-ball cartridge. The end of the pen is also aluminum. I bead blasted the aluminum and titanium to a matte finish and polished the very top and bottom. The 1/4 turn 5 sided twist encourages the pen to be rotated, this really makes the chatoyance of the Cocobolo to flip.
Lessons learned:
I need a small vertical mill; all the aluminum pieces were made by hand using a hacksaw, lathe, files, drill press, 6-32 tap and sand paper.
Sanding the aluminum next to the wood caused the aluminum dust to contaminate the wood. I put tape on the wood to keep it clean.
Titanium is not easy to work with, it does not cut or sand very well. White sparks!
Titanium does not cold form very well; I broke the first clip trying to bend a 90deg angle. Use a torch!
Just do it, you never know what you can create. This is not what I imagined my first kitless pen to look like, not too bad for not having any real plans, just trying to work out some proof of concepts.
Thank you Bruce for the inspiration!
Questions or comments welcome.