
monophoto
Member
Experienced turners often purchase a tap to match the threading of the spindle on their lathe headstock for use in creating glue blocks, wooden mandrels, and other shop-made tooling. Here are some thoughts on that process:
1. The Beall Tool Company is famous for their high quality taps that may be purchased directly from Beall or from various retailers. But you can also use a standard machinist's tap - if you can find one in the appropriate size. Smaller lathes typically have either a 3/4"x16tpi or 1"x8tpi spindle thread, and taps in these sizes can often be found in hardware stores. Don't overlook the possibility of ordering a tap from a chain hardware store website - some stores accept on-line orders, and then ship for pickup at a nearby brick-and-mortar store (and often without an added shipping charge).
2. Standard machinist's taps come in three flavors - tapered, plug, and bottoming. The difference has to do with the degree to which the end of the tap is tapered; bottoming taps are designed to tap all the way to the bottom of a 'blind' hole, so there is only minor tapering of the thread at the very end of the tap. Tapered taps are are designed for starting threads, and typically have a very noticeable taper. Plug taps are in between those two. Taps in the sizes required to match lathe spindles are expensive, and not many of us are willing to spend the amount required to purchase both a tapered tap and a bottoming tap. My suggestion is to purchase a tapered tap only, and then be creative about how it is used to thread the required hole depth. And tapered taps are more common, and therefore a bit less expensive.
3. There is an art to threading wood with a machinist's tap. Tapping a hole drilled into face grain produces threads that are reasonably strong, while tapping a hole in end grain typically produces only sawdust - as the tap progresses into the hole, it rides on the threads that it has already cut. In end-grain threading, especially with taps that are 3/4" and above, the threads aren't strong enough to withstand the forces involved in cutting additional threads, and typically strip out. So choosing face-grain hardwood (ash, maple, etc) for the glue-block or mandrel significantly increases the chances of getting good threads.
4. One of the measurements you will need to make is the length of the threaded portion of your lathe spindle - ideally, you want the finished glue-block or mandrel to engage with all of the spindle threads. But that presents a challenge if you are cutting the threads with a tapered tap. One solution is to make the hole much deeper so that the tap won't bottom out until after it has cut threads to the depth that you want. I believe that a better solution is to make the glue-block or mandrel in two pieces - one piece is face-grain timber that is slightly thicker than the desired thread depth. Drill the hole all the way through this piece, and run the tap all the way through so that full-depth threads are created for the full depth of the hole. Then, glue the second bit of timber onto the end to produce a blind hole. Use a good PVA glue and let it cure thoroughly before proceeding.
5. Threads in wood are not as strong as threads in metal. Soaking the threads in thin superglue, allowing the glue to cure fully, and then running the tap through the threads again for a final cleanup will improve strength considerably. And I find that apply some paste wax on the threads also helps.
6. Ideally, the threaded hole will be deep enough for the glue-block or mandrel to screw far enough onto the spindle for the face of the block to seat against the collar around the spindle. And some turners also suggest cutting a recess around the open end of the threaded hole that is large enough to fit around the spindle collar (although I haven't found that to be necessary).
7. After preparing the threads, mount the block on the spindle, turn the outside to the desired shape, and face off the end to prepare for the final application. I try to leave the walls at least 3/8" thick.
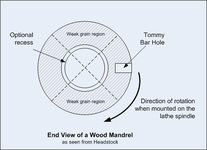
8. Most of the blocks I've made have been round. However, that presents a potential problem if the threads are tight - its hard to get the block off the spindle when the job has been completed (this is where paste wax helps). I've found that drilling a small hole in the side of the block to receive a 'tommy bar' helps with removal. But a subtle point is to remember that if the block is face-grain as recommended, there are two quadrants around the perimeter of the block where the grain is weak, and inserting a tommy bar in a hole in those regions potentially could break out grain. DAMHIKT. Note in the sketch the relationship between the grain in the timber and the direction of rotation. Another solution is to leave at least a portion of the block closest to the headstock square - if the block does get stuck on the lathe, a square is easier to grip, and in the worst case, you can even grip it with a wrench.
9. Face treatment depends on the application:
11. One of the advantages of constructing these tools by gluing two pieces of wood together is that if the 'working face' becomes too ragged, you can just glue on a new face. If this is a simple face joint, the force on the joint is 'shear' which could affect its strength. If that's a concern, you can always cut a short tenon on the portion closest to the headstock to fit into a matching recess in the portion facing the tailstock. Adding a mortise and tenon will reduce the shear stress on the glue joint.
1. The Beall Tool Company is famous for their high quality taps that may be purchased directly from Beall or from various retailers. But you can also use a standard machinist's tap - if you can find one in the appropriate size. Smaller lathes typically have either a 3/4"x16tpi or 1"x8tpi spindle thread, and taps in these sizes can often be found in hardware stores. Don't overlook the possibility of ordering a tap from a chain hardware store website - some stores accept on-line orders, and then ship for pickup at a nearby brick-and-mortar store (and often without an added shipping charge).
2. Standard machinist's taps come in three flavors - tapered, plug, and bottoming. The difference has to do with the degree to which the end of the tap is tapered; bottoming taps are designed to tap all the way to the bottom of a 'blind' hole, so there is only minor tapering of the thread at the very end of the tap. Tapered taps are are designed for starting threads, and typically have a very noticeable taper. Plug taps are in between those two. Taps in the sizes required to match lathe spindles are expensive, and not many of us are willing to spend the amount required to purchase both a tapered tap and a bottoming tap. My suggestion is to purchase a tapered tap only, and then be creative about how it is used to thread the required hole depth. And tapered taps are more common, and therefore a bit less expensive.
3. There is an art to threading wood with a machinist's tap. Tapping a hole drilled into face grain produces threads that are reasonably strong, while tapping a hole in end grain typically produces only sawdust - as the tap progresses into the hole, it rides on the threads that it has already cut. In end-grain threading, especially with taps that are 3/4" and above, the threads aren't strong enough to withstand the forces involved in cutting additional threads, and typically strip out. So choosing face-grain hardwood (ash, maple, etc) for the glue-block or mandrel significantly increases the chances of getting good threads.
4. One of the measurements you will need to make is the length of the threaded portion of your lathe spindle - ideally, you want the finished glue-block or mandrel to engage with all of the spindle threads. But that presents a challenge if you are cutting the threads with a tapered tap. One solution is to make the hole much deeper so that the tap won't bottom out until after it has cut threads to the depth that you want. I believe that a better solution is to make the glue-block or mandrel in two pieces - one piece is face-grain timber that is slightly thicker than the desired thread depth. Drill the hole all the way through this piece, and run the tap all the way through so that full-depth threads are created for the full depth of the hole. Then, glue the second bit of timber onto the end to produce a blind hole. Use a good PVA glue and let it cure thoroughly before proceeding.
5. Threads in wood are not as strong as threads in metal. Soaking the threads in thin superglue, allowing the glue to cure fully, and then running the tap through the threads again for a final cleanup will improve strength considerably. And I find that apply some paste wax on the threads also helps.
6. Ideally, the threaded hole will be deep enough for the glue-block or mandrel to screw far enough onto the spindle for the face of the block to seat against the collar around the spindle. And some turners also suggest cutting a recess around the open end of the threaded hole that is large enough to fit around the spindle collar (although I haven't found that to be necessary).
7. After preparing the threads, mount the block on the spindle, turn the outside to the desired shape, and face off the end to prepare for the final application. I try to leave the walls at least 3/8" thick.
8. Most of the blocks I've made have been round. However, that presents a potential problem if the threads are tight - its hard to get the block off the spindle when the job has been completed (this is where paste wax helps). I've found that drilling a small hole in the side of the block to receive a 'tommy bar' helps with removal. But a subtle point is to remember that if the block is face-grain as recommended, there are two quadrants around the perimeter of the block where the grain is weak, and inserting a tommy bar in a hole in those regions potentially could break out grain. DAMHIKT. Note in the sketch the relationship between the grain in the timber and the direction of rotation. Another solution is to leave at least a portion of the block closest to the headstock square - if the block does get stuck on the lathe, a square is easier to grip, and in the worst case, you can even grip it with a wrench.
9. Face treatment depends on the application:
- face plates and glue blocks: I typically face off the end as close to dead flat as possible. However, I have a couple of glue blocks where I have turned a central recess for use in making pendants where I mount the workpiece offcenter in order to cut hole near the edge.
- mandrels - taper the end as appropriate, and then drill a hole for a suitable bolt. My buffing wheels are designed for 1/2" mandrels, so I embedded 1/2" blots in the mandrels. I also have a wine stopper mandrel made with a 3/8" bolt. I have a sanding disk holder that has a 1/4" shaft, so I embedded a 1/4"x20tpi threaded insert in the end of the mandrel so I can simply screw in the mandrel. I also have a buff that I use for polishing metal that also have a 1/4" shaft and that can screw into the same mandrel.
11. One of the advantages of constructing these tools by gluing two pieces of wood together is that if the 'working face' becomes too ragged, you can just glue on a new face. If this is a simple face joint, the force on the joint is 'shear' which could affect its strength. If that's a concern, you can always cut a short tenon on the portion closest to the headstock to fit into a matching recess in the portion facing the tailstock. Adding a mortise and tenon will reduce the shear stress on the glue joint.
Attachments
Last edited: