
TurnaPen
Member
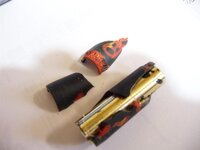
Ok, as promised, the story behind it all; there I was first thing in the morning, things were flying along very well, I lost concentration for a second and BANG;
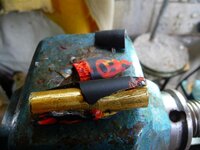
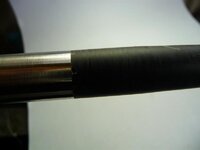
 :redface: see pictures 1 & 2; Well, after much searching found both pieces, by the way, the blanks had stacks of Epoxy, but I had spray painted the tubes, and the glue came away with the paint. So, with thick CA put the pieces back, my fingers stuck to the blank so had to pry them off and use some paper towel to hold the blank, that is why you see the towel pieces on it, pictures 3 & 4 ;
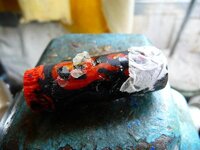
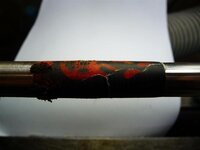
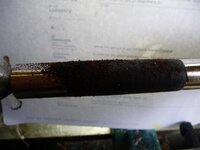
Now, in pictures 5, 6, & 7, I applied CA and Ebony sawdust to help fill the black portions that were chipped or missing.
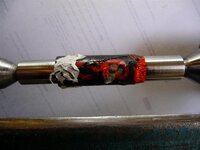
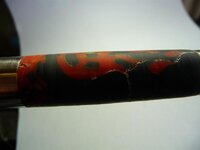
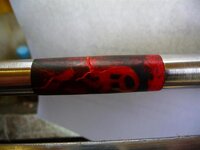
In picture 8 you can see the CA that had turned white, so I dug that out with a small pocket knife. Had a choice, either fill in with Ebony, or use the natural break lines as a feauture!!, filled the dug out lines with red and then yellow acylic paint to fit in with the current colour scheme, dried it quickly with some hot air, see picture 9.
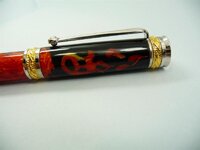
Finally, picture 10 the finished cap.
Those blanks are not cheap, but worth every penny; needless to say that majority of the day went into restoration, hope this may encourage you, that even experienced turners can make "mistakes", ALWAYS, good can come from them, either in recovery OR valuable lessons learned. Amos
:redface: see pictures 1 & 2; Well, after much searching found both pieces, by the way, the blanks had stacks of Epoxy, but I had spray painted the tubes, and the glue came away with the paint. So, with thick CA put the pieces back, my fingers stuck to the blank so had to pry them off and use some paper towel to hold the blank, that is why you see the towel pieces on it, pictures 3 & 4 ;Now, in pictures 5, 6, & 7, I applied CA and Ebony sawdust to help fill the black portions that were chipped or missing.
In picture 8 you can see the CA that had turned white, so I dug that out with a small pocket knife. Had a choice, either fill in with Ebony, or use the natural break lines as a feauture!!, filled the dug out lines with red and then yellow acylic paint to fit in with the current colour scheme, dried it quickly with some hot air, see picture 9.
Finally, picture 10 the finished cap.
Those blanks are not cheap, but worth every penny; needless to say that majority of the day went into restoration, hope this may encourage you, that even experienced turners can make "mistakes", ALWAYS, good can come from them, either in recovery OR valuable lessons learned. Amos
Attachments
-
 1 The Blown blank.jpg27.7 KB · Views: 173
 -
 2 the blown blank.jpg55.2 KB · Views: 160
 -
 3. After CA.jpg56.2 KB · Views: 169
 -
 4 After CA.jpg44.9 KB · Views: 155
 -
 5 some of the chip holes.jpg23.6 KB · Views: 152
 -
 6 Ebony fill note white join marks.jpg28.9 KB · Views: 162
 -
 7 Fixing the black area.jpg35.7 KB · Views: 143
 -
 8 note the CA dried white.jpg23.7 KB · Views: 161
 -
 9 dug out white and filled with colour.jpg34.4 KB · Views: 163
 -
 10 the finished cap.jpg31.6 KB · Views: 185