Signguy
Member
I have been making a lot of pens lately and they are usually each a different style kit so normal mass production techniques don't work so well. But since I've noticed that about 60% of my time doing this the normal way is spent in prep work rather than on turning, I set out to find a better way.
It's working great now, and has cut my prep time by at least half over the typical one at a time process, so I thought I'd share the process I have developed to speed up making a lot of different pen kits and minimize the time spent on prep work.
It takes a lot longer to read much of this then it does to actually do it, so don't be discouraged. I just wanted to try and explain it all clearly, so the text here is kind of lengthy. But after you do it once, you'll never need instructions again, it will just work naturally.
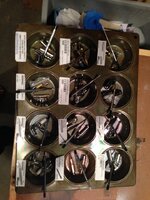
It's really pretty simple. The big secret is to sneak into the kitchen and get your hands on either 2 or 4 cupcake/muffin tins (or go buy your own if you are afraid of getting caught). Hint: The ones for big muffins (wider and deeper) work better than the standard (smaller) ones.
These tins not only keep your components and blanks straight, they also provide a way to keep multiple items "keyed" to each other without having to label them all individually, and furthermore make it easy to move multiple parts back and forth to be worked on at different tools without any danger of getting them confused.
Once you have the tins it is critically important that you put a mark, paint splotch, sticker or something else in JUST ONE corner of each tin before you start using them. You'll see why, shortly.
Why do you need 2 or 4? Because you will need 3 to do 12 kits at a time, or 4 to do 24 kits at a time. For this example, we are going to assume you are making 12.
Here are the steps I use from start to finish:
1) Put one tin down on your workbench with the corner spot at the upper left as you stand in front of it.
2) Grab the 12 kits you want to make and pile them up nearby.
3) Lay down a blue paper towel between the kits and the tin.
4) Pick up the first kit and peel the label off the plastic bag and lightly affix it below the upper left-most recess. If it won't peel off with some sticky left, it will usually still peel off the top layer with no sticky in which case just put it into the recess. Or, if you can't peel it at all use a post it note with the kit name instead.
5) Dump the kit bag contents onto the blue towel. Unwrap and de-bag each one as needed and put the component into the same recess as you just labeled.
6) Check the tubes and if they are not PSI they need to be sanded. Do this as you dump each kit so you don't have to come back and do them all at once later (as this avoids getting them confused at that time).
7) Keep doing this going from left to right and then from top row to middle and then bottom row until all 12 kits are in labeled recesses and with components ready for assembly. (Always use the same pattern for filling the tins or this will get confusing later.)
8) Now, set a second tin down right next to the first one (move the blue paper towel away) and be sure that the dot on the corner is in the upper left.
9) Tear some paper towel into recess size pieces (more or less) and put them in each recess of the second tin. You'll see why in a minute.
10) Take all of the tubes out of tin #1 (to the left) and put them into the corresponding recess in tin #2 (to the right).
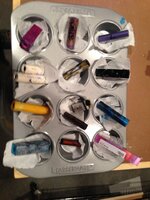
9) Now, select your uncut blanks for each kit. As you select them, put them into the same recess location in the 2nd tin as you used for the component parts in the 1st tin. (This way there is no need to mark them as the position in the tin tells you which kit they go with.) They go on top of the paper towel patches and just stick out looking funny for now.
10) With this done, go ahead and put the left tin #1 away somewhere safe (being super careful not to spill it!) as we won't need it for awhile and we do NOT want to take a chance on something mixing up the parts.
11) Go back to tin #2 (which is now the only one on the bench) and use the tubes and a marker to mark where each blank needs to be cut. After you make the cut marks, also use the marker to write the drill size needed on each blank (twice if you are cutting two pieces for a two barrel pen. Always do this one recess at a time so you have no chance of mixing up the tubes!
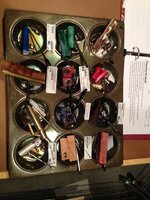
12) You are now ready for cutting. Pick up tin #2 and take to the bandsaw and cut each blank as marked. Be sure to do one recess at a time and put the cut blank pieces back in the correct recess before moving on to cutting the next one. Also, put the pieces so that the drill size marking faces up (makes the next steps easier/faster). Any odd pieces left over do NOT go in the tin. Set them aside and add to your collection later.
13) With all blanks cut to size, it's over to the lathe or drill press. The key here is to drill all of the same size holes at once – so you don't want to go in order across the tin. Instead, look at all the markings (see why you left them facing up?) pick out a size (let's say 3/8") and take each of the blanks needing drilled at that size out ONE at a time (so they can't get confused) and drill it. Then, it goes right back in the ONE empty recess it came out of.
Do the next one that size, and continue the same way until they are done. Change the bit and follow the same process on the next size, etc. Just keep going until all blanks are drilled and all are back in the original recess in the #2 tin.
14) Now, back to the workbench. I have started painted virtually all my blanks so for me, that is the next step. If you don't need/want to paint, please skip the next couple steps.
Side Note: After much experimentation I have settled on Plaid acrylic multi-surface paint from the craft store which I apply using doubled over white pipe cleaners (also from the craft store and really cheap in the big bags with coupon) which work way better than (the letter before) R-tips or brushes.
What I do is take them one at a time from tin #2, blow the hole clean with an air gun, swab the paint on them as above, wipe the ends on a paper towel and then drop them back into tin #2 on top of the patch of paper towel I put in each recess earlier (keeps paint from getting on the tin).
Follow the same procedure as everything else – never take more than one blank out at a time, and always put that one back in the same recess it came out of before pulling another one out of a different recess.
15) With all the blanks painted, and back in the original recess they came out of, grab tin #2 and take it into your kitchen. Set your oven on "warm" and put the entire tin on the center rack (warm is a very low temp so no worries about melting or anything) and leave the blanks in there for 30-60 minutes. (With the paint I use there is no smell, no fumes, and this makes no mess, so should be no issue with using the oven.) This will ensure the paint is totally dry.
16) Now, take tin #2 back to your workbench and glue the tubes into the painted blanks. (I have switched 100% to 30 minute epoxy and find that it works better than Gorillia or CA and also does not affect the baked on paint inside the blanks.) Be sure to follow our process – ONE blank at a time – and put it back into the same recess (on top of the paper towel swatch so that they don't get glued to the tin) before you grab the next one. Once they are all glued up leave them in the tin to dry completely.
17) The next step is to take tin #2 with the completed blank/tube assemblies to your sander (or whatever other tool you use) and trim the ends of each blank flush with the tube. Be sure to follow our process – ONE blank at a time – and put it back into the same before you grab the next one.
18) It's time for the final prep step. Put tin #1 (with the components) on your workbench with the dot in the upper left corner. Then put tin #2 on the bench, also with the dot in the upper left corner. Make SURE the dots are in the same corner on both, or all this work will be for naught and you'll have a mess to straighten out!
Now, grab the blanks from the upper left recess in tin #2 and put them with the components in the upper left corner of tin #1. (You can leave the paper towel behind, it's done it's duty.) Keep doing this until the contents of every recess are consolidated in tin #1, and tin #2 is empty.
19) Now for the fun! You are ready to turn your pens and can start doing so just working your way from recess to recess and putting the finished blanks back into the recess you took the un-turned blanks from each time. Here also, be sure that you never use more than one recess at a time. The finished blanks must go back in before you grab the next set of rough blanks. (This ensures the right blanks stay with the correct components for assembly).
The one difference here (vs the previous steps) is that it no longer matters what order you follow to go from recess to recess. So feel free to do all of the similar type pens in a group or follow any other order that works for you.
20) When all are turned and finished, just head back to the workbench and assemble them all one after another. It's super fast and easy because everything you need is in each recess and everything matches up perfectly. Best of all, you get the fun of seeing all your work come to life at one time!
It's working great now, and has cut my prep time by at least half over the typical one at a time process, so I thought I'd share the process I have developed to speed up making a lot of different pen kits and minimize the time spent on prep work.
It takes a lot longer to read much of this then it does to actually do it, so don't be discouraged. I just wanted to try and explain it all clearly, so the text here is kind of lengthy. But after you do it once, you'll never need instructions again, it will just work naturally.
It's really pretty simple. The big secret is to sneak into the kitchen and get your hands on either 2 or 4 cupcake/muffin tins (or go buy your own if you are afraid of getting caught). Hint: The ones for big muffins (wider and deeper) work better than the standard (smaller) ones.
These tins not only keep your components and blanks straight, they also provide a way to keep multiple items "keyed" to each other without having to label them all individually, and furthermore make it easy to move multiple parts back and forth to be worked on at different tools without any danger of getting them confused.
Once you have the tins it is critically important that you put a mark, paint splotch, sticker or something else in JUST ONE corner of each tin before you start using them. You'll see why, shortly.
Why do you need 2 or 4? Because you will need 3 to do 12 kits at a time, or 4 to do 24 kits at a time. For this example, we are going to assume you are making 12.
Here are the steps I use from start to finish:
1) Put one tin down on your workbench with the corner spot at the upper left as you stand in front of it.
2) Grab the 12 kits you want to make and pile them up nearby.
3) Lay down a blue paper towel between the kits and the tin.
4) Pick up the first kit and peel the label off the plastic bag and lightly affix it below the upper left-most recess. If it won't peel off with some sticky left, it will usually still peel off the top layer with no sticky in which case just put it into the recess. Or, if you can't peel it at all use a post it note with the kit name instead.
5) Dump the kit bag contents onto the blue towel. Unwrap and de-bag each one as needed and put the component into the same recess as you just labeled.
6) Check the tubes and if they are not PSI they need to be sanded. Do this as you dump each kit so you don't have to come back and do them all at once later (as this avoids getting them confused at that time).
7) Keep doing this going from left to right and then from top row to middle and then bottom row until all 12 kits are in labeled recesses and with components ready for assembly. (Always use the same pattern for filling the tins or this will get confusing later.)
8) Now, set a second tin down right next to the first one (move the blue paper towel away) and be sure that the dot on the corner is in the upper left.
9) Tear some paper towel into recess size pieces (more or less) and put them in each recess of the second tin. You'll see why in a minute.
10) Take all of the tubes out of tin #1 (to the left) and put them into the corresponding recess in tin #2 (to the right).
9) Now, select your uncut blanks for each kit. As you select them, put them into the same recess location in the 2nd tin as you used for the component parts in the 1st tin. (This way there is no need to mark them as the position in the tin tells you which kit they go with.) They go on top of the paper towel patches and just stick out looking funny for now.
10) With this done, go ahead and put the left tin #1 away somewhere safe (being super careful not to spill it!) as we won't need it for awhile and we do NOT want to take a chance on something mixing up the parts.
11) Go back to tin #2 (which is now the only one on the bench) and use the tubes and a marker to mark where each blank needs to be cut. After you make the cut marks, also use the marker to write the drill size needed on each blank (twice if you are cutting two pieces for a two barrel pen. Always do this one recess at a time so you have no chance of mixing up the tubes!
12) You are now ready for cutting. Pick up tin #2 and take to the bandsaw and cut each blank as marked. Be sure to do one recess at a time and put the cut blank pieces back in the correct recess before moving on to cutting the next one. Also, put the pieces so that the drill size marking faces up (makes the next steps easier/faster). Any odd pieces left over do NOT go in the tin. Set them aside and add to your collection later.
13) With all blanks cut to size, it's over to the lathe or drill press. The key here is to drill all of the same size holes at once – so you don't want to go in order across the tin. Instead, look at all the markings (see why you left them facing up?) pick out a size (let's say 3/8") and take each of the blanks needing drilled at that size out ONE at a time (so they can't get confused) and drill it. Then, it goes right back in the ONE empty recess it came out of.
Do the next one that size, and continue the same way until they are done. Change the bit and follow the same process on the next size, etc. Just keep going until all blanks are drilled and all are back in the original recess in the #2 tin.
14) Now, back to the workbench. I have started painted virtually all my blanks so for me, that is the next step. If you don't need/want to paint, please skip the next couple steps.
Side Note: After much experimentation I have settled on Plaid acrylic multi-surface paint from the craft store which I apply using doubled over white pipe cleaners (also from the craft store and really cheap in the big bags with coupon) which work way better than (the letter before) R-tips or brushes.
What I do is take them one at a time from tin #2, blow the hole clean with an air gun, swab the paint on them as above, wipe the ends on a paper towel and then drop them back into tin #2 on top of the patch of paper towel I put in each recess earlier (keeps paint from getting on the tin).
Follow the same procedure as everything else – never take more than one blank out at a time, and always put that one back in the same recess it came out of before pulling another one out of a different recess.
15) With all the blanks painted, and back in the original recess they came out of, grab tin #2 and take it into your kitchen. Set your oven on "warm" and put the entire tin on the center rack (warm is a very low temp so no worries about melting or anything) and leave the blanks in there for 30-60 minutes. (With the paint I use there is no smell, no fumes, and this makes no mess, so should be no issue with using the oven.) This will ensure the paint is totally dry.
16) Now, take tin #2 back to your workbench and glue the tubes into the painted blanks. (I have switched 100% to 30 minute epoxy and find that it works better than Gorillia or CA and also does not affect the baked on paint inside the blanks.) Be sure to follow our process – ONE blank at a time – and put it back into the same recess (on top of the paper towel swatch so that they don't get glued to the tin) before you grab the next one. Once they are all glued up leave them in the tin to dry completely.
17) The next step is to take tin #2 with the completed blank/tube assemblies to your sander (or whatever other tool you use) and trim the ends of each blank flush with the tube. Be sure to follow our process – ONE blank at a time – and put it back into the same before you grab the next one.
18) It's time for the final prep step. Put tin #1 (with the components) on your workbench with the dot in the upper left corner. Then put tin #2 on the bench, also with the dot in the upper left corner. Make SURE the dots are in the same corner on both, or all this work will be for naught and you'll have a mess to straighten out!
Now, grab the blanks from the upper left recess in tin #2 and put them with the components in the upper left corner of tin #1. (You can leave the paper towel behind, it's done it's duty.) Keep doing this until the contents of every recess are consolidated in tin #1, and tin #2 is empty.
19) Now for the fun! You are ready to turn your pens and can start doing so just working your way from recess to recess and putting the finished blanks back into the recess you took the un-turned blanks from each time. Here also, be sure that you never use more than one recess at a time. The finished blanks must go back in before you grab the next set of rough blanks. (This ensures the right blanks stay with the correct components for assembly).
The one difference here (vs the previous steps) is that it no longer matters what order you follow to go from recess to recess. So feel free to do all of the similar type pens in a group or follow any other order that works for you.
20) When all are turned and finished, just head back to the workbench and assemble them all one after another. It's super fast and easy because everything you need is in each recess and everything matches up perfectly. Best of all, you get the fun of seeing all your work come to life at one time!