DrD
Member
I have about exhausted the different ways I can think of to manufacture this style of ballpoint: short "fountain pen" type section mated to a longer main body.
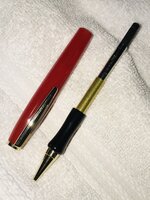
The first attempt was to make the section and the body as two different parts; that had the problem of getting a seamless transition from the section to the body. Then I tried using a longer blank and the parting off the section. You guessed it, due to the very slight taper going up into the body from the section, once parted, losing the "kerf", the od's of the section and the body didn't match. No problem, you say, just get the 2 back together and create the smooth transition. Now I was faced with the same issue as I had in making the 2 parts separately. If a long brass tube - 4.5" - is inserted to stabilize things, you may find perceptible wobble between the blank and the tube. This is a problem.
After much head scratching, the problem became evident: CONCENTRICITY. Let me explain. Measuring a number of 7mm brass tubes, I found the od to be consistently 0.265" to 0.266". The 2 different drill bits commonly used for 7mm pens are: 7mm bit, od 0.276", and the letter "J" bit, od 0.277". Couple that with the mounted drill bit run out when mounted in either a drill press using (typically a Jacobs MT 33) or in a lathe, and you will add at least another 0.001" or more to the hole you're about to drill, not to mention additional error due to method of mounting the blank, round or square.
The next factor affecting the concentricity issue is the length of the bit itself compared to the length of the blank; you may have to retract the bit and either move the blank or retract the tailstock quill. Each time the drill is re-inserted into the blank, the entrance point into the blank, and for some distance into the blank may become more out of round, and possibly become greater than the expected bore diameter. Experience has also shown me that if one lets the bit or the blank or both heat up, the drilled out material may become matted (read semi-melted) and adhering to the flutes of the bit. Upon removing the bit, that matted crud has the possibility/probability of further eroding the concentricity and the diameter of the bore hole.
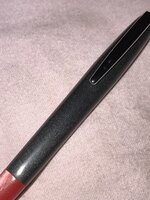
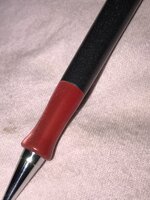
Where this comes up to grab you is when you glue in the tube(s). Usually in acrylics, but maybe not always, the brass tube, when inserted will slide in and out freely. If using to separate pieces - section and body - this means once the body tube is glued in place, the brass tube of the section may be concentric with the body. That is to say, when the section with brass tub in inserted into the body with a glued tube, there most likely will be some "wiggle" of the section tube inside the body. These variances aren't much, but they CAN keep both pieces from becoming perfectly mated.
I further noticed that , inserting the transmission into the section tube, the above issue doesn't always go away, there is still some wiggle - not a good thing to have when shearing with a lathe or sanding.
So my experience has been there is always a teeny tiny lip (maybe a 0.001" or so, but noticeable to the touch) between the section and the body. This may be more pronounced when the section is rotated to move the pen tip in or out.
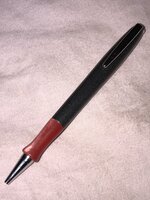
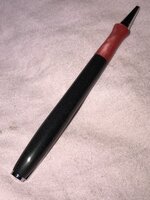
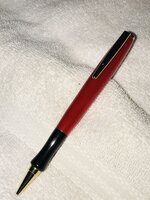
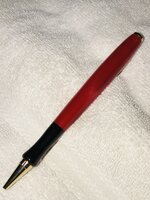
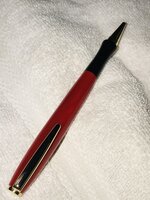
Given all that, I have found these pens are way more difficult to turn than I first imagined. Any comments, help advice is greatly appreciated. Attached is the latest attempt. It is a BHW Streamline 7mm kit in chrome with a translucent gray body (could not find this particular AA on BHW's web site any more) with a translucent red (AA24P) section. Finish was wet sanded with 320 grit on lathe at ~800 rpm; removed from lathe and wet sanded by hand long-wise (horizontally?) with MM2400 until no radial - round-wise - scratches are evident under 6 x magnification. Next wet sand by hand long-wise with MM 12000 until no scratches are evident. Finally, hand buff with Micro-Gloss.
Thanks for reading, and happy turning,
DrD
The first attempt was to make the section and the body as two different parts; that had the problem of getting a seamless transition from the section to the body. Then I tried using a longer blank and the parting off the section. You guessed it, due to the very slight taper going up into the body from the section, once parted, losing the "kerf", the od's of the section and the body didn't match. No problem, you say, just get the 2 back together and create the smooth transition. Now I was faced with the same issue as I had in making the 2 parts separately. If a long brass tube - 4.5" - is inserted to stabilize things, you may find perceptible wobble between the blank and the tube. This is a problem.
After much head scratching, the problem became evident: CONCENTRICITY. Let me explain. Measuring a number of 7mm brass tubes, I found the od to be consistently 0.265" to 0.266". The 2 different drill bits commonly used for 7mm pens are: 7mm bit, od 0.276", and the letter "J" bit, od 0.277". Couple that with the mounted drill bit run out when mounted in either a drill press using (typically a Jacobs MT 33) or in a lathe, and you will add at least another 0.001" or more to the hole you're about to drill, not to mention additional error due to method of mounting the blank, round or square.
The next factor affecting the concentricity issue is the length of the bit itself compared to the length of the blank; you may have to retract the bit and either move the blank or retract the tailstock quill. Each time the drill is re-inserted into the blank, the entrance point into the blank, and for some distance into the blank may become more out of round, and possibly become greater than the expected bore diameter. Experience has also shown me that if one lets the bit or the blank or both heat up, the drilled out material may become matted (read semi-melted) and adhering to the flutes of the bit. Upon removing the bit, that matted crud has the possibility/probability of further eroding the concentricity and the diameter of the bore hole.
Where this comes up to grab you is when you glue in the tube(s). Usually in acrylics, but maybe not always, the brass tube, when inserted will slide in and out freely. If using to separate pieces - section and body - this means once the body tube is glued in place, the brass tube of the section may be concentric with the body. That is to say, when the section with brass tub in inserted into the body with a glued tube, there most likely will be some "wiggle" of the section tube inside the body. These variances aren't much, but they CAN keep both pieces from becoming perfectly mated.
I further noticed that , inserting the transmission into the section tube, the above issue doesn't always go away, there is still some wiggle - not a good thing to have when shearing with a lathe or sanding.
So my experience has been there is always a teeny tiny lip (maybe a 0.001" or so, but noticeable to the touch) between the section and the body. This may be more pronounced when the section is rotated to move the pen tip in or out.
Given all that, I have found these pens are way more difficult to turn than I first imagined. Any comments, help advice is greatly appreciated. Attached is the latest attempt. It is a BHW Streamline 7mm kit in chrome with a translucent gray body (could not find this particular AA on BHW's web site any more) with a translucent red (AA24P) section. Finish was wet sanded with 320 grit on lathe at ~800 rpm; removed from lathe and wet sanded by hand long-wise (horizontally?) with MM2400 until no radial - round-wise - scratches are evident under 6 x magnification. Next wet sand by hand long-wise with MM 12000 until no scratches are evident. Finally, hand buff with Micro-Gloss.
Thanks for reading, and happy turning,
DrD