Sly Dog
Member
Hey all,
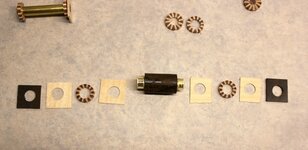
After squaring a hybrid blank recently I noticed a drilling issue on one end, a sliver of a crescent moon that looked like this:

The gap looks hollow but is actually filled with epoxy; nevertheless it meets the outer diameter of the bushing I intend to use. I did paint both tube and hole. I don't know how far along the tube the gap is, but it just looks like a blow up waiting to happen. It's a nice blank and I'd like to salvage it if possible.
The only remedy I can think of is to use a parting tool to turn down the affected region to the tube and glue on a segmented end cap (maybe on both sides), though that will be hard to make look good.
As the Dude said, maybe my thinking has become too uptight, man. :laugh: Anyway, I appreciate any thoughts, suggestions you might have.
Russ
After squaring a hybrid blank recently I noticed a drilling issue on one end, a sliver of a crescent moon that looked like this:
The gap looks hollow but is actually filled with epoxy; nevertheless it meets the outer diameter of the bushing I intend to use. I did paint both tube and hole. I don't know how far along the tube the gap is, but it just looks like a blow up waiting to happen. It's a nice blank and I'd like to salvage it if possible.
The only remedy I can think of is to use a parting tool to turn down the affected region to the tube and glue on a segmented end cap (maybe on both sides), though that will be hard to make look good.
As the Dude said, maybe my thinking has become too uptight, man. :laugh: Anyway, I appreciate any thoughts, suggestions you might have.
Russ