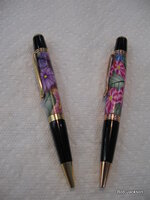
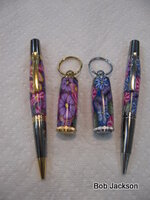
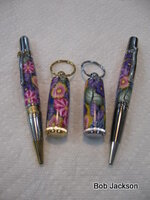
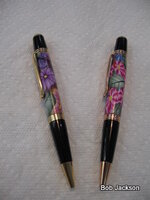
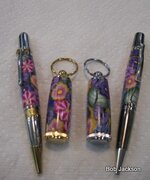
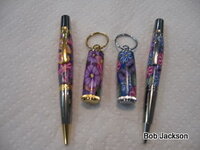
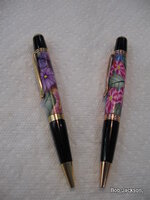
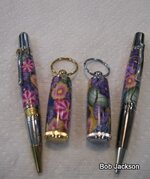
I just recently became enamored with Toni's canes for polymer clay pens and other items. The first and second pens turned out ok. The first one I cut the canes too thick and got some distortion. The second was better. I then made 4 pen and pill holder sets for some of the women in my life for mother's day. I'm hooked and will keep Toni's budget in the black. Thanks for looking.

You are using an out of date browser. It may not display this or other websites correctly.
You should upgrade or use an alternative browser.
You should upgrade or use an alternative browser.
Thanks to Toni for help with new clay pens.
- Thread starter bobjackson
- Start date
Signed-In Members Don't See This Ad
See more from bobjackson

I'm not sure if I've heard it explained here, but once you have the clay canes and slice them and apply them to the tubes, how do you "fill in" the spaces in between?
Also, are these sanded or turned in some way?? Thanks for any info you can give.
BTW....the pens you've created look pretty darned amazing to me.
Good job.


In my opinion I like to have 1 leaf, 1 butterfly thing, 3-4 flowers...depends on the design.. As for how much does it take to cover a tube I wouldnt have a clue, never thought about it especially since tubes are all different sized and how thin you can slice them.

Signed-In Members Don't See This Ad
SamThePenMan
Member
Those are nice, hard to believe that they're PC! ")
Freethinker
Member
I just recently became enamored with Toni's canes for polymer clay pens and other items. The first and second pens turned out ok. The first one I cut the canes too thick and got some distortion. The second was better.
I'm not sure if I've heard it explained here, but once you have the clay canes and slice them and apply them to the tubes, how do you "fill in" the spaces in between?
Also, are these sanded or turned in some way?? Thanks for any info you can give.
BTW....the pens you've created look pretty darned amazing to me.
Good job.
Dan
You buy some colored clay from Michael's or Pat Catan's (in the Cleveland, Ohio area) or Hobby Lobby. Use a color compatible with the flowers or items canes you will be using. Prepare the clay by rolling it several times folding it back onto itself. You have to work it so it's very soft and plyable so it will not crack when you roll it out on the tubes. Roll out the clay to just less than the bushing thickness and roll around a tube. I use a pasta roller I got at Hobby Lobby for $18.00 to make sure the clay is smooth and even thickness. Cut the canes (thinner the better) and place on the clay covered tube. When finished roll the tube lightly with a flat smooth board or piece of plexiglass to smooth and smooch everything together on the same plane. I use a sample piece of granite counter top material as a base and a piece of plexiglass to roll the tube until smooth. I keep checking with the bushings to make sure it's not too thick.
Bake in the oven at 275 for 30 minutes. I put the tubes on a metal shishkabob skewer laid across a baking dish to hold it while baking. When cool I mount the tube between bushings on the lathe to sand. I use 400 grit, 600 grit, then micromesh to 12000. then with the lathe off, 2 coats of medium CA, with the lathe running micromech 6000, 8000, 12000, then Hut PR polish. Then press the pen kit together, and you are done. I'v3 tried purple, dark blue, and yellow clay backgrounds so far. All look good. You quickly learn that green leaves go on first to look natural with the flowers. Mix and match colors and backgrounds for different looks. I copied many of the PC pens on this forum before I made one and tried to follow the look. After a few, you're more comfortable with your designs.
thewishman
Member
Nice PC work! Thanks for the detailed construction info - that makes the project less intimidating.
Toni
Member
Bob you did an excellent job!! Mothers day must be going pretty well for you
creativewriting
Member
Great canes make great pens! Nice work!

DanNelson
Member
These pens look amazing!
On the same topic: has anyone tried working with precious metal clay?
On the same topic: has anyone tried working with precious metal clay?
jtdesigns
Member
I have with a concept I was going to submit to PMG but how I was going to use it there was too much shrinkage 10 to 30% depending on type
cschimmel
Member
How many canes does it take to make a pen, I know you will be using different ones but in terms of how much it takes to cover the tube?
Toni
Member
How many canes does it take to make a pen, I know you will be using different ones but in terms of how much it takes to cover the tube?
In my opinion I like to have 1 leaf, 1 butterfly thing, 3-4 flowers...depends on the design.. As for how much does it take to cover a tube I wouldnt have a clue, never thought about it
especially since tubes are all different sized and how thin you can slice them.Most of you know I just make pretty wood pens, but I did come across an intersting site for those of you who are enjoying the polymer clay possibilities. Check out the many tutorials here.
Gagler
Member
Those are beautiful.