It was seeming to me it was getting harder to turn the hand wheel, on the tailstock on both my lathes. I took both of them apart, cleaned them, re lubed them, put them back together and oh my goodness are they smooth. If you have been neglecting this, like me, I urge you to take 15 minutes and just do it. You'll be glad you did. Extremely easy job.

You are using an out of date browser. It may not display this or other websites correctly.
You should upgrade or use an alternative browser.
You should upgrade or use an alternative browser.
Tailstock maintenance
- Thread starter KenB259
- Start date
Signed-In Members Don't See This Ad
Signed-In Members Don't See This Ad
mark james
IAP Collection, Curator
I agree. I am always pleased when I take my tailstock off, and clean the ways. It takes just a few minutes, and the tailstock/banjo just slides so much more easily: ( 220 grit - just to get any gunk off. 600 grit to smooth. (1) Turtle Wax Heavy Duty Rubbing Compound Cleaner. (2) Turtle Wax Polishing Compound. (3) Johnson's Paste Wax.). I bought the three cans in 2012, about 1/3 used in 9 years.
I do that too. In case you misunderstood my post, I was talking about the inner workings of the tailstock.I agree. I am always pleased when I take my tailstock off, and clean the ways. It takes just a few minutes, and the tailstock/banjo just slides so much more easily: ( 220 grit - just to get any gunk off. 600 grit to smooth. (1) Turtle Wax Heavy Duty Rubbing Compound Cleaner. (2) Turtle Wax Polishing Compound. (3) Johnson's Paste Wax.). I bought the three cans in 2012, about 1/3 used in 9 years.
monophoto
Member
Agree - part of my routing maintenance program.It was seeming to me it was getting harder to turn the hand wheel, on the tailstock on both my lathes. I took both of them apart, cleaned them, re lubed them, put them back together and oh my goodness are they smooth. If you have been neglecting this, like me, I urge you to take 15 minutes and just do it. You'll be glad you did. Extremely easy job.
My lathe has a grubb screw that locks the tailstock ram - the screw has a shaped tip that is supposed to ride in a groove machined into the side of the ram. Over time, the tip of the screw distorts the edge of the groove, leaving burrs that impeded movement of the ram. So when I disassemble it for cleaning, I use a file to remove any burrs from the edge of that groove. Takes about a minute, and makes a really big difference in how smoothly the ram moves.
Lubrication of the ram is a subject of some debate - some people suggest not lubricating it at all because the lubricant can absorb sanding dust and become 'gummy'. I'm of the school that favors lubrication - I've used dry silicone or teflon sprays, but I've found that aerosol white lithium grease (sold at the hardware store for lubricating garage door mechanisms) has worked best for me.
Last edited:
I'll second this. I'm actually about due for my maintenance myself. Got my lathe a little over two years ago and try to do this once per year. I've got a screw that locks the ram as well. I find that the track on the ram where the screw sets tends to develop a burr over time and usually needs to be filed down a little bit. I then lube everything up with T9 Boeshield, let it dry overnight, and then reassemble. Makes a huge difference.
Mine has the same setup with the slot and screw. I use TW-25 grease, you basically smear a little on and wipe it all off. I have been very happy with it, It doesn't get sticky at all. It's a little pricey but a tube lasts forever, you use so little of it.Agree - part of my routing maintenance program.
My lathe has a grubb screw that locks the tailstock ram - the screw has a shaped tip that is supposed to ride in a groove machined into the side of the ram. Over time, the tip of the screw distorts the edge of the groove, leaving burrs that impeded movement of the ram. So when I disassemble it for cleaning, I use a file to remove any burrs from the edge of that groove. Takes about a minute, and makes a really big difference in how smoothly the ram moves.
Lubrication of the ram is a subject of some debate - some people suggest not lubricating it at all because the lubricant can absorb sanding dust and become 'gummy'. I'm of the school that favors lubrication - I've used dry silicone or teflon sprays, but I've found that aerosol white lithium grease (sold at the hardware store for lubricating garage door mechanisms) has worked best for me.
Lgdowell
Member
What if you have issues putting the tailstock back together? Ever since I took all the parts of my nova comet 14 dr lathe tailstock apart, I cannot get the lead screw, quill, and hand wheel back together in working order. Any time I put any pressure against a drill bit in my tailstock ( to drill a pen blank) and use the handhweel, the leadscrew and handwheel separate all of the way out of the back of the quill. I have all the grub screws in place, just curious what I am missing.
Any thoughts? I tried calling teknatools support center but is so hard to follow them on the phone. Getting a but frustrated as the lathe is only 5 months old, and is pretty hard to use if you can't but any pressure on the tailstock.
Any feedback or assistance is greatly appreciated.
Linda ( new woodturning and loving it)
monophoto
Member
Do you fully reassemble the tailstock? It almost sounds like the lead screw is fully withdrawn (ie, the ram is fully extended) when you insert the jacobs chuck with the drill bit, so when you rotate the handwheel to drill into wood, you are already at the full extent of its travel.Ever since I took all the parts of my nova comet 14 dr lathe tailstock apart, I cannot get the lead screw, quill, and hand wheel back together in working order. Any time I put any pressure against a drill bit in my tailstock ( to drill a pen blank) and use the handhweel, the leadscrew and handwheel separate all of the way out of the back of the quill. I have all the grub screws in place, just curious what I am missing.
I think you need to reassemble the tailstock so that the lead screw is fully threaded into the ram before attempting to drill.
Lgdowell
Member
I agree. It seems so simple and when I was on the phone with Teknatool support, they helped me put everything back together but then I had to leave the phone call to make an appt.It is such a simple mechanism that I can't , in my mind, figure out what could be wrong. Have you looked at a schematic view?
It is basically 5 parts - the quill, the lead screw, the handwheel, the handwheel handle, and the hex socket screws that hold the lead screw in the handwheel. These are all assembled based on the exploded parts diagram in my manual, and I am still having the same issue - instead of boring a hole in a blank of any sort, the handwheel with the lead screw just unscrews. It's like I need something to keep the handwheel from moving backwards, if that makes any sense.
Lgdowell
Member
I have ensured the lead screw is fully screwed into the quill. It is in but any kind of pressure against the quill just unscrews the handwheel instead of boring a hole in to a blank.Do you fully reassemble the tailstock? It almost sounds like the lead screw is fully withdrawn (ie, the ram is fully extended) when you insert the jacobs chuck with the drill bit, so when you rotate the handwheel to drill into wood, you are already at the full extent of its travel.
I think you need to reassemble the tailstock so that the lead screw is fully threaded into the ram before attempting to drill.
The only thing I can think of is you don't have the set screw or screws tight enough in the handle itself.I have ensured the lead screw is fully screwed into the quill. It is in but any kind of pressure against the quill just unscrews the handwheel instead of boring a hole in to a blank.
Here's a diagram of your specific tailstock. Make sure part # 19 is installed. It looks pretty standard to any lathe I've seen.I have ensured the lead screw is fully screwed into the quill. It is in but any kind of pressure against the quill just unscrews the handwheel instead of boring a hole in to a blank.
monophoto
Member
Actually, I think that's basically normal - turning the handwheel in the clockwise direction (viewed from the right end of the lathe), advances the screw to extend the ram to the left (toward the headstock), so if you push the ram in the opposite direction, it will want to spin the handwheel in the counterclockwise direction. And if the ram and screw are lubricated, and if you aren't holding the handwheel, it can just spin on its own.any kind of pressure against the quill just unscrews the handwheel instead of boring a hole in to a blank.
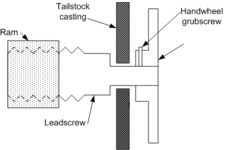
As Ken B said, tailstocks are really simple mechanisms. Here's a cross-sectional sketch of how the components of a typical headstock fit together. The leadscrew is pinned to the handwheel by means of a small grub screw (which typically has a hex socket head). The leadscrew is held in place because the larger diameter is larger than the hole in the tailstock casting, and the handwheel prevents it from moving to the left. Therefore, the leadscrew can rotate but cannot move laterally. At the same time, the ram is attached to the leadscrew by means of the coarse threads which means that it moves laterally; if the ram moves too far to the left, the threads uncouple and it has to be manually pushed back onto the screw, and it can only move to the right until it encounters the tailstock casting at which point it stops. (There is another grub screw that is not shown in this sketch. It is threaded into the side of the tailstock casting and rides in a groove machined into the side of the ram; when that screw is loose, it prevents the ram from rotating. When it is tight, it locks the ram and prevents lateral movement.)
When I'm drilling, I use my right hand to turn the handwheel in a clockwise direction to advance the bit into the wood, and I have my left hand (in a protective glove) on the chuck body to prevent it from spinning freely when I withdraw the bit. I know it's possible to advance the bit by sliding the entire tailstock assembly to the left, but I find that using the handwheel provides better control.
Are you trying to drill by sliding the entire tailstock to the left to advance the bit into the spinning blank? Putting pressure on the ram while not holding the handwheel will cause the handwheel to spin. You can advance the drill bit by sliding the entire tailstock assembly to the left, but if the ram is extended, that will cause the handwheel to spin and the ram to retract back onto the leadscrew, but only until it reaches the end of the threads..
Attachments
Last edited:
WriteON
Member
Consider a Zoom or FaceTime with someone who can walk you through
egnald
Member
Greetings from Nebraska.
I would caution anyone that uses a lubricant (or any material like mold debonders) that contains silicone. Although it is a most wonderful material and lubricant, it has one trait that can be both a benefit or a curse depending on the situation.
Silicone contamination has a negative impact on any processes such as soldering, adhesive bonding, coating, painting, varnishing, and wire bonding. Silicone is known to cause de-wetting of materials from surfaces. The problem isn't just localized to where the lubricant is applied as off-gassing, and residues can (and do) cause migration of the silicone to surrounding surfaces. This is further exacerbated when silicone is applied using an aerosol as atomized particles basically go anywhere.
I have had first hand experience with this which is the reason that anything containing silicone is banished from my shop. In the company I used to work for, one of the processes crucial to the manufacturing our primary product was the application and curing of a coating material a reel-to-reel process. A few years ago we had a mysterious and catastrophic adhesion failure on the production line that lasted for months and cost a fortune in production delays and material scrap. At the end of the line as the material was exiting the curing tunnel oven and was being reeled up, the coating would simply separate and peel away. It was a disaster! After much research and investigation we found that one of the maintenance technicians had lubricated the machine using an aerosol that contained silicone. The silicone migration was causing all of the problems as was ultimately confirmed by our reliability lab using their FTIR equipment.
Ok, I'm off of my soap box. Just be careful what you use in your shop. Sometimes getting a descent finish with CA can be hard enough without interference from some mystery contamination.
Regards,
Dave
monophoto
Member
Underscoring Dave's point - the automotive industry has some real horror stories about entire fleets of new vehicles that had to be destroyed because a silicone leak in the factory contaminated the sheet metal enough to inhibit paint adhesion.Greetings from Nebraska.
I would caution anyone that uses a lubricant (or any material like mold debonders) that contains silicone. Although it is a most wonderful material and lubricant, it has one trait that can be both a benefit or a curse depending on the situation. - - -
Lgdowell
Member
I got a new tailstock from Teknatool and if you can believe it, the same thing happened so I have got to assume it is me but for the life of me, I can't figure out what I am doing wrong. This time, I was drilling an acrylic pen blank with a 7mm bu\it and the handwheel/ lead screw became unscrewed and did not advance the drill bit. Now when I screw it back together, I have an issue with the screw and handwheel coming out the back of the tailstock. It seems to me that there should be something that keeps the handwheel and attached lead screw from coming out the back of the tailstock unless I am missing something.
Any help would be greatly appreciated.
Linda
Any help would be greatly appreciated.
Linda
Attachments

The threaded shaft has to be installed from the left to the right. Is that how you installed it? Also the groove isn't aligned with the set screw. The more I look at it the more I'm convinced you put the threaded shaft in from the wrong side. I can see the collar that should be on the inside right next to your handwheel.
Last edited:
monophoto
Member
Well, one option is to never disassemble the ram assembly again. But that's not a very good idea.
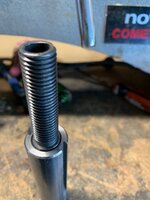
I just disassembled the tailstock of my lathe, and I think I know what is happening. Here's the picture you shared - notice the square bead on the leadscrew that I have enclosed in a red box. That bead is supposed to be inside the tailstock housing - the hole in the housing is sized to allow the shaft of the lead screw to pass through, but when the tailstock is properly assembled, with that bead on the inside and the handwheel on the outside, the lead screw will be trapped to prevent lateral movement - it should only be able to rotate. When that bead is inside the housing, it prevents the lead screw/ram assembly from moving to the right.

So the problem is that you reassembled the tailstock improperly - you inserted the lead screw from the right, and then threaded it into the ram that you inserted from the left. INSTEAD, thread the lead screw partway into the ram, and then put that entire assembly into the tailstock from the left (headstock) end such that the bead is inside the housing.. Then, install the handwheel. Orient the ram so that the groove machined in its side faces the grub screw, and then install the grub screw.
I just disassembled the tailstock of my lathe, and I think I know what is happening. Here's the picture you shared - notice the square bead on the leadscrew that I have enclosed in a red box. That bead is supposed to be inside the tailstock housing - the hole in the housing is sized to allow the shaft of the lead screw to pass through, but when the tailstock is properly assembled, with that bead on the inside and the handwheel on the outside, the lead screw will be trapped to prevent lateral movement - it should only be able to rotate. When that bead is inside the housing, it prevents the lead screw/ram assembly from moving to the right.
So the problem is that you reassembled the tailstock improperly - you inserted the lead screw from the right, and then threaded it into the ram that you inserted from the left. INSTEAD, thread the lead screw partway into the ram, and then put that entire assembly into the tailstock from the left (headstock) end such that the bead is inside the housing.. Then, install the handwheel. Orient the ram so that the groove machined in its side faces the grub screw, and then install the grub screw.
Last edited:
Lgdowell
Member
I threaded the lead screw into the quill and installed both pieces into the tailstock from left to right. I then attached the handwheel, making sure to align the grub screws with the small flat part of the back of the lead screw. The lead screw will only go in one way into the quill, threaded from the back of the quill. The lead screw is too large to be attached to the quill in any other way. It still will come out of the back and unscrew instead of boring a hole forward.
Attachments
Lgdowell
Member
monophoto
Member
For the sake of clarity - there are actually three grub screws in the tailstock ram assembly - two that hold the handwheel in place on the end of the lead screw, and one that prevents the ram from rotating so that rotation of the lead screw within the threads of the ram convert that rotary motion into lateral (in/out) motion. That grub screw can also be used to lock down the ram to prevent it from moving while turning.
The video shows that the groove on the ram is facing the front of the lathe. But the exploded diagram that Ken posted shows that the grub screw that locks the ram is on the back of the tailstock housing.
I suggest measuring the diameter of the hole in the right end of the tailstock, and also the diameter of the bead/collar. I would expect that either the bead/collar is larger than the ID of the hole.
But the video shows that there is a washer between the tailstock and the handwheel. The exploded diagram that Ken posted a while back doesn't show that washer. What is the ID of that washer, and how does that dimension compare with the OD of the collar? I wonder if that washer should be on the insider of the tailstock housing to prevent the collar from passing through the hole in the washer, while the washer prevents lateral movement of the lead screw?
My lathe also has a washer that has been in the same location (between the housing and the handwheel). It also doesn't appear on the exploded parts diagram in the lathe manual. I don't recall where it was when I first got the lathe (i9 years ago), but I just experimented and found that it's possible to move it inside.
So try assembling the ram, lead screw and washer, and then inserting that entire assembly from the left end of the tailstock (the headstock side) with the groove in the ram facing to the back.
Last edited:
monophoto
Member
Agreed - but she has replaced the entire tailstock and still has the same problem. Can't imagine that happening on two tailstocks.Hmmmm, the only way I could see that happening is your tailstock itself is broken, the casting itself
Me either and I don't see anything missing in reference to the exploded view I posted.Agreed - but she has replaced the entire tailstock and still has the same problem. Can't imagine that happening on two tailstocks.
monophoto
Member
Other than the washer.Me either and I don't see anything missing in reference to the exploded view I posted.
I guess I'm not seeing the washer you see.Other than the washer.
monophoto
Member
You're right - there is no washer in the video. There is a washer on my lathe, and I guess I just assumed that there was on on hers. But a washer might solve her problem.I guess I'm not seeing the washer you see.
Lgdowell
Member
I do not have any washer but was also thinking that would solve my problem, something to keep the bead on the lead screw inside the tailstock so it does not come out the back. Just curious how this can happen on 2 different tailstocks - the original one that came with my lathe and the new tailstock they sent to replace that one.You're right - there is no washer in the video. There is a washer on my lathe, and I guess I just assumed that there was on on hers. But a washer might solve her problem.
Can you send me a picture of the washer that was on your lathe so I can get and idea of the size of it?
Thanks a bunch!
Linda
Fred Bruche
Member
I just took apart the tailstock on my 14DR and there is no washer (as opposed to a washer present in my other lathe) to stop the quill. The "ring" at the end of the quill doesn't go through the hole in the tailstock casting. I've had mine for a couple of years, it's possible there was some design change. Not sure which phone number you have for Teknatool but I was in contact then with a very knowledgeable guy named Maurice. I called him a couple of times and had no issues reaching him. I can dig up the phone number if you are interested, let me know and I'll PM it to you.
So...just looking at this picture. Are you feeding the screw in from the BACK end of the tailstock, or the front? If you feed the screw in from the back, then that part circled in red will be on the outside, at the back, of the tailstock. You need to screw it into the ram first (not all the way, enough for the ram to hold the screw), then insert the ram from the front of the tailstock, so that only the smaller diameter shaft sticks out to be attached to the wheel.View attachment 320287
That collar, circled in red, to me, should be on the inside. That's what stops it from doing what you are experiencing.
If you look at her video, you'll see that collar just slips right through.So...just looking at this picture. Are you feeding the screw in from the BACK end of the tailstock, or the front? If you feed the screw in from the back, then that part circled in red will be on the outside, at the back, of the tailstock. You need to screw it into the ram first (not all the way, enough for the ram to hold the screw), then insert the ram from the front of the tailstock, so that only the smaller diameter shaft sticks out to be attached to the wheel.
Ah, I missed that...looked like a photo attachment...If you look at her video, you'll see that collar just slips right through.
So yeah...looking at that, it appears something is wrong with the tailstock itself...
Can you take the wheel off the shaft, and then take a photo directly at the back of the tailstock? With this video, we can see the problem, but not the potential cause. If the screw was screwed into the ram first, then that assembly was inserted into the front of the tailstock, so that only the remainder of the shaft comes out the back to be grubbed into the wheel, then this should not happen. If you started by slipping the screw through the back of the tailstock, then fed the ram in through the front and screwed it in, I can see this happening.I have installed with the bead of the lead screw inside the tailstock assembly, but as soon as I attach the handwheel and grub screws (all lined up with the flat part of the lead screw), the beading part will still come out the back of the tailstock.
If you DID assemble the ram and the screw first, and feed it in from the front, then there should be some clear evidence of the cause of the problem in the tailstock itself, looking at it from the back with the crank wheel removed. If it was damaged by say a drop or something, and the casting broke, it should be pretty evident that it broke I would think...and the hole that the shaft on the back of the screw is supposed to fit through would probably be larger than it should be, and likely misshapen.
monophoto
Member
Linda
Were you able to drill when you first got the lathe, and this is a new problem that has developed since? Or is this an issue that you have had ever since you got the lathe?
Also, when you took the tailstock apart the first time, was there a washer somewhere in the washer/quill assembly?
I think we have arrived at a consensus that the collar is supposed to prevent the lead screw from moving laterally. But the fact that it does suggests that either there is a problem (design flaw or damage) to the tailstock casting that results in the opening being so large that the collar passes through, or else a something (like a washer) is missing.
Lgdowell
Member
There was no washer in either the first tailstock they sent or the replacement. And yes, I was able to use for a while before the problem started happening. With the first lathe that I received in April of this year, it worked for several months before I started having the problem, which was around August. Then when they sent me the new tailstock, it happened after only 3 weeks.
monophoto
Member
OKThere was no washer in either the first tailstock they sent or the replacement. And yes, I was able to use for a while before the problem started happening. With the first lathe that I received in April of this year, it worked for several months before I started having the problem, which was around August. Then when they sent me the new tailstock, it happened after only 3 weeks.
But to be clear, you only had difficulties after you had disassembled the tailstock. Before that, the lathe worked properly.
Specifically, were you able to mount a blank and turn between centers.?
monophoto
Member
LindaThere was no washer in either the first tailstock they sent or the replacement. And yes, I was able to use for a while before the problem started happening. With the first lathe that I received in April of this year, it worked for several months before I started having the problem, which was around August. Then when they sent me the new tailstock, it happened after only 3 weeks.
Here is a photo of the leadscrew and ram from my tailstock.
While my lathe is a different brand than yours, cynics among us might speculate that all lathes of this general size are made in the same factory in China so there are similarities. That said, the dimensions for mine are:
Leadscrew shaft: 15mm
Leadscrew collar OD: 17.6mm
Hole in the tailstock housing: 15.5mm
Washer - ID: 15.5mm
- OD: 27mm
As I mentioned, that washer came with the lathe but it does not appear on the exploded parts diagram in the manual that came with the lathe. I chose to put it between the collar on the leadscrew and the side of the tailstock housing. The alternative position would be between the tailstock housing and the handwheel. My concern was that if the washer is between the housing and the handwheel, there is only a very small bearing surface between the collar and the housing (the difference between the ID of the hole and the OD of the collar, or about 1mm around the hold). Putting the washer between the collar and the housing makes sense to me because it spreads the stress on the tailstock casting over a much larger area. The housing is cast iron which can be brittle, so minimizing small areas of high stress makes sense to me.
Last edited:
Signed-In Members Don't See This Ad
Lgdowell
Member
No, the problems with the first lathe began with the hand wheel and lead screw becoming unscrewed instead of boring a hole in a piece of soft padauk wood. I took the tailstock apart as a way for me to understand the part and how it was supposed to work. This was the very first issue I had with the lathe after using it fur about 4 months. Before that point, no issues.OK
But to be clear, you only had difficulties after you had disassembled the tailstock. Before that, the lathe worked properly.
Specifically, were you able to mount a blank and turn between centers.?