Strike TWO, you're OUT!

Signed-In Members Don't See This Ad

amtechrs

Member
Joined
Feb 6, 2024
Messages
107
Location
Yoncalla, OR
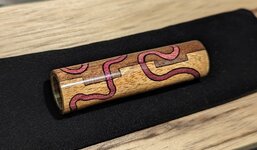
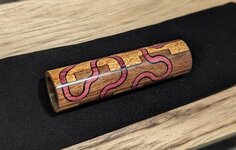
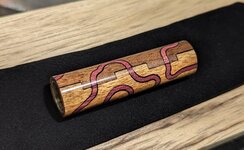
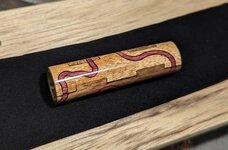
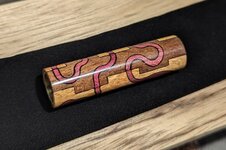
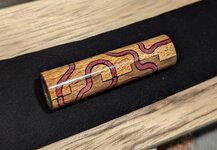
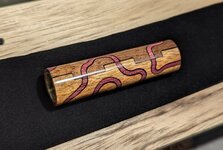
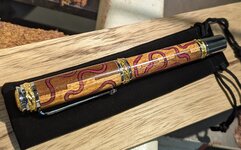
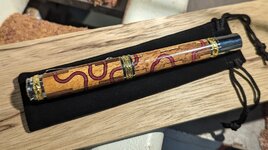
Well, this last attempt at the squiggle idea didn't turn out so good. Not ashamed of posting my failures! I think with so many segments that broke out of the edge of the panels, the result was some of the inside pieces fit looser than others. So, glue lines are inconsistent. I also probably should have chosen even more contrasting panel woods. I already glued up the upper blank as well (this one is the lower), just waiting on a tube for it, so I'll build it, and just use it as a pen to keep in my truck, or something.... Anyway, onward! Another photo dump, just to show the flaws all around...
 

Attachments

  • PXL_20240215_225244532.jpg
    PXL_20240215_225244532.jpg
    246.5 KB · Views: 93
  • PXL_20240215_225255630.jpg
    PXL_20240215_225255630.jpg
    299 KB · Views: 85
  • PXL_20240215_225307495.jpg
    PXL_20240215_225307495.jpg
    276.9 KB · Views: 85
  • PXL_20240215_225345162.jpg
    PXL_20240215_225345162.jpg
    269.2 KB · Views: 81
  • PXL_20240215_225359399.jpg
    PXL_20240215_225359399.jpg
    294.2 KB · Views: 82
  • PXL_20240215_225415779.jpg
    PXL_20240215_225415779.jpg
    293.5 KB · Views: 76
  • PXL_20240215_225438937.jpg
    PXL_20240215_225438937.jpg
    292.5 KB · Views: 89
Signed-In Members Don't See This Ad
Well, this last attempt at the squiggle idea didn't turn out so good. Not ashamed of posting my failures! I think with so many segments that broke out of the edge of the panels, the result was some of the inside pieces fit looser than others. So, glue lines are inconsistent. I also probably should have chosen even more contrasting panel woods. I already glued up the upper blank as well (this one is the lower), just waiting on a tube for it, so I'll build it, and just use it as a pen to keep in my truck, or something.... Anyway, onward! Another photo dump, just to show the flaws all around...
I don't see any problems with the blank above?..
 
I have looked several times at the pictures and I do not see an issue. Your segment lines look well placed, the lines are aligned, the glue lines that appear as black are typical for CA or epoxy, so no issue. I really like the result... not sure where your critique is coming from - all looks fine to me. Be well, Mark.
 
I understand what you're saying—the black lines are of varying thickness particularly around the intersection of square edges.
It's still very, very well done.
Does the varying width mean the glue is filling a gap or is it something else?
 
I understand what you're saying—the black lines are of varying thickness particularly around the intersection of square edges.
It's still very, very well done.
Does the varying width mean the glue is filling a gap or is it something else?
The black lines are entirely from the CA filling the laser kerf slot, the variations are due to a looser fit in some locations. I'd need to clamp better all around while gluing up..
 
I believe that I speak for most of us when I say this. "Failure" means that the end result is not what we envisioned. A true failure is something that you didn't learn something from.

What you have done is remarkable. The slight variance is the result of being handmade. Even when using a laser to cut, there will be a handmade element. Besides, what I call plan B products are often better than my original plan. Have you considered filling the grooves with resin or poly clay?
 
Sorry, Richard, but I have to agree with the others on this pen. If only my failures looked as good as this one! You say you'll carry yours in the truck. The only truck my failures see is the trash truck. I like your continuing experimentation, and this one looks fine. I think the suggestion about using polymer clay to fill the grooves would be worth looking into, maybe even the squiggly line. Looking forward to the next one.
 
Boy, thank you all for nice words and encouragement. I certainly did learn from this one. Yes, I want to try using crushed opal to fill the squiggle, and have some coming! I need to do some research now and learn how to use/apply that. Can you turn that media with lathe tools? Will probably set it with CA, maybe black?
 
I agree with the others, that while the lines are inconsistent, the squiggle pen still looks sharp overall. Perhaps this worm pattern is not the one best suited for your new technique? There are other patterns that might present better. If you continue with the squiggle, consider making the worm out of black wood (or dyed black wood), which matches the glue and therefore disappears it. 🪄

Would you consider going beyond geometrics. Maybe a little picture on two sides would be popular? Someone's name? Maybe rather than jigsawing different color woods, the lazer cuts a line drawing, which fills with ca. Maybe the lazer cuts circles, the size of aluminum rod which glues in there. A complicated pattern of squares could fill with material you could easily cut on a table saw.

Man I wish I had a lazer now. 😀
Hi Todd,

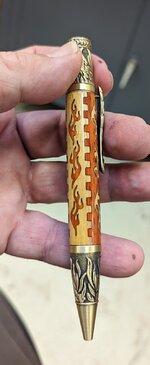
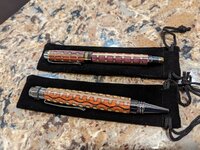
Thank you. Here are pics of some earlier experiments, which hit on some of your ideas. I like your other ideas too! The photo with two pens are six and eight segment or sided 'box/blanks'. Therefore, the box joints are angled instead of square to eachother, and the gaps are filled with black CA. The wavy line was just the laser-cut kerf also filled with the CA. I wasn't crazy about those. The Phoenix pen, I cut some little flames into.
 

Attachments

  • PXL_20240204_224907515.jpg
    PXL_20240204_224907515.jpg
    136.2 KB · Views: 52
  • PXL_20240210_160233127.jpg
    PXL_20240210_160233127.jpg
    385.7 KB · Views: 46
Hey Richard,

I don't want to redundant, but I am going to echo what everyone else is saying.....Great work!! I see the inconsistencies you pointed out and I want to also echo Todd's (socerertd) sentiment the failure is sometimes the result of an unexpected end result. Your work and skill set is quickly growing into what I would call a high level expertise focused on perfection. Keep at it!!

One thing I think is important to keep in mind (for all of us pen makers) is the work we do is hand-crafted work which many times results in slight imperfections or deviations from the outcome we are striving for. These deviations are what makes each piece unique and standout. With this in mind I looked at your photos again. The crispness of the squiggle lines really stands out from the background. The deviations (or in this case the inconsistencies may actually be complimenting the focal point of the designs which is the squiggle design.

Excellent work!!
 
Once again, thank you all for the nice comments and wonderful encouragement and support! I hope you guys don't get tired of me and my antics!
 
I went ahead and finished this pen up today. It's grown on me a bit. The Majestic is the only kit I had on hand.
 

Attachments

  • PXL_20240219_210608087.jpg
    PXL_20240219_210608087.jpg
    301 KB · Views: 54
  • PXL_20240219_210731197.jpg
    PXL_20240219_210731197.jpg
    268.2 KB · Views: 42
Back
Top Bottom