Stabilizing old barn wood blanks

Signed-In Members Don't See This Ad

widwotkma

Member
Joined
Feb 2, 2020
Messages
4
Location
Plano, TX
I have been asked to make pens from a piece of white oak salvaged from a 150+ year old barn. The wood is very hard and very dry, not punky. I cut the piece of wood into 8 pen blanks, but as you can see in the attached picture, each piece has numerous checks and cracks that need to be stabilized before turning.
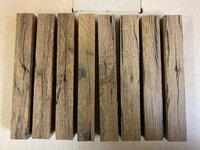
IMG_2599.jpg

What is the best method to stabilize them? From what I understand, stabilization under a vacuum with Cactus Juice is more for use in punky wood and not as a void filler. So I think I'm looking at a pressure-based process using epoxy or some other type of filler. Is that correct? I am new to the whole stabilization process and want to make sure I don't ruin the blanks, which have sentimental value to the requester. Suggestions?
 
Signed-In Members Don't See This Ad

Monty

Group Buy Coordinator
Joined
Mar 4, 2005
Messages
8,358
Location
Pearland, Texas, USA.
You can use just thin CA to fill the voids or even sand some of the wood, fill the voids with the sanding dust and then use thin CA to glue the dust in place.
 

MRDucks2

Member
Joined
Jul 17, 2017
Messages
3,227
Location
Bristow, IN
Having turned a lot of old barn wood, I agree with Monty. That wood should turn pretty well with sharp tools and a light touch around the cracks and checks, especially if filled with CA.

With the wood being relatively solid over all, you may find that pressure casting will not get resin everywhere you need it. Should you choose to go that route, I would recommend turning round and close to size before casting in order to get more resin where you need it for the finished product.
 

RKB

Member
Joined
Mar 17, 2014
Messages
731
Location
Apollo, PA
Wow, those blanks look great. Be sure to post pictures of the finished product.. Good Luck with your project.

Rod
 

RobS

Member
Joined
Jun 20, 2016
Messages
1,037
Location
Carlsbad, CA
Those cracks are too big for stabilizing, either A go the CA thin-medium-thick route to fill or pressure cast with alumilite to fill the cracks.
 

greenacres2

Member
Joined
May 2, 2017
Messages
1,690
Location
Northwest IN
You might also consider painting the brass tubes as well so that if (WHEN!!) there are voids near the center there's a darker background that the shiny brass if you fill with clear CA. When i paint tubes, i normally use epoxy to glue them in so that there's no interaction between paint and CA.
earl
 

widwotkma

Member
Joined
Feb 2, 2020
Messages
4
Location
Plano, TX
Coffee grounds... would have never thought of that, but I like the idea. I think the person that gave me the blanks tried using some colored epoxy on the outside of the original board (it was a little proud of 2x2x12 to start with), but there were bubbles in it and it didn't fill any of the internal voids.

I'll admit, I'm a bit nervous about using CA, but maybe it's because I've used it wrong in the past. My experience has been that it soaks into the wood and discolors it a bit, making it difficult to conceal where the fix was. Granted, this was on a larger piece (bowl) but has anyone else experienced that?

I had not thought about painting the tubes; will consider that if the filler I use is not colored dark. If I do, I'll use epoxy to glue in the tube to avoid an issue with the paint. Just curious, has anyone used a black Sharpie to darken the tube instead of using paint, and if so, did it work?
 
Last edited:

greenacres2

Member
Joined
May 2, 2017
Messages
1,690
Location
Northwest IN
Black Sharpie did not work for me with CA--only tried it once though!!

I have used coffee and tea grounds (fresh and dry, and NOT instant!!) with success. I have a baggie of tea that i've ground into a powder, nice shade of light brown. I also use powdered copper, lapis and turquoise often, sometimes aluminum. Not shavings, but powder. I turn close-ish to done, stop to gently pile the powder in--press a bit, then get a little more stacked above. Then i flood with Super Thin CA (have had good success with Bob Smith Industries Insta-cure for this). the super thin carries the powder to cracks i didn't know existed. Let it cure well without an accelerator (to avoid bubbling). Then turn. Doesn't "hide" the cracks--it "celebrates" them. The coffee, tea and powdered woods don't travel as well on the CA, so i've gone to the powders almost exclusively--unless i absolutely know where the crack ends and that i can get it filled.
Hope this helps.
earl
 

KLJ

Member
Joined
Oct 2, 2018
Messages
411
Location
Flat Rock North Carolina
Like Earl said I usually turn them to almost finished dimensions before filling cracks or holes. If I was concerned about them holding together while drilling and turning I would put CA in them to start. I have also on soft and fragile blanks put thin CA in the hole before gluing in the brass. I don't have stabilizing equipment is why I do that but it has worked well so far. Those blanks look like they should turn well as they are.
 

robutacion

Member
Joined
Aug 6, 2009
Messages
6,514
Location
Australia - SA Adelaide Hills
Great suggestions so far but before I would fill the cracks with "anything" I would talk to the wood owner and explain the various possibilities for filling those cracks. He may prefer a contrast than a blend or vice versa, sometimes stone powders are a great solution, particularly Turquoise but not only, another good contrasting material is gold powder (artificial) unless you've got plenty of the real thing...! ;)

The ground coffee beans trick is a very old one, I can't remember where I got it from but was many decades ago...!

If you are too concern about using the gouges to turn then for the risk of a catch and a blow-up, use the "Flap disc" system with a lathe at less than 1,000 RPM you will be surprised of the speed and how well it turns "difficult/fragile" blanks.

Best of luck,

Cheers
George
 

widwotkma

Member
Joined
Feb 2, 2020
Messages
4
Location
Plano, TX
"Flap disc" system
@robutacion You read my mind.... I'm definitely concerned about catching a crack and blowing up the blanks. I had never heard of or thought of using a flap disc with a lathe, but that is absolutely brilliant, especially since I already have an angle grinder and a low-grit flap disk I can use! :)
 

robutacion

Member
Joined
Aug 6, 2009
Messages
6,514
Location
Australia - SA Adelaide Hills
@robutacion You read my mind.... I'm definitely concerned about catching a crack and blowing up the blanks. I had never heard of or thought of using a flap disc with a lathe, but that is absolutely brilliant, especially since I already have an angle grinder and a low-grit flap disk I can use! :)
G'day Chris,

You are not the first one to be surprised by the idea, you will be even more surprised when you find out how well it works. I'm not sure if you have read my thread about this system, seeing it explains a lot, if you haven't seen it yet I suggest you have a look.

Cheers
George
 

widwotkma

Member
Joined
Feb 2, 2020
Messages
4
Location
Plano, TX
G'day Chris,

You are not the first one to be surprised by the idea, you will be even more surprised when you find out how well it works. I'm not sure if you have read my thread about this system, seeing it explains a lot, if you haven't seen it yet I suggest you have a look.

Cheers
George
Great post, George. Thanks for the link.
 
Top Bottom