
Glenn McCullough
Member
I posted a square bowl the other day and was asked to do a tutorial, its really quite easy...like doing half a bowl.
Heres the steps:
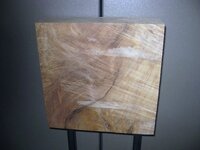
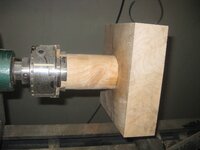
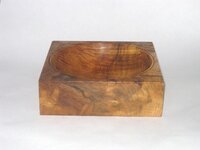
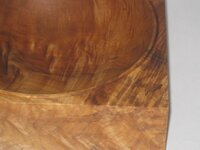
finish your blank entirely (here I used a stunning, figured maple blank from Landfill Lumber) It is 7"X7"x2.25". You'll have to do some clean up later, but its alot easier.
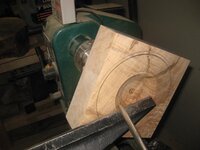
I ran it through my planer, in the first photo you'll see some rough areas that had to be cleaned up.
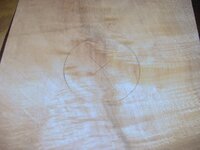
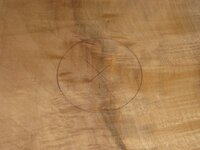
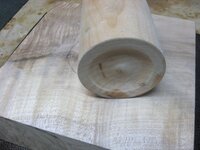
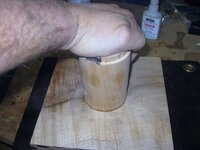
Next you make a glue block from a good strong wood like maple or cherry, I used maple. remove a bit from the center leaving a flat about 1/4" on the outside and a little nib in the center to measure your diameter. treansfer that to the blank with a compass after you've marked the center, see photos 3,4. place medium CA at the inside edge of the circle on the blank. You only need some at 12, 3, 6 and 9 oclock, not all the way around. Spray some excellerator on the glue block, center in circle and press. Hold it for a minite or two, Spray accellerator on the squeeze out so it doesnt spray you while turning (see phots 5,6).
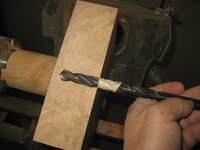
Mark your position on your chuck in case your blank comes off, like mine did. Also draw a outside finish line and a extra ring line(if desired). Drill a hole for depth (photo 7) and to start your turning, when you get to the bottom of the hole, you almost done.
Turn at 900rpm, that worked for me for the whole project. you should get to the bottom of the hole about the same time you get to the outside of the rim. I used a 3/4 long shoulder bowl gouge and finished with a round scraper. I used 60,80, 120, 220 sandig discs while on the lathe, with it turned off. The disc sanding attachment and my drill made the bowl spin as it sanded. I enhanced the grain with danish teak oil and will finish it with wipe on poly after that dries.
Hope this makes sense and is useful.
Heres the steps:
finish your blank entirely (here I used a stunning, figured maple blank from Landfill Lumber) It is 7"X7"x2.25". You'll have to do some clean up later, but its alot easier.
I ran it through my planer, in the first photo you'll see some rough areas that had to be cleaned up.
Next you make a glue block from a good strong wood like maple or cherry, I used maple. remove a bit from the center leaving a flat about 1/4" on the outside and a little nib in the center to measure your diameter. treansfer that to the blank with a compass after you've marked the center, see photos 3,4. place medium CA at the inside edge of the circle on the blank. You only need some at 12, 3, 6 and 9 oclock, not all the way around. Spray some excellerator on the glue block, center in circle and press. Hold it for a minite or two, Spray accellerator on the squeeze out so it doesnt spray you while turning (see phots 5,6).
Mark your position on your chuck in case your blank comes off, like mine did. Also draw a outside finish line and a extra ring line(if desired). Drill a hole for depth (photo 7) and to start your turning, when you get to the bottom of the hole, you almost done.
Turn at 900rpm, that worked for me for the whole project. you should get to the bottom of the hole about the same time you get to the outside of the rim. I used a 3/4 long shoulder bowl gouge and finished with a round scraper. I used 60,80, 120, 220 sandig discs while on the lathe, with it turned off. The disc sanding attachment and my drill made the bowl spin as it sanded. I enhanced the grain with danish teak oil and will finish it with wipe on poly after that dries.
Hope this makes sense and is useful.
Attachments
-
 IMG_1195.JPG76.3 KB · Views: 153
 -
 IMG_1196.JPG75.1 KB · Views: 139
 -
 IMG_1197.JPG77.9 KB · Views: 131
 -
 IMG_1198.JPG77 KB · Views: 177
 -
 IMG_1199.JPG76.6 KB · Views: 153
 -
 IMG_1200.JPG62.5 KB · Views: 170
 -
 IMG_1201.JPG62.1 KB · Views: 151
 -
 IMG_1205.JPG72.2 KB · Views: 185
 -
 IMG_1209.JPG53.4 KB · Views: 175
 -
 IMG_1211.JPG58.3 KB · Views: 174