monophoto
Member
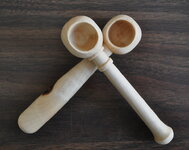
Last month, I saw some turned spoons at a show in Northville, NY, and decided to see if I could create something similar.
The basic design is a two-axis turning - starting out as a spindle with a 'bump', and then remounted in a donut chuck to hollow the bump. Mike Peace has a great video in which he demonstrates how to make these, and also shows how to make the donut chuck. Mike's spoons are basically coffee scoops with a 1.5" body, but you can rescale the design either up or design.
Mine are made from maple and have a 1" body. The handles are about 5" long - the only restriction is that the handle can't be longer than the swing of your lathe (unless you can shift or twist the headstock to avoid swing limitations).
I prefer the design with the thin handle. The spoon with the heavy handle was made from a blank with a bark inclusion that I had reinforced with CA, but I wasn't confident that the patch would be strong enough to make a thin handle.
Don't know how practical these are, but they are fun to make.