Smitty's Clicker kit instructions

Signed-In Members Don't See This Ad

knowltoh

Member
Joined
Aug 16, 2008
Messages
423
Location
Alpena, MI 49707
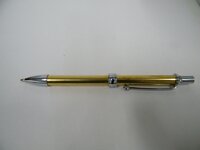
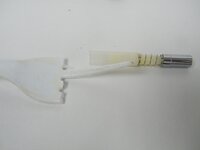
I found a few of these kits and am having some trouble with assembly.
Does anyone have a copy of the assembly instructions. The kit is one that Smitty was considering for his store and I bought 10 kits back in 2012 I believe. I have no assembly instructions and am having trouble figuring it out.

Any help would be appreciated.

Thanks,

Herb

knowltoh@gmail.com
 
Signed-In Members Don't See This Ad

ed4copies

Local Chapter Manager
Joined
Mar 25, 2005
Messages
24,523
Location
Racine, WI, USA.
SPW click assembly instructions

SPW click assembly is remarkably durable, once it is correctly assembled and secured to the outside cap piece. Here are the instructions:


Link does not work for me, tried twice--please let me know if it works for you. Otherwise, the video is short.
 

Attachments

  • Click Assy for SPW click pens.pdf
    443.2 KB · Views: 163
Last edited:

knowltoh

Member
Joined
Aug 16, 2008
Messages
423
Location
Alpena, MI 49707
I followed the you tube link and the plastic part the red mark goes on doesn't fit into the plunger holder part of the kit. It will fit in the pen kit 8mm tube but will only rest on the plunger holder. I hope that makes sense.
Thanks,
Herb
 

ed4copies

Local Chapter Manager
Joined
Mar 25, 2005
Messages
24,523
Location
Racine, WI, USA.
HI Herb,


What kit are you trying to make? Perhaps a picture of the kit or the item's label information, so I can find one that matches it.


Thanks,
Ed
 

knowltoh

Member
Joined
Aug 16, 2008
Messages
423
Location
Alpena, MI 49707
Thanks to all that responded to my post. I sent a kit to The Ed at ExoticBlanks for him to look at. I'll post the results of his opinion of the kit. It is a 2 piece pen with 8 mm tubes.
Herb
 

ed4copies

Local Chapter Manager
Joined
Mar 25, 2005
Messages
24,523
Location
Racine, WI, USA.
I received the pen in today's mail.


Wanna get a fish, or learn HOW to fish?


Here's the completed pen (didn't make an outside, just put the parts together)


attachment.php
refill retracted


attachment.php

refill extended
 

Attachments

  • SPW click early (10).jpg
    SPW click early (10).jpg
    94.6 KB · Views: 200
  • SPW click early (11).jpg
    SPW click early (11).jpg
    113.8 KB · Views: 210

ed4copies

Local Chapter Manager
Joined
Mar 25, 2005
Messages
24,523
Location
Racine, WI, USA.
Begin by taking the parts out and lining them up as they would be, in the pen.


attachment.php


Since the click mech is the tricky part, assemble it.


attachment.php


The "modified plastic fork" is the tool I used to hold the click mech in
position as I installed the spring and screwed on the chrome plunger.


Testing this assembly, it will only fit in the tube, by inserting the plunger end first. So, I installed the clip and chrome piece with the hole for the
plunger, then pushed the white assembly into the lower end of the brass tube. When I inserted the centerband piece, that piece pushed the plunger assembly up into the brass tube, positioning it where it was supposed to be. REMEMBER NOT TO PUSH on the plunger while assembling!!! Use a piece of wood with a hole in it to allow the plunger to be inserted without resistance.


The rest of the pen is straightforward--put the parts where they were laid out.


When testing the click, it did not retract all the way into the pen. I stretched the spring that is on the refill and solved that problem. As the pics above show, the pen now retracts fully and extends to a nice length.


If you have questions, feel free to ask.


Ed
 

Attachments

  • SPW click early (1).jpg
    SPW click early (1).jpg
    96.3 KB · Views: 167
  • SPW click early (9).jpg
    SPW click early (9).jpg
    100.6 KB · Views: 188
  • SPW click early (8).jpg
    SPW click early (8).jpg
    99.5 KB · Views: 102
Top Bottom