
Rich L
Member
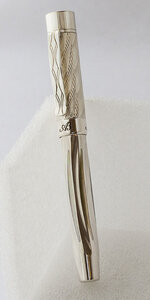
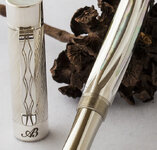
Here's another exercise in pearl inlays using EDM for making the holes. There are six long skinny inlays around the barrel bounded by grooves made by mounting the barrel in a custom fixture on a rotary table and running a 1/2" ball end mill across the surface. The grooves are about .020 deep into the .040 wall. Hope you can visualize that. The holes for the inlays are through the wall.
The inlay shapes were made on a pantograph using the same 2:1 pattern as was for machining the electrode. If anyone would like more detail about the general process, that can be found in the "All Squared Up" thread I posted several months ago. I'd also be happy to post additional info on this one if anyone wants.
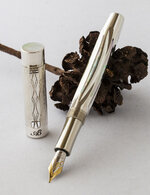
The inlays were placed, glued, and then the entire barrel was filled with epoxy to give it some backing. Of course most of it was drilled out so there's room for a filler! There are circular pearl inlays in the top of the finial and in the bottom of the barrel.
The cap is traditional guilloché using an unusually shifting pattern I've not seen anywhere before. It's meant to complement and continue the "wave" barrel inlay pattern.
I'm not likely to do this one again as it was very difficult. Making those long holes in the barrel added a temporary fragility to the barrel that was uncomfortable to work with, however, once I got the epoxy in there, that was solved. Also, finishing the pearl surfaces so they are flush with the barrel surface was challenging because of their length. You cannot easily feel any transition from pearl surface to barrel surface. The dark line you see in the pictures is some artifact of lighting, the translucency of the pearl and the color of the side wall of the pocket. The EDM process leaves a dark surface that I can wipe out to some degree but I do not even try to remove any more than that because it would be too delicate and I'd risk messing up the precise fit. Polishing out the ball end mill tool marks was an effort as well while trying to maintain the sharp edge between the top of the groove and the main barrel surface. I had to use a polishing stick slightly less than 1/2" diameter to stay in the groove and not touch the edges. PITA.
Keeping grooves and inlays evenly spaced was another - but it came out OK.
The pattern in the clip is done with the same pattern bars as used for the cap engraving.
I'm going to continue this basic design shape until I run out of the silver tube I have for it and that's about 20 more pens, or so. I'm thinking about a larger silver pen design in the meantime.
Cheers,
Rich
The inlay shapes were made on a pantograph using the same 2:1 pattern as was for machining the electrode. If anyone would like more detail about the general process, that can be found in the "All Squared Up" thread I posted several months ago. I'd also be happy to post additional info on this one if anyone wants.
The inlays were placed, glued, and then the entire barrel was filled with epoxy to give it some backing. Of course most of it was drilled out so there's room for a filler! There are circular pearl inlays in the top of the finial and in the bottom of the barrel.
The cap is traditional guilloché using an unusually shifting pattern I've not seen anywhere before. It's meant to complement and continue the "wave" barrel inlay pattern.
I'm not likely to do this one again as it was very difficult. Making those long holes in the barrel added a temporary fragility to the barrel that was uncomfortable to work with, however, once I got the epoxy in there, that was solved. Also, finishing the pearl surfaces so they are flush with the barrel surface was challenging because of their length. You cannot easily feel any transition from pearl surface to barrel surface. The dark line you see in the pictures is some artifact of lighting, the translucency of the pearl and the color of the side wall of the pocket. The EDM process leaves a dark surface that I can wipe out to some degree but I do not even try to remove any more than that because it would be too delicate and I'd risk messing up the precise fit. Polishing out the ball end mill tool marks was an effort as well while trying to maintain the sharp edge between the top of the groove and the main barrel surface. I had to use a polishing stick slightly less than 1/2" diameter to stay in the groove and not touch the edges. PITA.
Keeping grooves and inlays evenly spaced was another - but it came out OK.
The pattern in the clip is done with the same pattern bars as used for the cap engraving.
I'm going to continue this basic design shape until I run out of the silver tube I have for it and that's about 20 more pens, or so. I'm thinking about a larger silver pen design in the meantime.
Cheers,
Rich
Attachments
Last edited:

