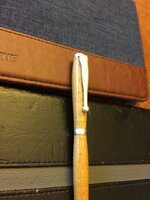
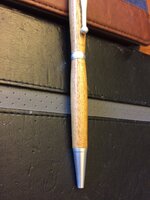
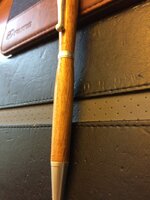
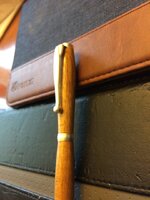
Slimline wrapped in Teak

Signed-In Members Don't See This Ad
See more from thomgarner

thomgarner

Member
Joined
Jun 13, 2019
Messages
136
Location
Boerne, TX
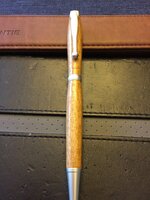
This is the latest pen, just assembled. It is a Slimline wrapped in Teak. It was easy to turn and finished with Pens Plus with top coat of wax. I am really enjoying this new hobby. I need to do another style but I have more of these kits than any other. Many of my friends want slim pens and these fit the bill.

812E043E-5AAF-47E2-93FE-BCADED21C029.jpegE240056A-1D8E-4A3E-B9DA-EAE2F719C9B5.jpegB0A75DBC-BAB9-42FA-96EB-F79ADBF981BF.jpeg8888248C-055A-46CC-B718-29042570D667.jpegD0A6F79F-FFBA-4BEB-AF31-2FBD40755BC8.jpegI
 
Signed-In Members Don't See This Ad

mark james

IAP Collection, Curator
Joined
Sep 6, 2012
Messages
12,745
Location
Medina, Ohio
Slims are just fine. Consider doing some modifications. Fairly easy, and they are fun to do, add just a few steps and about 10 minutes.

Oh, I also love Teak, just beats up my HSS - silicia in the wood. But that is just an excuse to get better at sharpening.
IMG_3340.jpg
 
Joined
Dec 22, 2017
Messages
3,053
Location
Wolf Creek Montana
Nice pen! Nothing wrong with a slim line. I know some people that make only that style and do well with it. The other style that seems to do well for me is the trim line and comfort. A bit heavier but still a nice pen. Congratulation on this pen, it's very nice.
 

turncrazy43

Member
Joined
Apr 22, 2012
Messages
1,104
Location
Marietta, GA
Real nice job Tom. Thank you for sharing. Keep up the god work. The slim line is a very good pen style that is very reasonably priced. Military and police folks like the style as it will fit into their uniform pockets easily. The larger pen styles will not IE Sierra and bolt action.
Turncrazy43
 

mark james

IAP Collection, Curator
Joined
Sep 6, 2012
Messages
12,745
Location
Medina, Ohio
Hi Thom, I didn't mean to detract from your fine pen. There are many examples of modifications of slims. Yes, I simply dill a 7mm hole in a scrap that is about 1/2" thick, part the initial upper slim blank down to the tube (about 1/4" now exposed), and glue the scrap on the end. Now you have 1/4" with no tube in. Turn the lower blank to whatever profile you want, then measure the end that will meet the upper blank (OD), and drill out that 1/4" overlap to allow the lower section to go into the upper section.

Don Ward wrote an entire book on how to do modified slims. This is certainly not my idea.

Once you get the hang of the centerbands, continue and do some closed ends, with different simple segments.

My point is, your slims are great kits - Have fun!
 

Attachments

  • IMG_0307.jpg
    IMG_0307.jpg
    147.5 KB · Views: 123
Top Bottom