Slimline Purple Heart pen

Signed-In Members Don't See This Ad
See more from bg15

bg15

Member
Joined
May 9, 2021
Messages
57
Location
Croatia, Varazdin
Hey guys,

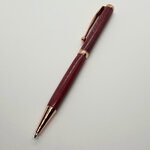
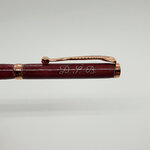
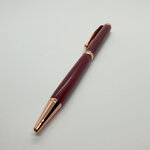
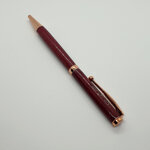
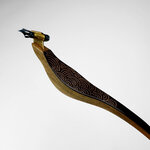
here is the third pen I made. It`s slimline with Purpleheart and silver wire inlaid initials.
I did this without bushings, that`s why my finish came out bad on the blank ends (CA finish).
In the meantime, I made HDPE bushings for my Large jr Gentlemen fountain pen. I will show that one in the next thread.
Every and any advice is very appreciated...

Thanks for watching
 

Attachments

  • 02 - 1.jpg
    02 - 1.jpg
    175.2 KB · Views: 194
  • 02 - 2.jpg
    02 - 2.jpg
    146.4 KB · Views: 193
  • 02 - 3.jpg
    02 - 3.jpg
    139.8 KB · Views: 188
  • 02 - 4.jpg
    02 - 4.jpg
    133.6 KB · Views: 180
  • 02 - 5.jpg
    02 - 5.jpg
    160.9 KB · Views: 196
Signed-In Members Don't See This Ad

leehljp

Member Liaison
Joined
Feb 6, 2005
Messages
9,331
Location
Tunica, Mississippi,
Wow, I love the inlay. Wish I had that kind of skill.

"Without bushings" - that usually, (with experience) results in better fit and finish.
IS there any CA inside the tubes?
Is the light portions on the ends the result of CA sanded off? Or CA that has lifted up off the wood? "CA lifted up" on the ends is what it looks like to me. That is caused by CA inside the tube OR pressing too hard or off center when pressing parts together. And one last possibility - if you had CA on the ends and the ends were not sanded flush with the tube, the CA was crushed and pushed back, lifting it off of the wood on the ends.

I wish I could do that kind of inlay. Excellent!
 

eteska

Member
Joined
Oct 29, 2019
Messages
261
Location
Wisconsin
That inlay is amazing? Can you share your process?

I have had issues with ca on the ends of my barrels from time to time. Both when using the metal bushings and with the non stick. I have had better luck since switching to turn between center. The 60 degree cones do not bump up against the edge. I feel like I am getting better coverage to the edge.
 

bg15

Member
Joined
May 9, 2021
Messages
57
Location
Croatia, Varazdin
Wow, I love the inlay. Wish I had that kind of skill.

"Without bushings" - that usually, (with experience) results in better fit and finish.
IS there any CA inside the tubes?
Is the light portions on the ends the result of CA sanded off? Or CA that has lifted up off the wood? "CA lifted up" on the ends is what it looks like to me. That is caused by CA inside the tube OR pressing too hard or off center when pressing parts together. And one last possibility - if you had CA on the ends and the ends were not sanded flush with the tube, the CA was crushed and pushed back, lifting it off of the wood on the ends.

I wish I could do that kind of inlay. Excellent!
Thanks Lee,

yes, the CA got lifted from the wood when I was taking the blanks of the mandrel. I didn`t have the right bushings.
Well, the good thing is that I know now how to fix the problem in the future. Thanks for your input Lee.
 

bg15

Member
Joined
May 9, 2021
Messages
57
Location
Croatia, Varazdin
That inlay is amazing? Can you share your process?

I have had issues with ca on the ends of my barrels from time to time. Both when using the metal bushings and with the non stick. I have had better luck since switching to turn between center. The 60 degree cones do not bump up against the edge. I feel like I am getting better coverage to the edge.
Thanks!

I made a fountain pen after this slimline, and I used HDPE bushings. That solved the problem because bushings didn`t bump up against the edges, just like you said.

The wire inlay process is more-less the same as the guys on youtube do it. You take the wire and flatten it with the hammer. Draw the design on the wood, and then make the grooves following those lines. Here I use a slightly reshaped small screwdriver. I just push the screwdriver into the wood with the strength of the fingers. After that, you take the wire and push it gently into the grooves using a standard small screwdriver (like the ones that watchmakers use). After that, you lightly sand until the wire is flush with the wood.
The magic is in the force you use for making the grooves and pushing the wire. We are talking 0.15mm wire thickness here. the grooves have to be the same depth all around. If they are deeper on some parts, the wire will be swallowed by the wood and stay hidden.
If you make some parts too shallow, you will rip the wire out with the sanding paper.
The technique requires a lot of practice and in some woods, it is nearly impossible to do it. For instance, ebony (see the picture attached)
 

Attachments

  • Pen holder OCE21 - 2.jpg
    Pen holder OCE21 - 2.jpg
    194.5 KB · Views: 126

sorcerertd

Member
Joined
Sep 30, 2019
Messages
2,712
Location
North Carolina, USA
That inlay... I agree that it is fantastic. Thanks for sharing the technique. I have lots of wire around here from jewelry work. I'll add this to my list of things to try. With all the ideas around here, it's a long list. :)
 
Top Bottom