Should I buy a a blank squaring jig?

Signed-In Members Don't See This Ad

FGarbrecht

Member
Joined
Aug 22, 2019
Messages
618
Location
NY
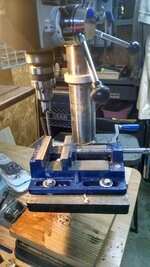
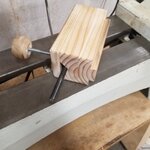
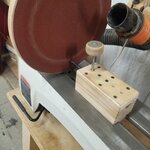
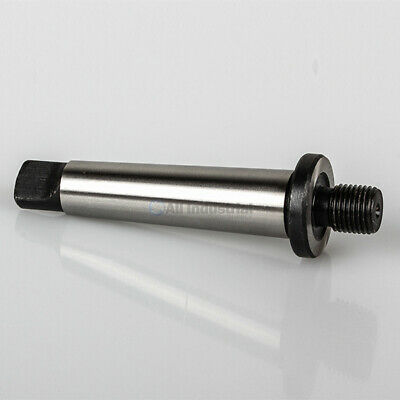
So I learned something (by reading here) that should have been obvious to me but wasn't, which is that the end of the blank should be square to the brass tube rather than to the sides of the blank. I have a barrel trimmer but I don't like it much because it gets dull really fast, so I've started squaring the blank ends on my rickety Wen disk sander, but this has the same problem of squaring the end to the blank rather than to the tube. I haven't seen any major problems so far with using the disk sander, but I'd like to learn to do things properly and to develop a reliable and accurate method to maximize my ability to make perfect (ha) pens. I've read here about various jigs one can build and am aware of the PSI jig that is available. I'm tempted to just buy the PSI just to save myself the effort of building another in a list of about 40 jigs and projects I'm already trying to get to. Any thoughts on this or advice?
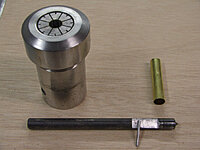
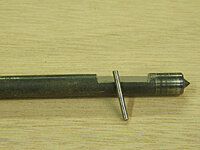
 
Signed-In Members Don't See This Ad

dogcatcher

Member
Joined
Jul 4, 2007
Messages
2,359
Location
TX, NM or on the road
I used one of my 3" faceplates to make a disc sander. I used the correct transfer punch in a drill chuck in the tail stock tp guide the pen blank. I only use the center of the sander, so I only make my discs about 2" in diameter. The press and stick sandpaper and a 2" punch to cut them. Punch is made from a piece of EMT pipe.
 

leehljp

Member Liaison
Joined
Feb 6, 2005
Messages
9,314
Location
Tunica, Mississippi,
I do, and so do others, each different. I keep it simple and use the simple jig:


That simple jig requires one to use sand paper with stick on backing and a pencil side hole in it; I use my drill to turn it. Some people use that but lately, it seems MOST people use jigs similar to what is in the post below. Look at all of them:

(Above link corrected)
 

magpens

Member
Joined
Feb 2, 2011
Messages
15,913
Location
Canada
Actually, squaring the blank ends to the sides of the blank is a good thing to do BEFORE you drill the hole to insert the tube.

But that becomes tricky if the blank does not have a square (or slightly rectangular cross-section).

Whenever possible, I like to do some preliminary rounding of the blank before drilling.
I do this by marking the center point on both ends and then mounting the blank on the lathe using two pointed centers, one in the headstock (probably a center with spurs on it), and one in the tailstock (probably a 60 degree live-center).

After you mark the blank ends, it helps to put a dimple at the marks (use an awl), or use a small hand drill to make a shallow 1/16" - 1/8" hole.

As you may know, turning a blank with this configuration is called "Turning Between Centers (TBC)" and is a very useful technique for many stages of the turning process.

After you have done this preliminary rounding (even if it is just taking the corners off) it is easier to square the blank ends to the blank "sides" by means of the disk sander.

And drilling the hole for the brass tube can be done more accurately after you have squared the blank ends.

I am not familiar with the PSI jig for squaring blank ends, but I don't think it is necessary.
 
Last edited:

FGarbrecht

Member
Joined
Aug 22, 2019
Messages
618
Location
NY
Thanks for all your replies, very helpful. I feel like I'm making every beginners mistake in the book and there is an overwhelming amount of detail involved (I shouldn't be surprised but I am), so it is great to get some outside feedback from the experts!
 

JimB

Member
Joined
Mar 18, 2008
Messages
4,683
Location
West Henrietta, NY, USA.
Here is my jig. Made from scrap wood and screws directly onto the headstock.
 

Attachments

  • 404C8764-8F24-4F4D-9EC2-15DF178B17EF.jpeg
    404C8764-8F24-4F4D-9EC2-15DF178B17EF.jpeg
    74.9 KB · Views: 185

WriteON

Member
Joined
Aug 21, 2013
Messages
3,266
Location
S. Florida
Thanks for all your replies, very helpful. I feel like I'm making every beginners mistake in the book and there is an overwhelming amount of detail involved (I shouldn't be surprised but I am), so it is great to get some outside feedback from the experts!
Beginners mistakes not. It's how we learn. As for barrel trimmers I use a carbide and it has been real good to work with. Still going after mega dozens of trimming
 

Xel

Member
Joined
Aug 16, 2018
Messages
58
Location
Longmont, Colorado
Is that a transfer punch in the drill chuck?
It does look that way.

I definitely empathize with your thought process, because I wrestled with the idea of buying a squaring jig before I mathed out what else I could get with that money, ha. Mine is identical to JimB's except instead of screwing directly into the headstock (which would require some kind of tap = $$$), I've turned a Morse taper out of scrap and glued it onto the back of more scrap. If you can turn a pen, you can turn a taper. ;) Some transfer punches from Harbor Freight are a great investment because they're useful in so many ways and you're good to go!
 

Attachments

  • IMG_20190826_162604.jpg
    IMG_20190826_162604.jpg
    249.3 KB · Views: 191

dogcatcher

Member
Joined
Jul 4, 2007
Messages
2,359
Location
TX, NM or on the road
In my old age I have gotten lazy, instead of turning Morse tapers I have bought a few dozen of these to make specialty tools.
With these 2MT I could just change out special stuff, but taking them off and putting them back on does mess up the true running of some of them.

Another option I liked was drilling and tapping blanks to screw on the headstock spindle threads. That way the cost is near zero after the tap is expensed.
 

More4dan

Member
Joined
Mar 17, 2016
Messages
2,102
Location
Katy, TX
I turn my blanks round between centers, drill on the lathe, therefore the hole is parallel to the blank. I then glue in the tube and square the end on my sander with a fence set at 90 degrees. Works great, easy peasy. As long as the hole isn't too oversized the brass will be parallel with the outside of the blank.


Sent from my iPad using Penturners.org mobile app
 

JimB

Member
Joined
Mar 18, 2008
Messages
4,683
Location
West Henrietta, NY, USA.
Is that a transfer punch in the drill chuck?
Yes, it is a transfer punch. I have the set from Harbor freight. Also yes to needing a tap to drill and tap the scrap wood so it threads directly onto the headstock. The tap is about $20 from woodcraft and other suppliers. You can also do this by turning your own Morse taper as already mentioned. Other opinions are using an extra faceplate, turn a tenon and mount it in your chuck or get an appropriate size nut and epoxy it to the scrap wood. Lots of ways to do it.

BTW, the tap is a great investment because you can use it to make other jigs that will screw directly on your headstock.
 

FGarbrecht

Member
Joined
Aug 22, 2019
Messages
618
Location
NY
It does look that way.

I definitely empathize with your thought process, because I wrestled with the idea of buying a squaring jig before I mathed out what else I could get with that money, ha. Mine is identical to JimB's except instead of screwing directly into the headstock (which would require some kind of tap = $$$), I've turned a Morse taper out of scrap and glued it onto the back of more scrap. If you can turn a pen, you can turn a taper. ;) Some transfer punches from Harbor Freight are a great investment because they're useful in so many ways and you're good to go!
So many great ideas here, thanks. I was just on the HF website looking to see if they had cheap transfer punches before I saw your reply:cool:
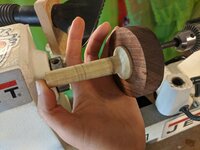
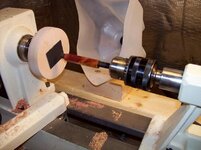
. Gonna give this a try.
 

Warren White

Member
Joined
Aug 27, 2014
Messages
497
Location
Livermore, CA
Just my opinion, but I feel like what I spent on Rick Herrell's offset sanding jig was the best investment I have ever made in support of this hobby. With it, you can use three portions of the sandpaper which has two benifits: One, when it is appropriate, you can sand faster. Second, because you are using three areas of the sanding disk, they last longer.

I made two wooden platters to hold sandpaper. One is for 120 grit for the heavy sanding when I am getting the blank down to the tube and ensuring it is perpendicular to the tube, and the other with 220 grit for the final touchup after applying the CA finish.

I buy the sticky sandpaper discs at my local big box store. I prefer the sticky kind rather than the hook and loop because I feel (no hard evidence here, just my gut) that there is less flex between the sandpaper and the wooden platter with the sticky sandpaper.
 

penicillin

Member
Joined
Feb 27, 2019
Messages
1,036
I use the basic pen mill sets that they sell at Rockler. They have a six-wing cutter and come with four different cleaner/inserts, a slimline tube to adjust the fitting on the 7 mm insert, and a small plastic box to keep them safe.

https://www.rockler.com/barrel-cleaner-pen-mill-kit

I like the six-wing pen mill because I believe it cuts smoother and easier than the four-wing types. I have not tried the two-wing and single-wing carbide pen mills.

I extend the life of the six-wing pen mills by honing the backs of each wing cutter using a diamond paddle set. I chose this set because the backing paddles are metal, not plastic, and they come in four different grits. I chose them over a similar set of three diamond hones on plastic. It is a minor annoyance that the grits are interleaved; you must alternate paddles to hone with all four grits:

https://www.rockler.com/double-sided-diamond-hone

Sharpen the flat back of each wing. You will have to angle the hone a particular way, and move it in a diagonal direction to keep it flat against the back. Leave the bevels untouched. Go through the grits from course to fine. You can skip the courser grits if not necessary.

I plan to move to a disk sanding jig on the lathe someday. I like the idea of a sander to reduce the chances of tearout, and because sandpaper is much cheaper and easier to replace than sharpening pen mills with diamond hones. Someone above mentioned a spindle tap. I bought one at Woodcraft to get my project going:

https://www.woodcraft.com/products/beall-spindle-tap-1-x-8-tpi
(They also sell a 1.25 x 8 version.)
 

randyrls

Member
Joined
Feb 2, 2006
Messages
4,821
Location
Harrisburg, PA 17112
Thanks for all your replies, very helpful. I feel like I'm making every beginners mistake in the book and there is an overwhelming amount of detail involved (I shouldn't be surprised but I am), so it is great to get some outside feedback from the experts!

I've made those same mistakes! Don't feel bad. Over years, I've developed a "process" that is successful 99 of 100 times.
Here is one: If you buy three kits separately from the same place, Don't assume they are identical. I had one Baron kit, and ordered two more. Somehow I managed to mix up the pieces. They were not identical and not interchangeable. :(
 

menglor

Member
Joined
Mar 15, 2017
Messages
85
Location
Ottawa Canada
one word of caution I would advise when squaring up a blank, in either method, sanding or using an end mill, be super careful not to remove any of the brass tube. Most will tell you, its ok to remove one or two mill, and while on paper thats ok. remember some pens dont like it.

For example, a Click pen, the tolerances for the mechanism is such that if you take too much of the barrel, it wont click, or the end will stick out.

while I dont have a personal favorite that answers all the needs, I find from time to time I need to restart because I cut too much off, sanded too much off. or the cutter damaged the end grain.
 
Joined
Aug 13, 2016
Messages
1,460
Location
Surprise, Arizona
Just my opinion, but I feel like what I spent on Rick Herrell's offset sanding jig was the best investment I have ever made in support of this hobby...

Me too! I've had some beautiful pens not go together perfectly because the ends weren't square. It left a gap you could see if you held it in the light the right way, particularly at the CB. This hasn't been an issue at all since I bought Rick's jig. Worth every penny and then some. I was so done with my barrel trimmer not doing a good enough job (not to mention the added expense of needing the correct size pilot shaft for each pen when I already had a punch set) and sometimes blowing out the blank that I was about to quit making pens altogether. And I probably would have if it weren't for Rick's awesome jig.
 

Woodchipper

Member
Joined
Mar 15, 2017
Messages
5,138
Location
Cleveland, TN
I have always had luck with the Whiteside pen mill from Woodcraft. Use it in the DP and carefully take small bites when I get close to the tube. When I see that the tube is starting to show, an easy/light application which ends when the end of the tube is bright. So far, never had any problem with assembly but I'm sure that there are pens that can be picky.
 

Attachments

  • IMG_20171118_060456492_HDR.jpg
    IMG_20171118_060456492_HDR.jpg
    283.1 KB · Views: 102

John Eldeen

Member
Joined
Apr 3, 2019
Messages
419
Location
Sacramento, CA
I use both a disk sander and pen mill set. The pen mill if memory serves me right is a 7 piece carbide set from PSI. It does any good job for the most part with a couple of exceptions. If the blank is a synthetic that is prone to chipping of fracturing or a segmented I use the disk sander. Also if I don't have the right size pilot shaft I will use the disk sander. With that being said when I use the pen mill I don't use the vice to hold the blank. I hold the blank with a quick clamp to stop it from spinning then with the mill in my drill press trim away. Doing this lets the blank move so the tube is square with the mill rather then the blank be square with the vise. That makes the stresses on the blank and the mill considerably less and for me a better result. As for the disk sander I use a little different homemade contraption. I don't have a dedicated disk sander I use a faceplate in my lathe with a block mill from a pine 4x4 that fits snugly into the ways on the lathe to keep it square to the disk. The only bad thing is it only uses on spot on the disk. I will be making something different at some time but I am not sure what it will be or if that time will ever happen.
 

Attachments

  • 20190828_081234.jpg
    20190828_081234.jpg
    232.3 KB · Views: 148
  • 20190828_081246.jpg
    20190828_081246.jpg
    305.1 KB · Views: 107

jttheclockman

Member
Joined
Feb 22, 2005
Messages
19,082
Location
NJ, USA.
Everyone over the years has developed a method that works well for them and I too fall into this. I first started using the pen mills and loved the carbide 4 wing cutters. They were all the rage and we even had a person here that took old steel cutters and made them into carbide cutters and sold them. I still have a few. But like most things we evolved. I went to sanding on the lathe and have not looked back since. It is the most accurate way to get to final results.

I took the face plate and attached a piece of thin sheet metal to it using double sided carpet tape. Now the sheet metal needs to have some thickness because you will be pushing on it in the center all the time so it needs to stay flat. I use sticky backed sandpaper and cut in small squares from a roll. never use the velcro stuff because it will deflect as you push on it and have a tendency to sand unevenly the blank. In the tailstock I use my drill chuck and match a transfer punch (from HF) to the tube size. Now slide you blank over the punch and on slow speed push tailstock close to face plate and lock both tailstock and quill of the chuck so it does not move. Now I know what you all are thinking the sandpaper gets worn out quickly in that one spot. yes that is true and that is why someone made those sanding jigs. I found that unnecessary because all I do is move that small piece of sandpaper around the plate. It has sticky back adhesive so very easy to do this and now I use the entire piece of sandpaper and when used up change real quick to a new one. yes stop the lathe when moving paper.

I should back up a step. When I have the blank drilled and tube mounted and get ready for sanding I take it to my disc sander and sand roughly close to the tube edge. This saves time and wear and tear on the sand paper on the plate. Easy enough.

Now here is where a disclaimer should be inserted because I see these sanding set ups where they use the sides of the blank as a reference point for sanding to the tube. This should never be done. There is no way to tell if that tube was drill dead parallel to the edge of the blank or what edge . any deviation when drilling and no longer parallel. Instead the method or some form of it that I described is the best way because you are referencing the tube to dead center of the blank and now the sanded edges are flat to the edges of the tube. hope this helps some.
 

FGarbrecht

Member
Joined
Aug 22, 2019
Messages
618
Location
NY
I picked up some transfer punches from HF and made a little headstock mounted sanding disk out of scrapwood that I can put in my little G3 chuck. I've tried it on a couple of unturned blanks and a couple of finished pen blanks and it works GREAT! Thanks so much everyone for all the advice and accumulated wisdom.

I had never even heard of a transfer punch before and I've already used the set for other stuff. They work well for cleaning the goop out of the inside of brass tubes, and I was able to use one to disassemble a Sierra Kit that I screwed up by putting the parts together in the wrong order; I was able to salvage a really beautiful Bloodwood finished blank for re-use.
 

jttheclockman

Member
Joined
Feb 22, 2005
Messages
19,082
Location
NJ, USA.
I picked up some transfer punches from HF and made a little headstock mounted sanding disk out of scrapwood that I can put in my little G3 chuck. I've tried it on a couple of unturned blanks and a couple of finished pen blanks and it works GREAT! Thanks so much everyone for all the advice and accumulated wisdom.

I had never even heard of a transfer punch before and I've already used the set for other stuff. They work well for cleaning the goop out of the inside of brass tubes, and I was able to use one to disassemble a Sierra Kit that I screwed up by putting the parts together in the wrong order; I was able to salvage a really beautiful Bloodwood finished blank for re-use.

I have 5 sets and use them for many things. One other use to put in your memory banks because there may come a time when you get this far advanced that you will need a pin chuck. They work great for that too.
 

Attachments

  • IMGP0815.JPG
    IMGP0815.JPG
    180.7 KB · Views: 113
  • IMGP0816.JPG
    IMGP0816.JPG
    181.8 KB · Views: 105

FGarbrecht

Member
Joined
Aug 22, 2019
Messages
618
Location
NY
I have 5 sets and use them for many things. One other use to put in your memory banks because there may come a time when you get this far advanced that you will need a pin chuck. They work great for that too.
I had to look up pin chuck as I hadn't heard of that either. As I understand it, a pin chuck lets you turn a blank without a mandrel or bushings and gives you access to one end if you are turning a pen that has a wooden end instead of some kit part. Correct?
 

greenacres2

Member
Joined
May 2, 2017
Messages
1,686
Location
Northwest IN
I use one of these https://www.exoticblanks.com/pen-blank-squaring-jig-large.html?category_id=571 with transfer punches on my Ridgid belt/spindle sander (belt attachment--of course). For transfer punches, i keep a set of 1/64" graduated and a set of letter at the sander, along with a handful of metrics. Keep another set of each by the lathe, and like FGarbrecht i regularly use various sizes to clean the inside of tubes as well.

Didn't lose many blanks using a barrel trimmer, but hybrid/segmented and some sensitive materials were susceptible to break even with a light touch. Since switching to the jig--have lost none due to chipping, but have lost a few because i got distracted and sanded too far--i did the same a few times with a barrel trimmer to be fair!!
earl
 

TonyL

Member
Joined
Mar 9, 2014
Messages
8,904
Location
Georgia
As we all know, make sure whatever means used, it doesn't rely on your work piece to be square or perfectly round. The jigs that rely on the lathe axes have the best chances of a square edge. Think deer antler due to its irregular shape.
 
Top Bottom