Shawl pins

Signed-In Members Don't See This Ad
See more from monophoto

monophoto

Member
Joined
Mar 13, 2010
Messages
2,543
Location
Saratoga Springs, NY
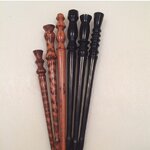
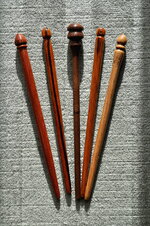
One of the women in my wife's knitting group asked if I could make shawl pins. Naturally, my response was 'what the heck are shawl pins?"

So after some research, this is what I came up with. They are about 5" long, with a 'working diameter' of about 1/4", tapered slightly at one end, and with a decorative cap at the other end. They are used to hold knitted shawls closed.

The neat thing is that they are made from scraps of wood that would otherwise have gone into the burn box.

Left to right, these are bubinga, goncalo alves, walnut, goncalo alves, and ash. The finish is a lacquer-based friction polish (WOP on the ash).
 

Attachments

  • Shawl pins-s.JPG
    Shawl pins-s.JPG
    677.9 KB · Views: 387
Last edited:
Signed-In Members Don't See This Ad

monophoto

Member
Joined
Mar 13, 2010
Messages
2,543
Location
Saratoga Springs, NY
When I did the research on shawl pins last year, I noted that they were often accompanied by shawl pin keepers (or shawl pin rings). But at the time, it was not clear how I could make something that would serve that purpose. There were basically two problems:
1. How to mount stock on the lathe to make the keepers.
2. How to make them with enough physical strength to withstand the cross-grain force that could cause the thin (about 3/8") rings to snap in half.

I revisited the issue over the holidays and found solutions to the problems.

The physical strength problem was solved by laminating two pieces of wood together with their grain directions at right angles - essentially, making two-layer plywood. I started with a 1" board that I cut into a 2 1/2" square. I then resawed the board to make two squares 1/2" thick, and then glued them back together with their grain directions crossed. For that, I used ordinary PVA glue and left the blank clamped for 24 hours to cure thoroughly.

Mounting also proved to have a simple solution. I attached the blank to a glue block using double stick tape, and with the tail stock in place, turned the blank to a circle and shaped the edge profile all the way down to the glue block. That was important because when I turned the piece around to work on the back side, I wouldn't be able to work on the outside edge. Then, I backed the tailstock away and used a 1 1/2" forstner bit to drill out the center of the blank - I could have just as easily used a gouge and turned it out. Then, I cleaned up the face and the inside edge of the hole, sanded the exposed portions of the piece, and applied finish (shop-made lacquer friction polish).

Finally, I remounted the piece on cole jaws so that I could turn, sand and finish the back of the ring.
 

Attachments

  • Shawl Pin Keeper small.jpg
    Shawl Pin Keeper small.jpg
    349 KB · Views: 156
Last edited:

Fay Prozora

Member
Joined
Jul 20, 2014
Messages
469
Location
Port Angeles, Wa
Very nice keepers. The round one with the pin through it could also be used for a woman's hair. It reminds me of a leather one that I made many years ago to hold my hair up. I would just put it in a pony tail and then twist the hair until it would make itself into a rope and then hold it to the back of my head and put the leather part on it and then slide the pin through and my hair was off my neck and in a cute little bun that looked like a piece of French pastry.... Great job on all of those... Fay
 
Top Bottom