Sharply defined color separation in resin blank

Signed-In Members Don't See This Ad

ctfolmar

Member
Joined
Jul 29, 2013
Messages
28
Location
San Antonio, Texas
I see many blanks where the resin colors are very sharply defined, almost like they were made with multiple casts. Camo blanks for instance. How is that accomplished?
Clipboard02.jpg
 
Signed-In Members Don't See This Ad

hokie

Member
Joined
May 29, 2017
Messages
302
Location
Falls Church, Virginia
I don't have exactly the answer you're looking for, but I am almost certain none of the blanks with that kind of patterning and contrast between colors are homemade. Same with the ribbon blanks often sold commercially. I have seen DIY attempts at copying the style, but they look a lot more clunky and the ribbons aren't nearly long enough. Looks more like scrap acrylic sheets thrown in.
I mention the ribbon blanks because I have a feeling it's how the blank you posted is made... just ribbons of material with the same opaque color filling in between. It's interesting to note all of the "figure" is on top and bottom. Not much to speak of on the sides, so there seems to be a system where they can pour acrylic in between layers and avoid any color mixing too. I hope to hear from someone who is more in the know!
 

JohnU

Member
Joined
Jan 31, 2008
Messages
4,951
Location
Ottawa, Illinois
Commercially made blanks like the camo series are a different type of plastic from what we use in our shops. I agree that they are often using ribbons / films to keep colors separate. I've looked closely at some and found a very thin clear layer between colors. The resins we ( home casters ) use are thin and set quick. I don't believe we have the working time commercial plastic have or the ability to work it like they do in their automated process. Most of us pour like in the video above (with individual techniques). It all depends on what results you want.... large swirls, small tight swirls, tiger stripes, color transitions, and so on. There are many ways to do this depending on what results your striving for. You can use the same colors in several pours and get different results from each depending on your technique.... vertical pour, flat bowl pour, flip cup pour, individual cup pour, pour them together and then pour, stir after you pour, directional pours, spin the mild as you pour, how high you pour from...and so on. The biggest thing to remember is if you pour too soon, your colors mix to create a new color, too late and you get a blob with air bubbles trapped inside. Also, dont pay too much attention to the photos only showing the top of the poured blocks. The top looks cool but rarely ever reveals what the inside looks like. Here's a photo of the top and then the inside of some I poured. The churning curing resin makes a cool pattern but it doesn't look like that inside.
 

Attachments

  • 3B6A9A7B-FAD9-4DFD-B5A4-5C38776B6928.jpeg
    3B6A9A7B-FAD9-4DFD-B5A4-5C38776B6928.jpeg
    383.1 KB · Views: 324
  • 53F97187-BCBC-4786-8A64-0359D72A2916.jpeg
    53F97187-BCBC-4786-8A64-0359D72A2916.jpeg
    380.1 KB · Views: 324

ctfolmar

Member
Joined
Jul 29, 2013
Messages
28
Location
San Antonio, Texas
Commercially made blanks like the camo series are a different type of plastic from what we use in our shops. I agree that they are often using ribbons / films to keep colors separate. I've looked closely at some and found a very thin clear layer between colors. The resins we ( home casters ) use are thin and set quick. I don't believe we have the working time commercial plastic have or the ability to work it like they do in their automated process. Most of us pour like in the video above (with individual techniques). It all depends on what results you want.... large swirls, small tight swirls, tiger stripes, color transitions, and so on. There are many ways to do this depending on what results your striving for. You can use the same colors in several pours and get different results from each depending on your technique.... vertical pour, flat bowl pour, flip cup pour, individual cup pour, pour them together and then pour, stir after you pour, directional pours, spin the mild as you pour, how high you pour from...and so on. The biggest thing to remember is if you pour too soon, your colors mix to create a new color, too late and you get a blob with air bubbles trapped inside. Also, dont pay too much attention to the photos only showing the top of the poured blocks. The top looks cool but rarely ever reveals what the inside looks like. Here's a photo of the top and then the inside of some I poured. The churning curing resin makes a cool pattern but it doesn't look like that inside.
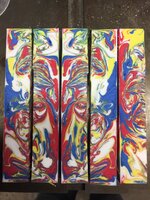
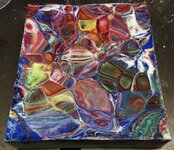
Those blanks may not be what you expected, but they sure are pretty!
 

TonyL

Member
Joined
Mar 9, 2014
Messages
8,913
Location
Georgia
When I polish mine on the buffing wheel...i get it down to where i can see a very thin line (super-fine indentation) where the colors meet. send me your address and i will show you.
 

greenacres2

Member
Joined
May 2, 2017
Messages
1,689
Location
Northwest IN
Great info, makes sense in a commercial setting. It also creates a bit of a homogenous look. It may cost a little more but i really do prefer turning pours that come from smaller batches--there is an artistry that rivals the natural beauty of wood in custom pours. I'll never be able to do it--but sure do appreciate the work of others.

The bonus was reading @JohnU post--couldn't help but think of Bubba talking about the ways to make shrimp!! :)

earl
 
Joined
Jan 8, 2020
Messages
15
Location
Omaha, Nebraska, USA
I've tried to do something similar many times and while I am very happy with what I've made, they just aren't the same as those acrylic blanks you pick up at the Rocker or Woodcraft, or from online places. The closest I could come was a 6 color Alumilite Clear Slow pen blank pour I recently did. The trick was to wait until the resin got almost gummy.

I hear 100 different temperatures for 10 different resins so I can't pinpoint an exact time/temp to aim for, I just went by feel. Pouring when almost sticky and then giving it a quick few toothpick swirls before hitting the pressure pot gave me the best color separation I've been able to achieve so far. There is still some "melting" of the colors which you don't seem to get in those factory-made blanks, but I guess I was close.

Maybe if I hadn't used 6 colors, maybe the color separation would be more obvious. IDK. In any case, the temperature seems to be the key.il_fullxfull.2329989390_se2r.jpgil_fullxfull.2333945024_5273 (1).jpgil_fullxfull.2378097553_f4lo.jpg
il_fullxfull.2380845155_25ml.jpg
 

mick

Member
Joined
Mar 13, 2005
Messages
2,608
Location
Decatur AL, USA
I've got an idea I want to try but I'm going to experiment first so if it's an abysmal failure y'all won't see it! [emoji6]
Stay tuned.

Sent from my SM-G955U using Tapatalk
 

ramaroodle

Member
Joined
Feb 15, 2018
Messages
686
Location
Seattle
I've got an idea I want to try but I'm going to experiment first so if it's an abysmal failure y'all won't see it! [emoji6]
Stay tuned.

Sent from my SM-G955U using Tapatalk
No!! Let us know what it is and let us see it so we can learn from it.
 
Top Bottom