Segmenting - Things I Learned

Signed-In Members Don't See This Ad

crokett

Member
Joined
Dec 4, 2012
Messages
610
Location
Mebane, North Carolina
Someone gave me what is likely to be a lifetime supply of brass sheet. I've had it for a while. I decided to try some segmenting with it. I'm glad that I practiced on scrap wood first. My idea was wavy lines in a pen blank. Some things I learned... Make your cuts run the long axis of the pen. This way when you're clamping, its just clamping 2 long halves of the blank together. Angled cuts across the width of the blank are very hard to clamp. Any pressure applied to the ends the halves start to slide apart. If you do a segment, then cross cut it to glue up another one, it is difficult to line up the brass in the first glueup. I won't be attempting Celtic knots any time soon. :). I may try cutting across the blank in a U shape or maybe a V. That will give it a wedge shape where I can clamp on the ends and it can't slide apart.
 
Signed-In Members Don't See This Ad

KenB259

Member
Joined
Dec 24, 2017
Messages
3,537
Location
Michigan
Someone gave me what is likely to be a lifetime supply of brass sheet. I've had it for a while. I decided to try some segmenting with it. I'm glad that I practiced on scrap wood first. My idea was wavy lines in a pen blank. Some things I learned... Make your cuts run the long axis of the pen. This way when you're clamping, its just clamping 2 long halves of the blank together. Angled cuts across the width of the blank are very hard to clamp. Any pressure applied to the ends the halves start to slide apart. If you do a segment, then cross cut it to glue up another one, it is difficult to line up the brass in the first glueup. I won't be attempting Celtic knots any time soon. :). I may try cutting across the blank in a U shape or maybe a V. That will give it a wedge shape where I can clamp on the ends and it can't slide apart.
You just need a clamping fixture to hold that type of cut together so it wont slip. Celtic knots with just metal can be done, but it's harder to match the infill to the kerf.
 

jttheclockman

Member
Joined
Feb 22, 2005
Messages
19,083
Location
NJ, USA.
Nothing is impossible. Just takes a little out of the box thinking for jigs and methods. But this is what makes it fun to do and why I like creating my own blanks. weather it is segmenting or casting. You too can do it. Any questions fire away. By the way though brass is a little ways up the hardness scale when it comes to cutting and working. Aluminum is much easier. Here is an example of a black acrylic and aluminum knot I did a few years ago.

Copy of IMGP0144.JPG
 

crokett

Member
Joined
Dec 4, 2012
Messages
610
Location
Mebane, North Carolina
You just need a clamping fixture to hold that type of cut together so it wont slip. Celtic knots with just metal can be done, but it's harder to match the infill to the kerf.
yeah. it occurred to me (too late) that the fixture I use to hold blanks for drilling would have worked perfectly to keep the the parts from slipping. the first one I tried cuts didn't line up. the second one I used CA glue instead of epoxy and just hand clamped the parts. It seemed to work better.
 

Mr Vic

Member
Joined
Aug 11, 2008
Messages
1,865
Location
Falcon, CO
If yo have a blade with a kerf the same width as the segmenting material don't cut all the through the blank. Basically cutting a slot to slip material into.
 

Wmcullen

Member
Joined
Dec 1, 2020
Messages
397
Location
Fairfax, Virginia
I haven't tried laminating with brass yet but I can imagine the problem you mention would be annoying. "Slippery" segments are never fun. I appreciate your "workaround" of making long cuts, as well as all the solutions above if you want to tackle the problem head-on. : )
 

Todd in PA

Member
Joined
Feb 16, 2021
Messages
645
Location
Port Matilda, PA
I just started using brass myself!

My "jig" is just a straight board screwed to plywood. I use some wood (or popsicle sticks) to hold the blank to the jig and the squeeze the ends a little with another clamp. It won't be perfect, but I'm going to re-square it on the table saw after gluing anyway.
5106A8EB-4B62-4239-B02D-8AA0EE934AC4.jpeg
 

crokett

Member
Joined
Dec 4, 2012
Messages
610
Location
Mebane, North Carolina
I just started using brass myself!

My "jig" is just a straight board screwed to plywood. I use some wood (or popsicle sticks) to hold the blank to the jig and the squeeze the ends a little with another clamp. It won't be perfect, but I'm going to re-square it on the table saw after gluing anyway.
View attachment 319437
Yeah. Im thinking of something similar with a piece of right-angle aluminum that I have.

For wavy lines, I don't have a scrollsaw. I have a bandsaw and could change the 1/2 blade out for a 3/8" to be able to cut sharper turns.
 

egnald

Member
Joined
Jun 9, 2017
Messages
3,062
Location
Columbus, Nebraska, USA
Greetings from Nebraska! For clamping materials (wood, stone composites, metal) with those angle cuts I've had good success recently. These are the steps that I take:

1) I make sure the non-metals are the same size before cutting. I true up my wood blank so that it matches the dimensions of the stone blank I will be using as a segment.

2) I keep the metal exact size or a little under sized. I do this by essentially cutting the other materials first and then using the cut surface to measure and mark the metal before I cut it.

3) I keep the metal as flat as possible when cutting it. I use some bits of wood, clamps, and a utility knife to score the metal and break it rather than using shears as shears usually cause the edges of metal to curve when it is being cut. If the metal isn't flat, then I squash it in a vise or pound it flat with a hammer on an anvil. Just as with tubes, I scuff the surfaces of the metal with sandpaper to promote adhesion when gluing.

4) I use epoxy. Nearly all of my segmenting failures have been on blanks that I used CA on. I use epoxy, spread evenly, and allowed to fully mature (overnight).

5) I clamp on both the sides and on the ends of the blank. The uniform size of blank (#1, and #2) permits me to use bits of wooden outside corner molding (90 degree angle) to clamp across the outside corners of the blank to keep the angled segments from sliding. I then use an "F" style clamp to apply end-to-end pressure for squeezing the angled segments tight for curing.

6) I drill carefully, using a sharp drill that is best suited for the materials being drilled. For example, I use a carbide bit for drilling segmented blanks that contain stone composites. Also use drill to minimize heat buildup in the blank. My rule of thumb has been to never drill to a depth of more than 3 times the diameter of the bit before retracting the bit to clear the flutes and to give both the blank and the bit time to cool. I also use "BladeCoat" or "DriCoat" blade and bit lubricant on my bit when drilling. I also cut my blanks long so that any chip-out when the bit exits the blank can be either cut off or sanded off when the ends are being squared to the tube.

7) I use epoxy to glue the tubes in. There are a lot of blowouts during turning that can be attributed to insufficient coverage, i.e. areas of poor or no adhesion between the tube and the blank. Let the epoxy fully cure before starting to turn (overnight).

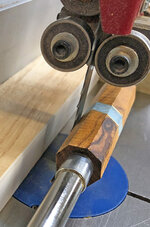
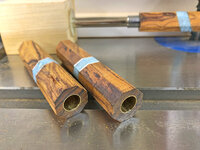
8) I use a jig and bandsaw to saw the corners off before turning. This not only removes excess material in a less stressful way than turning, but also reduces (or changes) the type of stresses between the tool, the blank, the tube, and the mandrel (if used) when turning. Turning the corners off causes an impact type of stress that works against the tensile strength of the glue. This is much different than the steady stress that results from turning after the blank is round. The corners can also be sanded off or routed off as well. There are lots of commercial jigs available to help with this task. This is the homemade "Corner-b-gone" that I use. It not only cuts the corners off, but it cuts with reference to the tube so the shape is symmetrical. Using the bushings on the blank also lets me adjust the cut depth to reduce the bulk of the material beyond just rounding the corners off as the flats are cut as well (All 8 sides of the blank get cut).

IMG_1762 Cropped 2.jpg IMG_1749 Cropped 2.jpg

Regards,
Dave
 

Attachments

  • IMG_1747 Cropped 2.jpg
    IMG_1747 Cropped 2.jpg
    356.3 KB · Views: 126
  • IMG_1748 Cropped.jpg
    IMG_1748 Cropped.jpg
    341 KB · Views: 132
Last edited:

jttheclockman

Member
Joined
Feb 22, 2005
Messages
19,083
Location
NJ, USA.
Yeah. Im thinking of something similar with a piece of right-angle aluminum that I have.

For wavy lines, I don't have a scrollsaw. I have a bandsaw and could change the 1/2 blade out for a 3/8" to be able to cut sharper turns.
Yes this is an easy way to glue things up like that. I use that method and here is a photo of my jig. Simple yet effective.

IMGP0072.JPGCopy of IMGP0553.JPG
 

Bope

Member
Joined
Oct 24, 2018
Messages
183
Location
Western NY
Doesn't the angle iron have a slight radius? I could see using the outside of the angle and reference the table. Using the inside can you get both sides of the blank touching?
 
Top Bottom