Segmenting Small Pieces, and variations....

Signed-In Members Don't See This Ad
See more from KMCloonan

KMCloonan

Member
Joined
Jun 13, 2017
Messages
1,489
Location
Round Lake, Illinois
I recently read the instructions from Phil Morris titled "Segmenting Small Pieces" - I really liked it, so I gave it a try, with some slight modifications.
IMG_0325.JPG

The green diamonds are just pieces of green acrylic from a serving plate - about 1/8" thick. The white dividers are some cardstock I found years ago that I had no idea what to do with, but could not bring myself to throw it away. I still have about 1000 cards left. I noticed that I needed to improve the placement of the white inserts so there were no gaps in the middle.

After this pen, I decided to make another one, using red acrylic. But when I built the blank, I could not bring myself to sand away more than half the material, so I used my bandsaw to slice off the "fins" on either side of the red inserts, and I then made a second blank from the two slices.
IMG_0455.JPG

I am not terribly happy with how this pen turned out - the white dividers seemed to not cut crisply, but folded over on some of the seams.

Here was the second pen from the same blank
IMG_0469.JPG

Again, not a perfect pen, but interesting to make, and I know some areas I can improve for the next time.
 
Signed-In Members Don't See This Ad

Wmcullen

Member
Joined
Dec 1, 2020
Messages
399
Location
Fairfax, Virginia
All are very interesting but the first brown/white/green combo is my favorite. Your decisions on how much "bright green" to introduce keeps it looking precious. I really enjoy seeing the color combinations! Thanks for sharing.
 

KMCloonan

Member
Joined
Jun 13, 2017
Messages
1,489
Location
Round Lake, Illinois
Kevin , I really like your first pen and think that the use of white veneer, instead of the card stock, would produce the desired look in the finished pen. Keep trying !! You are doing great .
I agree completely Joe. I had run out of white veneer, so I thought I would give the thin cardstock a try. It's interesting that the first pen, the card stock worked ok, but the second pen with the red inlays, the cardstock seemed to melt or something. Maybe my carbide tool was getting dull. Anyway, I have ordered more white veneer, and will try again.,
 

KMCloonan

Member
Joined
Jun 13, 2017
Messages
1,489
Location
Round Lake, Illinois
All are very interesting but the first brown/white/green combo is my favorite. Your decisions on how much "bright green" to introduce keeps it looking precious. I really enjoy seeing the color combinations! Thanks for sharing.
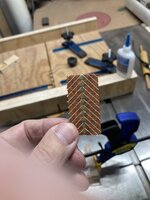
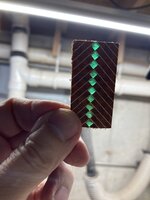
Thanks Cullen - Yes, I intentionally chose to not paint my tubes, so that the light would go through the clear green (or red) acrylic and bounce back. I got the idea when I trimmed the blank before drilling, and saw the light passing through the piece I sliced off.

IMG_0309.JPGIMG_0308.JPG
 

Wmcullen

Member
Joined
Dec 1, 2020
Messages
399
Location
Fairfax, Virginia
Thanks Cullen - Yes, I intentionally chose to not paint my tubes, so that the light would go through the clear green (or red) acrylic and bounce back. I got the idea when I trimmed the blank before drilling, and saw the light passing through the piece I sliced off.

View attachment 314880View attachment 314881
Thanks for the extra pics. That second shot is just magical… like a kind of treasure!
 

sorcerertd

Member
Joined
Sep 30, 2019
Messages
2,704
Location
North Carolina, USA
That looks like a lot of effort went into the segmenting. Pretty darned good for giving it a try. I agree that the green acrylic on the first one really pops. I see you taking this from "wow" to "amazing" with a little tweaking. Thanks for showing them.
 

jttheclockman

Member
Joined
Feb 22, 2005
Messages
19,148
Location
NJ, USA.
Now not sure if it is the photo or was a planned happening but what I like is the depth you get with the green inlay. Again I do not believe it is what I am trying to see but it would look great if you could make the green be recessed down from the top of the rest of the pen body. In other words a cavity for every green piece. That would look cool.
 

KMCloonan

Member
Joined
Jun 13, 2017
Messages
1,489
Location
Round Lake, Illinois
Now not sure if it is the photo or was a planned happening but what I like is the depth you get with the green inlay. Again I do not believe it is what I am trying to see but it would look great if you could make the green be recessed down from the top of the rest of the pen body. In other words a cavity for every green piece. That would look cool.
John, The depth you see in the green was intentional (on this pen) - I accidentally discovered the light reflecting off a tube through a clear acrylic pen I made several years ago - so I intentionally made it this way (I did not paint the tube, and I used a "clear" green acrylic.) I like your suggestion about a cavity for each "gem", and will give it some thought. Thanks!
Kevin
 
Top Bottom