Segmenting Setup

Signed-In Members Don't See This Ad

Pjohnson

Member
Joined
Feb 16, 2012
Messages
278
Location
Plympton, MA
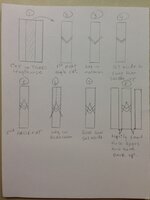
I have learned to understand the curvature of the scallop based on 15, 45, 60 degree segments.

How should a blank be prepped if you want a crisp right angle without the curvature?
 
Signed-In Members Don't See This Ad

Dale Lynch

Member
Joined
Dec 12, 2011
Messages
1,819
Location
Hastings,NE
That can be done easily enough by cutting a wedge in from the end of the blank instead of cutting a bevel off the end.
 

Pjohnson

Member
Joined
Feb 16, 2012
Messages
278
Location
Plympton, MA
Thank you all - let me explain my objective.
My avatar has the square and compass ... I would like to achieve the same look in a segment.

I do realize the same can be achieved with inlays or decals. My hope was to do it with a segment, then apply the "G" via a decal. There are other masonic symbols that are similar that I could do, if this was possible.

Thank you
 

Dale Lynch

Member
Joined
Dec 12, 2011
Messages
1,819
Location
Hastings,NE
I think you are going to find it quite difficult to accomplish your task with segments.The reason being is because of the scale of what you are trying to do it on.I don't think there is a saw with a thin enough kerf to make the cuts and leave enough room for the segment material while remaining centered in the barrel after turning.A laser,cutting the pattern through a round barrel is probably your best bet.
 

Krash

Member
Joined
Feb 10, 2014
Messages
1,259
Location
Albuquerque, NM
Thank you all - let me explain my objective.
My avatar has the square and compass ... I would like to achieve the same look in a segment.

I do realize the same can be achieved with inlays or decals. My hope was to do it with a segment, then apply the "G" via a decal. There are other masonic symbols that are similar that I could do, if this was possible.

Thank you

One thing that I am conjuring up in my head may help you. It may have been done before but I haven't seen it. Just a disclaimer in case someone else has already done this.

If you can visualize this symbol in the center of the pen, first cut your blank into thirds. Take the center section and make the V cut for the square. I would use some light wood like maple so that it looks like a ruler but your could use thicker aluminum. If you haven't done segmenting with metal, you have to rough it up with 100 grit first so the CA can grip it. Segment it and glue it all back up and let it sit at least overnight. Square it up then cut the compass V. Obviously it will be at a more acute angle. Lay in some aluminum and glue it all back up again. Let it sit for a couple days. Now, sand the sides of all three pieces lightly to ensure straight lines and glue all three back together. I think when you turn it you will end up with a reasonable symbol.

You can also play with putting in some other kind of wood to get the symbol center a different color. There are a lot of options to play with. Let me know if you need any more thoughts or guidance. This is just want I visualized I would do if I were to try and do what you are trying to do.

Good luck!
 

Krash

Member
Joined
Feb 10, 2014
Messages
1,259
Location
Albuquerque, NM
And the top of the compass, you can just drill a hole and put in and aluminum nail or something. I would drill half way thru from each side so that you make sure it is at the point.
 

eranox

Member
Joined
Sep 12, 2012
Messages
322
Location
Killeen, TX
While I am sure it's not the solution you're looking for, Lazerlinez.com does sell a laser-cut kit with the Masons' logo.

Thank you all - let me explain my objective.
My avatar has the square and compass ... I would like to achieve the same look in a segment.

I do realize the same can be achieved with inlays or decals. My hope was to do it with a segment, then apply the "G" via a decal. There are other masonic symbols that are similar that I could do, if this was possible.

Thank you
 

KenV

Member
Joined
Oct 28, 2005
Messages
4,720
Location
Juneau, Alaska.
Paul -- the advantage that the laser and CNC mill versions have is that they are cut on a 4th axis (that is a rotary axis so the laser and mill are always oriented to the center of rotation). With most segmenting, orientation to cut to the center of rotation is quite difficult.

The alternative is to make a somewhat small center element and build it out. Fine detailed work. Take a look at what Eli Avisera does and you will see that level of detail is possible. Difficult but possible.

Woodturning gallery - Eli Avisera - Woodturner

I would rather turn than fit little pieces with precision. Take a look at the CNC with fill that exotics sells if you want to look at something different.

(Am sitting Master this year)
 

Krash

Member
Joined
Feb 10, 2014
Messages
1,259
Location
Albuquerque, NM
Paul - here is a quick sketch of what I was thinking. Kerf thickness will come into play on step #6 since the upper portion will settle lower because of the removed material during sawing. Your square will be offset unless your kerf is exactly the same width as your aluminum which is unlikely. Maybe using a very small hand saw or Exacto-Saw would work. I would use as small a kerf bladed tool as you can find. A table saw or cut-off saw would just consume all the material so you would have nothing left.

One possible way to rectify the offset, and I haven't tried this or seen it done, is to make a vertical cut from the compass point up to remove some material before you lay in the aluminum. This would narrow the "V" and possibly line the square back up. It would be a trial and error type of operation. Again, I haven't tried this but I just thought of it so maybe it will work. I'll be trying this concept sometime. This will end up narrowing the entire center blank so some thought may have to be put in to see if this modifies the thickness of the initial cuts into the blank ... not sure.

Lightly sand the mating sides of all 3 vertical pieces to ensure they are flat. You can skip this step if you used a table saw (but you lose a lot of material with the TS). Glue everything back up and let sit for a couple days.

Get some aluminum nails. Carefully drill a hole at the compass point. I would drill half way thru from opposite sides to ensure the hole is directly on the compass point ... unless your drilling is a lot beter than mine!

You are going to have to try this procedure a few times to see if you can create the effect you are looking for. It seems doable but there are perials waiting for you. Get some scrap wood and see how it goes and how you might need to modify your process. This could be a lot of fun! I may even try one myself.

Let me know how it goes.
 

Attachments

  • photo1.jpg
    photo1.jpg
    142.2 KB · Views: 168
Top Bottom