
creativewriting
Member
I have read several posts about visible seams when wrapping tubes with polymer clay. Some avoid wrapping by making standard blanks then drilling and gluing like wood or acrylic. In my frugality I like wrapping to eliminate waste. Over the holidays I grabbed some scrap clay and experimented with a few techniques that I use to avoid seams. The attached pictures may help those that are having issues with seams.
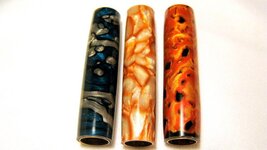
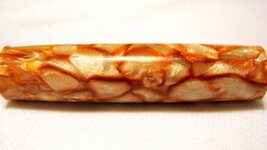
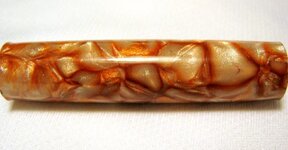
The first picture includes all 3 blanks. For sake of posting I will only talk about one at a time. The blue one is by far my favorite. When you are holding it the depth of color is amazing and the black highlights the two colors. The gold one is growing on me and the depth of color and effect is pretty incredible. The last one I could take or leave, but I am sure with the right colors it could be a keeper. All three are finished with CA.
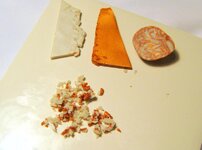
In the second picture I show the basics of making the gold blank. You can use different colors. This is made with Premo pearl clays (Pearl and Gold). The clay contains mica particles that add the depth to the blank. I roll out (using the pasta machine) medium sheets of clay. Using a tissue blade (long razor blade) I chop the sheets into small pieces. There is no science to this. I have also used a small food processor that I keep for clay. Once everything is chopped you have (2) options. Option one is to roll the clay back together. Wrap the tube with a thin layer of pearl and then using the tissue blade make thin slices of the combined clays to laminate the covered tube. Roll the tube on a flat surface and it will smooth the blank. The second option is to roll the tube directly on the chopped clay. Once you get good coverage roll the tube on a flat surface to blend everything together. Both yield great results and hide all seams. It may sound simple and that's because it is. Fire the tube in the oven at 275F for about 30 minutes or so (depending on thickness), turn to size, and finish.
To be continued……
The first picture includes all 3 blanks. For sake of posting I will only talk about one at a time. The blue one is by far my favorite. When you are holding it the depth of color is amazing and the black highlights the two colors. The gold one is growing on me and the depth of color and effect is pretty incredible. The last one I could take or leave, but I am sure with the right colors it could be a keeper. All three are finished with CA.
In the second picture I show the basics of making the gold blank. You can use different colors. This is made with Premo pearl clays (Pearl and Gold). The clay contains mica particles that add the depth to the blank. I roll out (using the pasta machine) medium sheets of clay. Using a tissue blade (long razor blade) I chop the sheets into small pieces. There is no science to this. I have also used a small food processor that I keep for clay. Once everything is chopped you have (2) options. Option one is to roll the clay back together. Wrap the tube with a thin layer of pearl and then using the tissue blade make thin slices of the combined clays to laminate the covered tube. Roll the tube on a flat surface and it will smooth the blank. The second option is to roll the tube directly on the chopped clay. Once you get good coverage roll the tube on a flat surface to blend everything together. Both yield great results and hide all seams. It may sound simple and that's because it is. Fire the tube in the oven at 275F for about 30 minutes or so (depending on thickness), turn to size, and finish.
To be continued……
")