Thanks for the kind comments.
I think I got the following tips from an article in the American Woodturning (AAW) magazine a year or so ago.
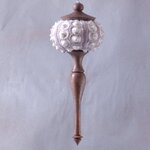
I filled the inside of the shells with expandable foam from a can. I made a tapered stone from an inexpensive grinding wheel from the hardware store and rounded out the large hole. I tapered the stone with a diamond dressing tool. I used a steel burr on a Dremel to touch up the edges of the small hole.
I used a dowel (turned from the same walnut as the finials) to join the top and bottom. No glue required between the shell and the wood.