Scratches, dents... Avoiding them. How much scratch is "acceptable"?

Signed-In Members Don't See This Ad

jrista

Member
Joined
Aug 12, 2021
Messages
2,241
Location
Colorado
So, I've been turning pens for a little while now. Officially I'd say around five months or so, although I first started over a year ago with a big gap. I bought a pen assembly/disassembly setup last year, which originally seemed to be great. But as I try to improve the quality of my pens here, I'm finding that it actually seems to damage the parts. For one, it seems to add little nicks and sometimes small, faint scratches. It may be that most people wouldn't notice them, but...I do, and...they bug me! :p

Another issue is, this assembly rig has a metal piston at the lever end, and a plastic stop with a hole with a beveled edge in it on the other side. I've found that, if I simply place a nib inside that, and compress a turned blank+tube onto it, most of the time, it seems to damage the nib. This happens most often with slimlines...I had it happen a couple times with bigger and more expensive kits, before I decided to try something. I bought some pieces of leather, and cut a circle out and glued it onto the end of that plastic stop. Then cut a hole in the center, and allowed the leather to ultimately get compressed down over the bevel. This has reduced the amount of scratching that occurs on the nibs, but I still have a problem with pen nibs, especially slimline, basically getting a dented ring where they meet this plastic & leather stop.

I started to offset most pen kits when I'm putting in the nib now, so that the tip of the nib touches the leather (and now, a fixed hole that's been cut out of that leather by regular assembly). I avoid slipping the nibs on that beveled hole. That makes it harder to assemble, its a lot more fiddly, and the change that the nib and the turned blank+tube slip to an angle preventing proper assembly (and potentially cracking) is high. But it seems to be the only way to avoid damaging the nibs.

For caps, I haven't found a good way to deal with them. The only way to really push them into the upper part of a pen kit is to center the cap in that hole in the plastic stop, which usually ends up putting at least one little nick in the caps of my pens. Small, hard to see unless you get the angle of the light right, or have really good vision, or bring them really close...but, it still bugs me, and I feel it is consistently diminishing the quality of my pens.

I'm curious what others think about scratches...and what others may consider acceptable as far as scratches or nicks go. Maybe I'm just being too picky? I want to produce a professional product, and I seem to really be struggling with this part of pen making...damage-free assembly. I thought this assembly rig was supposed to help AVOID these kinds of issues, but I seem to have had a consistent problem with them so far. I'm also curious if anyone else has had these kinds of issues with an assembly rig, and if they found ways around them...
 
Signed-In Members Don't See This Ad

1080Wayne

Member
Joined
Feb 5, 2006
Messages
3,344
Location
Brownfield, Alberta, Canada.
I have no experience with the type of press you have , but would not find the scratches acceptable . I use a Zyliss vice , but any small vise should work . As you say , there is a chance of misalignment , so care is required . I put the nib end against a small paper pad , which has a bit of give , prevents it from sliding on the smooth jaw surface , and would protect it from a rough one . I do the same with the cap , finial against the paper pad .
 

magpens

Member
Joined
Feb 2, 2011
Messages
15,911
Location
Canada
To answer the question in your title ...... NONE !!!! . . I cannot tolerate any scratching at all.

Once I identify a part of my process . . . or an offending tool . . . that causes scratches . . . out it goes, never to return !!

So . . . having said that . . . how do you avoid scratches ?
First off, get rid of that assembly/disassembly tool with the tapered center hole . . . or permanently cover the hole.
I suppose that the tapered hole was designed-in in order to make it easier for you to center your pen-to-be-assembled on the axis.
But you can do the centering by eye without having that tapered hole . . . WHICH YOU DON'T NEED.
You can actually eyeball it pretty accurately . . . and you very soon get the feel of things.

You are definitely not being too picky in your assessment of your assembly process ..... you CAN achieve perfection !

It might help when asking for opinions on these problems to actually show the equipment you are using and which causes the offense.

I have two pen presses that I bought in the early days of my pen-making . . . neither one has a tapered hole.
And both of them have served me well without any downside to their use.

I firmly believe that you do not have to tolerate any imperfections caused by a pen press.

There are other sources of scratches which are harder to deal with, but in my experience those all arise from sanding and polishing.
But it is possible to avoid even those scratches.
Unfortunately, it is very hard to teach that kind of thing.
A lot depends on your attention to detail and building up experience.
I can tell you that I strive to get smooth surfaces from the turning to begin with.
I then sand carefully with papers only .... 180, 240, 320, 400, 600, 800, 1000, 1200, 1500 and 2000 grit.
I do all my sanding on the lathe with the motor off, rubbing lengthwise only ..... NOT around the circumference of the barrels.
I do about 30 longitudinal strokes over the full length at each grit, wiping off the dust before moving on to the next.
After the finest grit, in the case of "plastic materials", I use a medium automotive cut polish ( Meguiar's #45).
I then use Novus 3 followed by Novus 2 ( polishes from Exotic Blanks, but others sell them)
Finally, I use Mequiar's "PlastX".

From start to finish ... sanding through final polish ... all strokes are horizontal (lengthwise) and lathe power is OFF throughout.

The reward is a mirror-like finish that I love. . Of course, a microscopic examination will reveal some scratches, but I say that "there are none"

It is a painstaking process, but .... in my opinion .... well worth it.

Feel free to ask about anything you don't quite "get".

With wood pen blanks, you first have to decide on what you want .... gloss or matte appearance, and proceed accordingly.

I usually prefer gloss, and that requires a dozen or so coats of CA glue, carefully smoothed to remove all surface "bumps".
And after that, the process is the same as laid out above.
 

jrista

Member
Joined
Aug 12, 2021
Messages
2,241
Location
Colorado
I have no experience with the type of press you have , but would not find the scratches acceptable . I use a Zyliss vice , but any small vise should work . As you say , there is a chance of misalignment , so care is required . I put the nib end against a small paper pad , which has a bit of give , prevents it from sliding on the smooth jaw surface , and would protect it from a rough one . I do the same with the cap , finial against the paper pad .

Sometimes its the really simple tools that are just right! I never thought of using a pad of paper. I did try a few sheets of paper before the leather, which never worked all that well...but a whole pad might just do the trick.
 

jrista

Member
Joined
Aug 12, 2021
Messages
2,241
Location
Colorado
To answer the question in your title ...... NONE !!!! . . I cannot tolerate any scratching at all.

Once I identify a part of my process . . . or an offending tool . . . that causes scratches . . . out it goes, never to return !!

So . . . having said that . . . how do you avoid scratches ?
First off, get rid of that assembly/disassembly tool with the tapered center hole . . . or permanently cover the hole.
I suppose that the tapered hole was designed-in in order to make it easier for you to center your pen-to-be-assembled on the axis.
But you can do the centering by eye without having that tapered hole . . . WHICH YOU DON'T NEED.
You can actually eyeball it pretty accurately . . . and you very soon get the feel of things.

You are definitely not being too picky in your assessment of your assembly process ..... you CAN achieve perfection !

It might help when asking for opinions on these problems to actually show the equipment you are using and which causes the offense.

I have two pen presses that I bought in the early days of my pen-making . . . neither one has a tapered hole.
And both of them have served me well without any downside to their use.

I firmly believe that you do not have to tolerate any imperfections caused by a pen press.

There are other sources of scratches which are harder to deal with, but in my experience those all arise from sanding and polishing.
But it is possible to avoid even those scratches.
Unfortunately, it is very hard to teach that kind of thing.
A lot depends on your attention to detail and building up experience.
I can tell you that I strive to get smooth surfaces from the turning to begin with.
I then sand carefully with papers only .... 180, 240, 320, 400, 600, 800, 1000, 1200, 1500 and 2000 grit.
I do all my sanding on the lathe with the motor off, rubbing lengthwise only ..... NOT around the circumference of the barrels.
I do about 30 longitudinal strokes over the full length at each grit, wiping off the dust before moving on to the next.
After the finest grit, in the case of "plastic materials", I use a medium automotive cut polish ( Meguiar's #45).
I then use Novus 3 followed by Novus 2 ( polishes from Exotic Blanks, but others sell them)
Finally, I use Mequiar's "PlastX".

From start to finish ... sanding through final polish ... all strokes are horizontal (lengthwise) and lathe power is OFF throughout.

The reward is a mirror-like finish that I love. . Of course, a microscopic examination will reveal some scratches, but I say that "there are none"

It is a painstaking process, but .... in my opinion .... well worth it.

Feel free to ask about anything you don't quite "get".

With wood pen blanks, you first have to decide on what you want .... gloss or matte appearance, and proceed accordingly.

I usually prefer gloss, and that requires a dozen or so coats of CA glue, carefully smoothed to remove all surface "bumps".
And after that, the process is the same as laid out above.

Thanks, Mal! Speaking of other sources...I just assembled another kit, and that one had a nick on the cap right out of the package. Also a slight scratch right at the top of the clip. The parts were all in separate little plastic bags inside the bigger bag that holds all of it, so I don't know how those got nicked...

I'm now wondering if the previous pen had the nicks in the caps before I assembled... I wonder if the parts are coming out of manufacturing that way...once they are all put in individual tiny plastic bags, it would have to be pretty hard for them to scratch each other, I would think! I guess these are all slimlines, so I guess you get what you pay for as well.

I have found some tiny nicks in some of the bigger kits I've assembled recently. The nibs, I think I've got that sorted, and with a pad of paper to press the nib against, I think I'll be totally sorted for the nibs. Its the caps, that I seem to have the most trouble with. But, I agree with you, I really don't want any scratches at all! I guess the only reason I asked, is I see photos on Etsy and Ebay and the like, and sometimes it seems like people have scratches on their pens... Which, really blows me away...

---

Regarding scratches on blanks (notably the arcrylic, poly, etc. stuff, as I don't use CA on wood, instead I use either friction polish or melamine lacquer...I did try CA at first, but...eh, somehow I just can't come to grips with turning my beautiful wood, into plastic!! :p I actually did pick up the Dr. Woodshop Pens Plus friction polish on recommendation from someone on these forums, which has that microcrystalline wax in it...I tried that on a couple of simple things like keyrings, and, it actually is pretty amazing stuff! It is expensive for the bottle, but for pens, I think it will go a long way and last a while...so it might be my ticket to getting the kind of "natural wood" sort of finish I want on my pens), I did have some problems with that very early on. It was especially frustrating on non-wood stuff. I think I'm finally over the hump on that front now, though. I've spent a lot of time recently trying to hone that skill (and I've been turning a lot of acrylic and poly pens.) I think its pretty honed now! Mark Dreyer has some really great tips here.

I found some videos from some makers who use pen polishing compound and the micromesh for wet sanding. Since I started doing that, I've been scratch free on the acrylic and poly blanks. I did try to do the lengthwise only sanding for a while, but with paper an even the micromesh (I think it goes 1500, 1800, 2400, 3200, 3600, 4000, 6000, 8000 and 12000...I start with the 1500, which when I look at it, seems more like 240 or 320 for normal sandpaper), I would end up with lengthwise scratches (faint and fine, but they would still catch the light when it was bright enough.)

I ended up settling on doing the full series of micromesh, all wet sanded, from the start (1500 MM wet was the first I would use, and I'd spend time using it to smooth out the blank and get a uniform surface before moving through the rest of the grits). I would do one micromesh with the lathe on, the next start off and lengthwise lathe off, then turn it on again, so I cut both directions (something I learned from Mark Dreyer I think, and it makes sense...each grit is 50% finer than the previous, and you can only really CUT the ridges made with the previous paper by sanding the opposing direction!) with each sheet. At 12000, I would again spend time really polishing things out. That would get me a pretty darn good result, and maybe most people would be satisfied...I'm too darn picky and can still see scratches in the highlights!! :p After watching some vids with some makers using polish, I ended up getting some, and will do my final finishing with polish on a paper towel and circular motions with the lathe off. That, the polish, gives me a totally scratch free finish, as far as I can tell. Especially if I go in circles in both directions...clockwise down the blank while manually turning it, then counter-clockwise the other way, back and forth a few times. Once the polish is basically dry, I like to use a dry piece of paper towel and just buff out the rest (lathe off of course) until the blank is totally clean.

Mal: If you really want that totally scratch free finish on non-wood blanks (or, I guess, on CA), you should look into some pen polish. It only takes about 2-3 minutes to fully polish and buff a finished pen blank, and the random nature of whatever final scratches you do end up with (because they would have to be there, albeit at something like 30,000 grit or so) seems to render them invisible to the naked eye.

The sanding/polishing is indeed pretty painstaking now, but for acrylics and poly (and alumalite, etc.) its really worth it. Wood has been different. I haven't had a problem with scratches on most woods...the two woods I have, have been the very hard gabon ebony and katalox. Those two are hard enough that they can show scratches. I haven't turned any this year so far, so maybe I have honed my sanding skill enough to avoid that now... Also, on wood, I do just like you do, only sand papers and only dry, although usually I start at 240 and go up to 2000 through all the grits. (Actualy, I added 800, 1200, 1500 and 2000 this year, so last time I turned ebony or katalox I probably stopped at 800, which is probably just not high enough! :p) I did find one video where the guy basically wet-sanded his wood pens with oil as a lubricant...I haven't tried that. I did oil wet sanding on a couple of bowls, and didn't like how the slurry ended up filling in the pores, leaving the pores with a lighter grayish colored look, which contrasted poorly with the rest of the bowl (at least IMO.)


My current problems are scratches and nicks in the pen kit parts themselves. I'm hoping you are right, and that achieving perfection (or closely enough that it seems that way) is possible!
 

magpens

Member
Joined
Feb 2, 2011
Messages
15,911
Location
Canada
@jrista
Thanks for your continuing discussion . . . we all learn how to improve via these discussions. . Reviewing/sharing what we do is part of it.

In my previous, I forgot to mention that my sanding of "plastics" is actually wet sanding . . . you mentioned that so thought I should too.

So much of what we learn about finishing/polishing comes from our own efforts, our curiosity, our perseverance, our trials and errors, etc.

We learn by doing . . . . as well as by sharing our thoughts . . . . but thinking, trying, and doing is the biggest part.

And what you say about some kits having damaged parts even before we receive them is a fact of life, I'm afraid.
I am not going to mention names . . . some kits are supplied to higher quality standards than others. . . You learn as you go.
 

jrista

Member
Joined
Aug 12, 2021
Messages
2,241
Location
Colorado
@jrista
Thanks for your continuing discussion . . . we all learn how to improve via these discussions. . Reviewing/sharing what we do is part of it.

In my previous, I forgot to mention that my sanding of "plastics" is actually wet sanding . . . you mentioned that so thought I should too.

So much of what we learn about finishing/polishing comes from our own efforts, our curiosity, our perseverance, our trials and errors, etc.

We learn by doing . . . . as well as by sharing our thoughts . . . . but thinking, trying, and doing is the biggest part.

And what you say about some kits having damaged parts even before we receive them is a fact of life, I'm afraid.
I am not going to mention names . . . some kits are supplied to higher quality standards than others. . . You learn as you go.

Thanks for the clarifications.

Yeah, wet sanding the "plastics" is awesome. I've tried with some dry sanding first, but that usually seems to leave deep scratches that can be a pain to get out. Once the sandpaper is lubed and you have some slurry, its amazing.

So, I checked some more kits. Seems like a lot of them have just one little nick in the cap parts. They are never large or particularly obvious, but when the light hits the cap right, you definitely see it...a little speck. Its mostly on the slimlines, though, and those are pretty cheap most of the time. I guess its not surprising. :p

I purchased about....oh, well, FAR too much the last week. I just spent a mind boggling amount of money on kits, blanks, stands for photography.... (I think I have a disease! Blankitis for sure! Penkititis to, probably! :p) A bunch of higher end kits, rollerballs, fountains, and so far, all of those seem to be pristine.

I'm almost afraid to turn some of the more expensive $20-$30 blanks and assemble the $30, $40, $50 kits... I ended up buying some more "lesser" kits like Woodriver's Wall Streets to get some more practice on. What a hobby! (Maybe soon, business!)
 

egnald

Member
Joined
Jun 9, 2017
Messages
3,133
Location
Columbus, Nebraska, USA
Greetings from Nebraska.

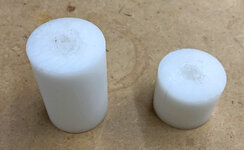
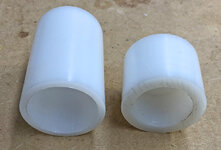
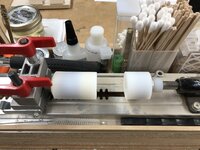
I've been through exactly what you were describing. The solution for me was HDPE. I bought a rod of 1-1/2 inch HDPE from Grangers or McMaster Carr or someone and turned a pair of caps/covers for the ends of my pen press. One for the aluminum pusher and one for the plastic (hard plastic) piece with the hole in the center. So far they have been working great with only a minimal amount of deformation on their surfaces. (I have more HDPE, so if they do get too bad I can simply make another set).

A fellow penmaker, Robert Blanford, aka RGB Woodturner, simply slipped a square of corrugated cardboard between the pen and the press to help prevent this. On kits like the Cigar, I unscrew the nib from the part being pressed in (coupler) so I don't press directly on the nib. I also used a piece of the HDPE with a clearance hole drilled in it so I press against the shoulder instead of the face of the threads for nib and transmission couplers.

Good luck in finding the solution that works best for you and your regimen.

Dave

IMG_2009 Cropped.jpg IMG_2010 Cropped.jpg

IMG_2008.JPG
 

jrista

Member
Joined
Aug 12, 2021
Messages
2,241
Location
Colorado
Greetings from Nebraska.

I've been through exactly what you were describing. The solution for me was HDPE. I bought a rod of 1-1/2 inch HDPE from Grangers or McMaster Carr or someone and turned a pair of caps/covers for the ends of my pen press. One for the aluminum pusher and one for the plastic (hard plastic) piece with the hole in the center. So far they have been working great with only a minimal amount of deformation on their surfaces. (I have more HDPE, so if they do get too bad I can simply make another set).

A fellow penmaker, Robert Blanford, aka RGB Woodturner, simply slipped a square of corrugated cardboard between the pen and the press to help prevent this. On kits like the Cigar, I unscrew the nib from the part being pressed in (coupler) so I don't press directly on the nib. I also used a piece of the HDPE with a clearance hole drilled in it so I press against the shoulder instead of the face of the threads for nib and transmission couplers.

Good luck in finding the solution that works best for you and your regimen.

Dave

View attachment 315807 View attachment 315808

View attachment 315806

Thank you, Dave! This is a great idea with the HDPE...and, your pen assembly rig there, is exactly the same one I have. I am going to give this a try. I have used a piece of wood with a clearance hole when I need a clearance hole, but I like the idea of using HDPE better. I always worry that the wood grain will leave an impression or something.
 

EricRN

Member
Joined
May 16, 2019
Messages
761
Also, for the dents, be sure not to press them in too hard. I had the same thing happen. Turns out I was hogging down hard on the press and really pushing them together. Instead, push the pieces in slowly, with a light touch. Let the press do the work. And when the pieces are touching, that's it; just let it go. No need to press down further to make sure they are tight. That helped tremendously with avoiding dents.
Also be wary of using the press directly on threaded components. Because the walls are so thin, they have a tendency to bend, even microscopically, and then your parts will be misaligned when you screw on whatever is supposed to get threaded on.
 

randyrls

Member
Joined
Feb 2, 2006
Messages
4,829
Location
Harrisburg, PA 17112
I don't like single-tasker tools like a pen press. I have oak jaw faces on my woodworkers vise and it works well for me. Transfer punches work well for disassembly and are also used for my blank trimming sander.

Press blocks are needed on click pens and situations where there are threads or thin parts. Press against the shoulder of the part and not the extended thin section.

PS I do have a set of plastic press blocks like Dave showed that go into the tapers of a lathe for when I am away from my shop.

Hope this helps..
 

Bats

Member
Joined
Oct 12, 2020
Messages
364
Location
W. Nowhere, CT
I start with the 1500, which when I look at it, seems more like 240 or 320 for normal sandpaper
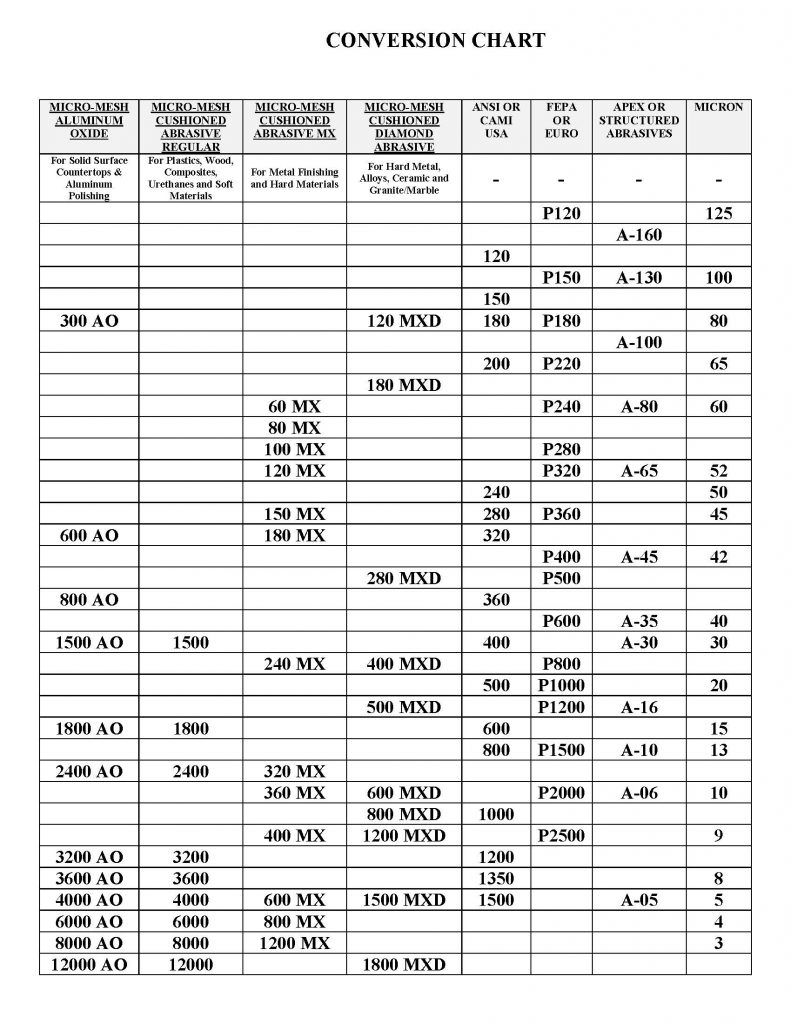
Just a quick interjection here, for the curious. The 1500 Micro-Mesh is (supposed to be - there seems to be a lot of variation between sandpaper brands) equivalent to a 400 grit US paper, between a P600 and P800 European, or 30 micron.

For the especially curious, if you dig around on their site enough, they actually provide a handy conversion chart between the various grit systems:

(the color chart is less useful, since they seem to periodically shuffle those around)
 
Top Bottom