Rose Engine Lathe Universal Cutting Frame

Signed-In Members Don't See This Ad
See more from rherrell

rherrell

Member
Joined
Aug 22, 2006
Messages
6,475
Location
Pilot Mountain, NC
This is a project I just completed for a customer. I really don't know exactly how it works but you insert 3/16" cutters into the cutting head and it spins around and makes a pattern on your workpiece. You connect it to the lathe via the double pulley on top.

IMG_9721.JPG
IMG_9722.JPG
IMG_9723.JPG
IMG_9724.JPG
IMG_9725.JPG
IMG_9727.JPG
 
Signed-In Members Don't See This Ad
I may happen to know that customer (we chatted about this very item a week or so ago) and he is super thrilled! I may have you make one of those for me in the near future.
 
Rick, completely fascinated with this and would love to see this in action. Any videos you can direct us to? I love your work and the tool rest you did for me as well as the Turning Between Centers bushings you did for me are awesome and think of you everytime I use them. What beautiful work you do.
 
Hi all, I am the lucky recipient who reached out to Rick to make this awesome universal cutting frame. To start i will say this, Rick H never disappoints! Ricks work has always been above and beyond what i expected, and this cutting frame is no different , once again he produced a very fine piece of equipment that i will use and cherish for years to come. We are all very lucky to have someone so talented in our group offering up his machinist services @ more than fair prices and i already have another project in mind for him for my Rose engine lathe build. Anyhow, this UCF is perfect for what i wanted and needed and i am a few days away from have the overhead cutting frame built and once its together, since some of you asked i will share some pics here of this UCF in action. Thanks Again Rick I value your work and fair prices more than you will ever realise.
 
I agree whole-heartedly with all you wrote, and especially this line.

I'm looking forward to seeing your rose engine when complete - and some progress pix as you progress in the build if you have the time & patience to record the journey.

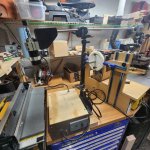
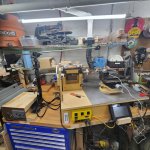
Duncun, Rick (and anyone else interested ) I started the build last summer (its all based on the MDF Rose engine 2 plans) and have had it running now since october. That being said there are many upgrades and things stiill to do and that i want to build and add on, but at least i can play and learn some on it as i go now. The OCF that Rick made is an upgrade, the cutting frame i am currently usuing has the motor mounted on it and has carbide cutters on it. The upgrade will do a few things for me ( at least based on research) first it will help with some very small vibration lines that are showing up on my work that are coming from the vibration of the motor (direct mount). The over head cutting frame should eliminate these. And second this cutting frame uses 3/16" hss cutters that i can profile and they spin like a fly cutter so i can do different profiles of brick type work or basket type work on the side of pieces in different profiles as well it opening up other design opertunitys. My instagram link is https://www.instagram.com/franklinscreativecorner/ if you want to check out a few pics of things i have made with it so far and there are a few pics of my rose engine in October, when i first had it operational. Also here is a couple pics of this afternoon, I just finished building the overhead drive arm assembly and motor /belt and control unit and wiring it all for the UCF that Rick made and its in these pics.(this is based on Here is the DIY overhead drive that I Modeled after Spencer Hamann 's design That i seen in the last OTI meeting and modeled this one-off memory ) Now i just need to make a jig or two to help grind the cutters and then i will have it operational and once i do i will share some pics or a video (if possible ) of it all in action.
 

Attachments

  • 20260408_145025.jpg
    20260408_145025.jpg
    219.4 KB · Views: 24
  • 20260408_144906.jpg
    20260408_144906.jpg
    222.2 KB · Views: 24
Last edited:
Back
Top Bottom