You are using an out of date browser. It may not display this or other websites correctly.
You should upgrade or use an alternative browser.
You should upgrade or use an alternative browser.
Read Read Read the Directions!
- Thread starter Stephanie
- Start date
Signed-In Members Don't See This Ad
Signed-In Members Don't See This Ad
jttheclockman
Member
Well Stephanie if these are your first pens you did quite well. You are correct about slowing down. This is a marathon and not a relay race. After you do a few kits you will pick up little things that you know you should look for. If you start doing kits like cigar pen kits you have always be aware of the bushing sizes and the barrels for the top and bottom because it is so easy to reverse and mix up. There are a few kits like that. Keep at it you are well on your way and have fun.
Lucky2
Member
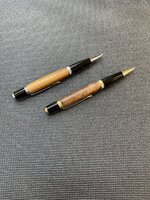
Stephanie, I checked out these two pens, and I can't see where you'd have an issue? So, what's your beef???
Len
Len
Stephanie
Member
The first one I completely blew up. Going to fast. One of these has a slight chip out on the top side that I hid with the pen clip.Stephanie, I checked out these two pens, and I can't see where you'd have an issue? So, what's your beef???
Len
Stephanie
Member
Do you have a camera in my garage? That is exactly what I did with the next two pens I started to make. Cigar pens. I kept looking at it wondering...what the heck is going on. Yeah...read the directions a little closer. Fun learning the lathe/speeds/turning tools.Well Stephanie if these are your first pens you did quite well. You are correct about slowing down. This is a marathon and not a relay race. After you do a few kits you will pick up little things that you know you should look for. If you start doing kits like cigar pen kits you have always be aware of the bushing sizes and the barrels for the top and bottom because it is so easy to reverse and mix up. There are a few kits like that. Keep at it you are well on your way and have fun.
Stephanie
Member
Thank you. They are called Wall Street II. I bought them at Woodcraft.Nice looking pens, Stephanie !! . Are they Sierras ?
It appears that you have done extremely well on these, your first, pens !!! . . In my opinion, you chose the kits for your first pens very wisely !!!
Do you have a camera in my garage? That is exactly what I did with the next two pens I started to make. Cigar pens. I kept looking at it wondering...what the heck is going on. Yeah...read the directions a little closer. Fun learning the lathe/speeds/turning tools.
For your Cigars, be sure to take things slowly ..... examine the bushings and examine the diagrams in the instruction sheet.
Measure the bushing diameters with your calipers.
Be sure you have each of the 4 bushings in the right place ..... the BUSHINGS ARE ALL DIFFERENT.
If your Cigar pens are not from PSI, then I suggest you go to the PSI website and examine the instruction sheet for the Big Ben pen kit, which is basically the same as most other cigars. .
The PSI instructions will specify the diameter of each bushing ..... compare with your own measurements .... I think they should be very close.
It is most important that you GET THE BUSHINGS IN THE RIGHT ORDER ON YOUR MANDREL.
And, as you turn, be very careful ..... the WOOD GETS QUITE THIN AT THE NIB END.
Stephanie
Member
Thanks for the words of wisdom. I stopped for the night after I realized I had them all messed up. These are the kind of mistakes that you never forget. 
Looks like I am wrong about the bushing dimensions being in the instruction sheet for the pen kit. . . They are not there.
But they are in the instruction sheet for the actual bushings themselves.
https://www.pennstateind.com/library/bushing_book.pdf#page=42 ....... check dimensions there.
This PSI bushing set has only 3 bushings, but the center bushing serves a two-fold purpose.
If your kit is a Cigar pen kit from Berea, then the bushing set will have 4 bushings, and the dimensions will be close to the PSI dimensions.
Don't worry about the exact dimensions being a LITTLE different. . . Just use the PSI dimensions as a guide to getting the right positions of the bushings.
Be sure to follow the pen kit instructions from the company where you bought the pen kit and the bushings.
The "same" size bushings will go in the same positions ..... I am pretty sure this positioning will be the same for Cigars from all companies.
PSI is the only company, as far as I know, which is so good as to give you diagrams with the bushing dimensions. . . I praise them FOR THAT.
Last edited:
Stephanie
Member
Stephanie
Member
Is that a list of all the pen bushing sets for all the pen kits? I think I just had a mini stroke. If so, now I get why people use calipers instead. Dang...
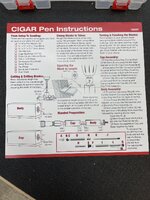
The kit I used it exclusively made for Woodcraft. Super special(insert sarcasm). Thanks to everyone that has sent me links to other pen making websites...there are so many more out there that are so much better looking. I just bought these to get started. The world of pen making has opened up into an Ocean of places to look for pen stuff.
The kit I used it exclusively made for Woodcraft. Super special(insert sarcasm). Thanks to everyone that has sent me links to other pen making websites...there are so many more out there that are so much better looking. I just bought these to get started. The world of pen making has opened up into an Ocean of places to look for pen stuff.
Woodcraft instructions are probably the worst of any !!!!!
I think they do have a diagram showing the pen blanks on a mandrel with bushings, and showing bushing sizes, but I cannot find it now.
OH ..... I see that now on what you posted.
THE NIB IS AT THE RIGHT HAND SIDE (smallest bushing). . . . . THE TOP OF PEN IS AT THE LEFT HAND SIDE (second smallest bushing)
[ BEWARE: . The diagram underneath shows the pen parts A, B, C, D, ...... with the OPPOSITE ORIENTATION to the bushing diagram above ]
They are showing the situation where you will put both blanks on the mandrel at the same time and turn both blanks at the same time.
THAT CAN BE RISKY ...... I recommend that (if you can) you mount each blank by itself ....... turn one at a time
If you must mount both blanks on the mandrel at the same time, then I recommend that you work on only one blank at a time and complete it
before moving on to the other blank. . . It is very easy to get confused otherwise.
Is that a list of all the pen bushing sets for all the pen kits?
I do not see what you are referring to. . However, I do know that Woodcraft prints a VAST ARRAY of their part numbers in their instruction sheets.
Those numbers are OVERWHELMINGLY CONFUSING , especially to somewhat just starting out.
The Cigar kit, unfortunately, is one of the trickiest of all pen kits ...... from the point of view of the bushing order ....... and .......
...... also from the point of view of shaping the wood barrels "correctly" . . . I remember going through all that .
To make the pen look right ...... or to make your pen look like the published photographs and diagrams show ...... can be very tricky .
Take it really slow and methodically.
jttheclockman
Member
Thanks for the words of wisdom. I stopped for the night after I realized I had them all messed up. These are the kind of mistakes that you never forget.

Last edited:
randyrls
Member
Those are good pens! I print and keep the instructions in a loose leaf binder. Any wisdom I gather goes into the notes for that pen.
RichAldrich
Member
A great tip by randyris above.
Write on the instruction sheet or a piece of paper.
List any item or any process that needs thought or improvement.
Address them all.
jtheclockman
Shows his cigar pen. (Very Nice)
Draw the outline on paper of the profile of the pen you would like to make.
Plan the pen and execute.
Have fun and welcome!
FWIW, Reading the directions is important. So is reading them right and that's a lesson I keep learning over and over. Yesterday I ruined the nib on an Executive kit because the directions were for two types of kits and my eyes zeroed in on the Pencil assembly instructions.
it said to press the nib adapter into one end of the barrel but the nib was already attached to the adapter so I figured, just unscrew the nib from the adapter and get going. Nope.
I twisted that thing until it was crooked but the nib still wouldn't unscrew from the adapter. That's when I noticed the instructions have a section for pen assembly right above the section I was reading. The pen instructions say to press the nib into the barrel. The adapter is part of the nib.
DOH!
Btw your pens came out a lot better than my first, second, third pens.
Mart.
JoeCallahan
Member
I've been turning pens for around 3 years now, and thanks to the amazing people on this forum(and a whole lot of practice), have come such a long way since I first started out. But to this day, I still hide little chips and imperfections under the pen clip!The first one I completely blew up. Going to fast. One of these has a slight chip out on the top side that I hid with the pen clip..
eharri446
Member
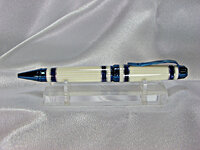
Just an FYI, the Woodcraft Wall Street II uses the same diameter bushing as the Sierra. Also, it is not technically a cigar pen since it has a single barrel. I do agree that you need to pay attention to the bushing order since some are smaller at one end than at the other. The ExoticBlanks Glacia kit is that way. Also, you need to make sure that if you are having someone laser engrave them for you that the small end needs to be on the left side if you want the engraving to read from left to right on the left side. If you want it to be on the left side for a left handed person, then reverse the direction of the small end. I made several of them for my son's grooms men and did not realize they were different and did not tell the person who engraved them for me.
Just an FYI, the Woodcraft Wall Street II uses the same diameter bushing as the Sierra. Also, it is not technically a cigar pen since it has a single barrel.
@eharri446
Just an FYI in reply to yours .... there is mixed discussion in this thread .... some about the Wall Street II/Sierra .... some about the two-barrel Cigar
I don't think we have confused the two. . . If we have, it was an accidental confusion of words. . . Please highlight such, if you don't mind. . . Thanks.
howsitwork
Member
"And so we learn" ..... Stephanie.
I learned to re read before completing the pen, having forgotten to put the adaptor ring behind the nib unit
I then learned that the CA I decided to use just to be extra sure it was permanently fixed did just that ! I also then learned that the CA will eventually dissolve in acetone if you have enough patience ( sadly I had to reflect on that to learn it as I didn't have enough patience ) .
Kits are more difficult to diss assemble than to assemble....
Have fun , swear a lot ( where appropriate and unobserved ) , drink coffee ( with dark chocolate digestive biscuit) and reflect . But above all HAVE FUN !
tomtedesco
Member
I graduated from the "School of Hard Knocks" at the head of the class. Bone head things I did when first starting out, welcome to the club. In a year or so you will join the rest of us laughing about these learning methods.  You have done some great work so far, keep it up.
Stephanie
Member
I am trying to clean up my potty mouth. But thanks for the encouragement. The only ears that will hear me are my cats, thankfully."And so we learn" ..... Stephanie.
I learned to re read before completing the pen, having forgotten to put the adaptor ring behind the nib unit
I then learned that the CA I decided to use just to be extra sure it was permanently fixed did just that ! I also then learned that the CA will eventually dissolve in acetone if you have enough patience ( sadly I had to reflect on that to learn it as I didn't have enough patience ) .
Kits are more difficult to diss assemble than to assemble....
Have fun , swear a lot ( where appropriate and unobserved ) , drink coffee ( with dark chocolate digestive biscuit) and reflect . But above all HAVE FUN !
Stephanie
Member
Great idea. I went and grabbed one of my empty notebooks and put it out in the garage.Those are good pens! I print and keep the instructions in a loose leaf binder. Any wisdom I gather goes into the notes for that pen.
egnald
Member
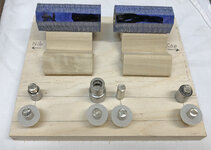
Greetings. Very nicely done - pens to be proud of for sure. As for instructions, I usually jot notes down on the sheets in my 3-ring binder, because often they are not as clear as one would hope. On some kits I pretty much do a cut and paste from the instruction sheets and add photos to make up a custom instruction sheet of my own. I have found this especially useful with the two part pens where the cap is removable. It helps me remember how to get the wood grain or plastic patterns lined up during turning and assembly. And I made a helper out of some scraps of wood, 1/4-inch shelf pins, and outside corner molding. I use it to try to keep my bushings, tubes, and blanks oriented as I carry them through the various processes. It does help but sometimes I still get things turned around! - Dave
Attachments
sorcerertd
Member
I opened this and had to laugh. No, not at you. With you. SLOW DOWN! Hahaha. I finally got back in the shop today after a couple weeks. Still should be taking care of other stuff, but needed a break. I was thinking how the most important thing in pen making is patience! So guess what I did right after thinking that? Yep, rushed something and ruined the finish. SMH. It happens. There's worse things for sure. Glad to see you got a couple nice pens out of your effort!
Stephanie
Member
Everyone has such useful ideas. Thanks for sharing. I am truly finding how easy it is to get stuff turned around.

You can laugh at me also. I don't mind. This is fun and entertaining. Everyone is so kind and helpful. If we can't laugh at ourselves...what is the point in continuing on.I opened this and had to laugh. No, not at you. With you. SLOW DOWN! Hahaha. I finally got back in the shop today after a couple weeks. Still should be taking care of other stuff, but needed a break. I was thinking how the most important thing in pen making is patience! So guess what I did right after thinking that? Yep, rushed something and ruined the finish. SMH. It happens. There's worse things for sure. Glad to see you got a couple nice pens out of your effort!


