Question: Tapered Hole in Pen Press

Signed-In Members Don't See This Ad

egnald

Member
Joined
Jun 9, 2017
Messages
3,061
Location
Columbus, Nebraska, USA
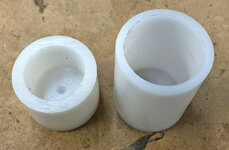
Greetings from Nebraska. I am planning on making new HDPE sleeves to cover the aluminum and UHMW contact surfaces on my PSI pen press. I think the HDPE should reduce the risk of marring the parts because it is softer than the aluminum and UHMW parts.

The UHMW (spring loaded) end of my press has a tapered hole in it. I assume that this was done to accomoadate the tip when pressing; however, some of the pens I have pressed have an obvious ring on the tip that can be seen in reflection after being pressed. I assume this is because a point contact in the tapered hole on the UHMW is deforming the tip or plating on the tip.

So, as of now I am planning on making the sleeve flat on the face, forgoing any kind of hole for the tip unless I am missing something. Does the tapered hole provide some kind of advantage that I am not aware of? It looks like most pen presses and pen pressing devices have this tapered hole on one of their faces.

Regards,
Dave
 
Signed-In Members Don't See This Ad

Fine Engineer

Member
Joined
Nov 17, 2021
Messages
286
Location
Carson City, NV
I've found that hole to be a problem as well. On my first pen, I put the transmission in there and it swaged the top of the transmission cylinder such that I almost couldn't get the refill in it. Turning the next pen around and putting the tip in the hole marred the finish. So now when pressing a transmission in, I offset the pen to the outside of the two pressing cylinders so that it is flat on both ends, and that has worked very well. It would be nice to plug that hole so that I can use the whole face of the press.

I'm using a Milescraft press
 

RobS

Member
Joined
Jun 20, 2016
Messages
1,037
Location
Carlsbad, CA
The logic from everyone aligns, use a flat plastic in the jig instead of the hole.

I use a giant #3 arbor, and i place a plastic sheet under and on top of the pen, works fine. This aligns with what you are all proposing.
 

jebner

Member
Joined
Oct 5, 2021
Messages
40
Location
New Philadelphia, OH USA
As with the previous comments, I've had issues as well with that hole messing up pen tips during assembly. I also placed a chunk of oak over the UHMW as a solution. I personally think it works better now that I have a solid surface to press against.
 

sorcerertd

Member
Joined
Sep 30, 2019
Messages
2,655
Location
North Carolina, USA
Yep, same here with ruined tips. As for the aluminum, I usually put a scrap piece of leather between it and the part. My guess is that it is there to prevent the parts from slipping, but a very small dimple would accomplish the same thing.
 

egnald

Member
Joined
Jun 9, 2017
Messages
3,061
Location
Columbus, Nebraska, USA
Thanks everyone for reinforcing that I should just leave the inserts flat. Even though they are new, they are pretty much the same as the ones I was replacing. The sleeve for the aluminum post is the short one and has a 1-inch hole drilled in. The one that covers the UHMW spring loaded post is the longer one and has a 30mm hole drilled in it. Both fit a little loose on their respective posts, so I wrapped a layer of blue painters tape around them before sliding the sleeves on which tightened things up just right.

Thanks again. - Dave
 

Attachments

  • IMG_2455 Cropped.jpg
    IMG_2455 Cropped.jpg
    220.1 KB · Views: 60
  • IMG_2456 Cropped.jpg
    IMG_2456 Cropped.jpg
    242.8 KB · Views: 65
  • IMG_2457 Cropped.jpg
    IMG_2457 Cropped.jpg
    119 KB · Views: 55
Joined
Sep 24, 2006
Messages
8,206
Location
Tellico Plains, Tennessee, USA.
No longer a pen maker, but I found the PSI pen press to be near useless when I was doing pens... I use an Arbor press from HF.... have to be careful with it as you can crush a pen with it, but with care works better than a pen press for me.
 

penicillin

Member
Joined
Feb 27, 2019
Messages
1,036
I use the lathe for pen assembly with the Sawdust Bros. pen press adapters (MT2). You hold the pen and the part in place with one hand, making sure the part is perfectly aligned and square, then crank the tailstock slowly to press the part in place. I like these lathe pen press adapters because they are small, store easily, and work very well. I keep them in a small tray under the lathe bed with the spur drives, live centers, Jacobs chuck, etc. That is as convenient as it gets.

Both pen press adapter parts are slightly dished, but one part has a hole in the center. I assume the hole is for centering the pen tip. The center hole is sized so the rim fits halfway up on a Slimline pen tip. If you are not careful, that center hole will leave dents in the pen tip. I avoid the problem by not using the part with the hole for pen tips. In general, I use the non-hole adapter to press in all pen parts, including pen tips. In my opinion, the hole does no good. I would eliminate the hole from the design. Still, the pen press adapters work very well if you don't use the hole. I recommend them:

https://www.woodcraft.com/products/lathe-pen-press-adapters-2-mt
https://www.amazon.com/Lathe-Pen-Press-Adapters-MT/dp/B00C9731LM/
 

egnald

Member
Joined
Jun 9, 2017
Messages
3,061
Location
Columbus, Nebraska, USA
I use the lathe for pen assembly with the Sawdust Bros. pen press adapters (MT2). You hold the pen and the part in place with one hand, making sure the part is perfectly aligned and square, then crank the tailstock slowly to press the part in place. I like these lathe pen press adapters because they are small, store easily, and work very well. I keep them in a small tray under the lathe bed with the spur drives, live centers, Jacobs chuck, etc. That is as convenient as it gets.

Both pen press adapter parts are slightly dished, but one part has a hole in the center. I assume the hole is for centering the pen tip. The center hole is sized so the rim fits halfway up on a Slimline pen tip. If you are not careful, that center hole will leave dents in the pen tip. I avoid the problem by not using the part with the hole for pen tips. In general, I use the non-hole adapter to press in all pen parts, including pen tips. In my opinion, the hole does no good. I would eliminate the hole from the design. Still, the pen press adapters work very well if you don't use the hole. I recommend them:

https://www.woodcraft.com/products/lathe-pen-press-adapters-2-mt
https://www.amazon.com/Lathe-Pen-Press-Adapters-MT/dp/B00C9731LM/

At one point I thought about making a set of those, or I should say, something like those. I have two or three #2 Morse Taper to 3/8-16 Drill Chuck Arbors (MT2 on one end and 3/8-16 male threads on the other), so the plan was to simply drill and tap a couple of pieces of HDPE and screw them on to the MT2. But then I bought the PSI assembly/disassembly press and have been using it since then.

I suppose this could be done with MT2 chucks made for turning bottle stoppers too. I think they have the same threads.

Dave
 

penicillin

Member
Joined
Feb 27, 2019
Messages
1,036
At one point I thought about making a set of those, or I should say, something like those. I have two or three #2 Morse Taper to 3/8-16 Drill Chuck Arbors (MT2 on one end and 3/8-16 male threads on the other), so the plan was to simply drill and tap a couple of pieces of HDPE and screw them on to the MT2. But then I bought the PSI assembly/disassembly press and have been using it since then.

I suppose this could be done with MT2 chucks made for turning bottle stoppers too. I think they have the same threads.

Dave
I have used the same Sawdust Bros pen press adapters for several years. I think they are worth the cost just for their convenience and ease of use.

If you have a very tight budget, it would be easy to make a very quick and dirty version on your own:

Drill partial holes in two small blocks or boards - not all the way through. Glue dowels in the holes. Make sure the dowels are perpendicular in all directions during the glue-up. After the glue dries, unplug the lathe and mount one in the headstock with a four-jaw chuck or a collet chuck or whatever. Mount the other in a Jacobs chuck (holds drill bits) or a collet chuck or whatever. Use the two flat surfaces to press pen parts together using the crank on the tailstock. Remember to keep the parts straight and square as you press the pen parts in, the same as you would for any pen press.

If you want to get fancy, use a countersink bit or a fat standard drill bit (with your drill set to reverse) or a router bit (like a core box bit) to make a small "dish" on the flat side of the blocks to help center the pen parts. A very slight dish, not a hole, okay?

You can also turn your own pen press adapters. Just look at the photos of the Sawdust Bros product for the basic shape. In my opinion turning good matching tapers takes more time and effort than my quick and dirty design above, but if you turn your own tapers, you don't need chucks.
 

sorcerertd

Member
Joined
Sep 30, 2019
Messages
2,655
Location
North Carolina, USA
The PSI pen press is working better for me than the wood end vise on the end of my Harbor Freight bench that I used prior to buying the press. The screw mechanism on that vise does give you a surprising amount of control, though.
 
Top Bottom