Question about Polymer Clay

Signed-In Members Don't See This Ad

Waluy

Member
Joined
Jan 30, 2013
Messages
285
Location
Olathe, KS 66061
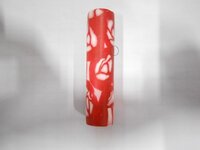
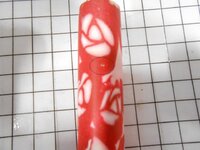
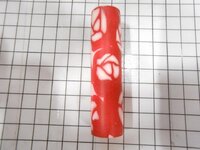
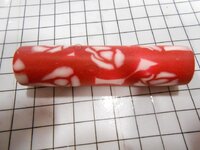
I made my first attempt at a polymer clay tube this weekend bu the results left me with some questions.
The first question I have is there were several spots where it looks like I had air bubbles (circled in the pictures). Is there something I am doing wrong?
Second (and this is more of an observation) the color I used as the base layer was pink when I laid it on but after baking and shaping to size it appears white. Is there something I can do to prevent massive color shifts?
 

Attachments

  • Pen 017.jpg
    Pen 017.jpg
    84 KB · Views: 268
  • Pen 019.jpg
    Pen 019.jpg
    142 KB · Views: 238
  • Pen 020.jpg
    Pen 020.jpg
    151.7 KB · Views: 225
  • Pen 021.jpg
    Pen 021.jpg
    154.6 KB · Views: 200
Signed-In Members Don't See This Ad

Gary Beasley

Member
Joined
Sep 18, 2009
Messages
1,326
Location
Marietta, Ga. USA
Voids are something you will see when working clay if it happens to catch a pocket when folding it. A drop of CA on the hole and a CA finish on top of that will usually make them invisible.
 

BeSquare

Member
Joined
Dec 3, 2012
Messages
211
Location
Arlington Heights, IL
+1 to what was said above, it happens, especially when pushing multiple pieces together to form the blank. A little CA, and CA finish the whole thing and they look amazing :D

As for the color shift, what clay did you use?
 

Waluy

Member
Joined
Jan 30, 2013
Messages
285
Location
Olathe, KS 66061
Ok I figured it was something like that. When I run my next test I will know.

I used Sculpey III. It was on sale for $1 per block at joann's and I wanted to make sure it was something I was serious about before investing too much money.
 

Lashaby

Member
Joined
Aug 1, 2013
Messages
22
Location
San Antonio
I haven't had a noticeable color shift on mine, using Sculpey III and Premo. The colors typically brighten and intensify when we add the CA finish, and that may help bring back the pink in yours.
 
Joined
Aug 7, 2009
Messages
700
Location
Jamestown, NC
Bubbles are something you will battle the entire time you are working with clay. If you can catch them before you bake them use a needle tool to pop them and roll the blank back and forth on a flat surface to fill the void left by the tool. If you carefully apply your slices "side to side" you will avoid some of the pockets.

For me Sculpy III is one of the worst with pockets due to the softness of the clay. This is just in my use of it as others have great success with it. I stick with Kato and Premo due to the hardness before and after curing.
 

Waluy

Member
Joined
Jan 30, 2013
Messages
285
Location
Olathe, KS 66061
How long and at what temperature are you cooking them?

I baked it at 275°F for 15 min.

Bubbles are something you will battle the entire time you are working with clay. If you can catch them before you bake them use a needle tool to pop them and roll the blank back and forth on a flat surface to fill the void left by the tool. If you carefully apply your slices "side to side" you will avoid some of the pockets.

For me Sculpy III is one of the worst with pockets due to the softness of the clay. This is just in my use of it as others have great success with it. I stick with Kato and Premo due to the hardness before and after curing.

There were no indications of bubbles before turning down some (I made it a little thicker than the kit size and turned it down). I will probably switch from Sculpey III to something else once I get a better grasp of it but at the moment it is the cheapest locally available.
 

pshib

Member
Joined
Oct 20, 2012
Messages
122
Location
Dallas
Next time you turn try using sandpaper only....mine come out pretty good when I start out worth 120 grit and then work my wAy up. I wet sand then finish with ca depending on what look I'm going for.
 

peepsquirrel

Member
Joined
Aug 19, 2013
Messages
3
Location
Knoxville, TN
I usually turn with a cutting tool just enough to make the polymer concentric with the bushing. I then switch to 80 or 120 grit and take it down the rest of the way with sandpaper. The cutting tool seems to rip out chunks of the polymer.

Tiny bubbles and tiny cracks seem to be inevitable with polymer clay.
 

Waluy

Member
Joined
Jan 30, 2013
Messages
285
Location
Olathe, KS 66061
I may have to try just using sandpaper the next time and see if that was the issue. But I feel like they were just bubbles because while turning it felt just like turning acrylic (no snags at all).
 
Joined
Aug 7, 2009
Messages
700
Location
Jamestown, NC
bubbles will be there whether you use sandpaper or not. The action of kneading incorporates air no matter what you try. Typically I run mine through a dedicated pasta machine. Its a fold, then turn, then fold type of thing:)

I have found if I keep some of the clay that you made the blank with it helps to cover up the air pockets. If there are voids once you turn it to size take some of the uncured clay and rub it into the voids. Put the blank back in the oven for 5 minutes or so to cure the small amount of clay you added. Be sure to watch it when you put it back in the oven because it can burn quickly. Once it cools sand it and your ready to go!
 

Cmiles1985

Member
Joined
Nov 12, 2013
Messages
1,611
Location
Aransas Pass, TX
I was going to ask about the pasta machine idea. I know my wife uses the type specifically for clay. We haven't ventured into clay pens yet, but soon we will! I know she has a very specific way of running the clay through the pasta machine (as in the fold ALWAYS goes through first). I'll look closely at what she's been making and see how she gets rid of bubbles.
 

pshib

Member
Joined
Oct 20, 2012
Messages
122
Location
Dallas
The pasta machine is the way to go. You can get it very close to the bushings then all it needs is very little sanding. I will usually only go bigger in one tube go a slim line because I like to leave the nib end slightly larger to make it comfortable to hold. I just shape it with sand paper and ca it.
 

Waluy

Member
Joined
Jan 30, 2013
Messages
285
Location
Olathe, KS 66061
I used a pasta machine on mine. Always sent the clay through folded side first. I think the bubbles came from rolling it on the tube since it looks like they are mostly at the points where two pieces of cane joined together.
 

pshib

Member
Joined
Oct 20, 2012
Messages
122
Location
Dallas
I've had bubbles form between the clay and tube. Luckily with I my patterns it's hard to see. I usually shave them down with a razor before a sand. May or May not work for you.
 
Top Bottom