Puzzle Pen advice

Signed-In Members Don't See This Ad

Turned Around

Member
Joined
Jul 28, 2011
Messages
838
Location
Houston, TX
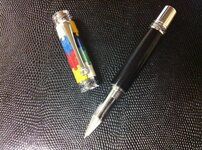
I just got one of the Majestic pezzle pen kits int he mail (thank you Constant, great colors) and i realized I might have jumped in the deep end without my floaties. I have made many pens, but no lazer cut ones. Do you guys have any advice on how to go about making this kit without messing it up? I'm trying to make it for my sister for x-mas, and I would like to make it look good. I haven't made a pen for her YET, and she keeps bugging me for one.

I have searched other threads, and (unless I missed it) most of the talk is about where to buy one of the kits and not how to actually assemble the thing. ANY help at this point will be awesome.

Thanks,
Nic
 
Last edited:
Signed-In Members Don't See This Ad
I typically assemble the pieces together on the tube and saturate with thin CA. If the pieces are loose, put some of those rubber bands used for braces around the tube to hold it tight. Ideally, before you saturate, you should be sure your tube is roughed up with sand paper and even better if you can slide it out of the puzzle pieces and glue it up using some 5min epoxy, then saturate it with CA. Dont worry about the rubber bands, those will turn off.
 
Nic-I second everything that Seamus said.

I was worried when I did my first laser kit, but I just went slowly, followed the directions in the kit (rare for me), built it around the tube, and then was lucky enough to get it out to be able to epoxy it back in. In subsequent laser kits the tube has generally gotten stuck (probably because I used more CA), so I have now learned to sand the tube in advance, and then if it doesn't come out I just add thin CA in whatever holes I can find to make sure it is solidly glued.

It may be overkill, but when dry, I go over all the edges with medium CA, because I am afraid that I might get tear out. Also, when I first put the blank on the lathe, I sand with 60 grit until I am down to smooth wood (ie: into the laser inserted pieces), before I use VERY sharp chisels to shape the blank, then go back to sanding/finishing.

So give it a try. I don't think they are really that hard, if you are patient and go slowly.

Good luck.

Roger
 
The puzzle pen is a little difficult to assemble, just follow the instructions and have a little patience. Some pieces may be a little tough to put in but they will go. I paint my tubes black before I start and use black sawdust to fill in the lines between pieces. Just rub the sawdust in then cover with thin CA. I paint the tubes because if the CA washes out the sawdust you will just see black and not brass at the joints.
 
INSTRUCTIONS!!!!
Thank you, Richard. there weren't any in the box with my purchase.

Seamus, I'd be worried about using thin CA since the set time on that is alomost instant. Knowing he I work, I'd be a bit more comfortable with the thick CA. The rubber bands is a good idea though.
 
I will add one thing I do differently. Instead of saturating the tube and blank with CA I glue the puzzle to the tube like I would with a normal blank. Then I put it on the lathe and fill the joints and cracks with wood shavings (usually blackwood). Then I slurry the blank with thin CA to fill in all the voids. This allows me to get a fairly solid blank to work with and the blackwood acts as a good grout. Just my 2 cents.
 

Attachments

  • Puzzle1.jpg
    Puzzle1.jpg
    32.2 KB · Views: 541
  • Puzzle2.jpg
    Puzzle2.jpg
    72.1 KB · Views: 288
I would suggest, if the tube isn't dark when you got it, take a black felt tip permanent marker, after you rough it up with sandpaper, color the tube. You don't want any brass showing through the joints.

Also, you probably won't need to turn much off after the glue sets up. I usually sand them to shape so I don't blow out the blank. Just make sure you assemble it all before you glue. You might have to lift one piece to get the final one down. Just don't force them or you may break a piece.
 
Last edited:
i will darken the tube before gluing it to the blank. what do you guys use for the blackwood to fill in the gaps? just throw a piece of ebony on the lathe and collect some dust from a quick sanding?
 
INSTRUCTIONS!!!!
Thank you, Richard. there weren't any in the box with my purchase.

Seamus, I'd be worried about using thin CA since the set time on that is alomost instant. Knowing he I work, I'd be a bit more comfortable with the thick CA. The rubber bands is a good idea though.


The instruction are available in PDF format only. Keeps the cost down
 
I don't use any tools. I sand all mine down to what i want. I learned that the hard way after distroying two kits. Quiet expensive learning cure. I start with 80 grit and work my way up to 600 works for me.
 
i will darken the tube before gluing it to the blank. what do you guys use for the blackwood to fill in the gaps? just throw a piece of ebony on the lathe and collect some dust from a quick sanding?

Yes. I put a piece of blackwood on the lathe and turned it round. Collected all the shavings and dust to use for any joints in the future.
 
I use blue painters tape when I assemble the puzzles. I make sure it is wrapped good and tight when I am don.. I then glue the tube in place with CA. I use the brass antiquing acid to turn the tubes black. I then remove the painters tape and then fill all the gaps with thin CA. I carefully trim up the tube and then put it on the lathe. Turn off a little bit then check for gaps and fill as necessary.
 
I didn't have any dark shavings or dust. I ground up some charcoal very finely and used that - works great with a coat of CA. I also found a very fine black powder at Hobby Lobby for a couple of dollars. I just rub that all over the blank and use thin CA. I really fills the cracks and the detail lines.
gordon
 
If the tube is black you won't need to fill the cracks. They will be dark from the clear CA and dark tube. Never had a problem with that.
 
I haven't done the puzzle one, but am just now working on the flames - which is a puzzle in its own way! I used black copy toner to fill in the gaps -- very fine dust that finds all the cracks.
 
ok, thanks for all the advice and tips.I finally got around to making the kit sunday. All comments welcome. Keep in mind, this is my first lazer cut kit. (and I am aware my pics aren't the best, I was off to work and used my cell phone real quick)

IMAG0396.jpg


IMAG0395.jpg


It was supposed to be for my sister for x-mas, but when it was all done, it seemed to be a bit big for her. so i might have to buy another one in the junior kit.
 
In my book, the top two are Lazerlines and Kallenshaan. Both provide exceptional work and excellent service. I tend to goto Constant because he is much closer to me (just down the road near Atlanta). But, my first inlays were from Kallenshaan.
 
Back
Top Bottom