egnald
Member
Hello all and Greetings from Nebraska.
Today I built a copycat of the PSI Corner-B-Gone jig. Previously I had a couple of bandsaw jigs to cut the corners off of my blanks based on an angle that was a fixed distance from the blade. I had one for 3/4 and one for 7/8 blanks. The problem was that not all of my blanks are square and I also don't always get the tube perfectly down the center. These problems cause the blank to be quite out of round when I start to turn it.
I liked the idea of PSI's Corner-B-Gone jig because it uses the tube to reference the blade rather than a stationary guide on the fixture. This compensates for off-center drilled holes and it allows me to not only trim off the corners but also to trim off any excess width on oversized or non-square blanks. I used it to prep some blanks for Southwest Mesa kits and it worked much better than my other jig. It is also less bulky and takes up much less storage space. Whoever engineered this for PSI was one clever designer.
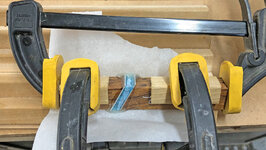
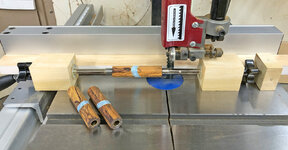
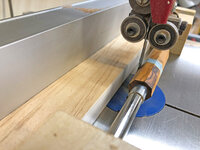
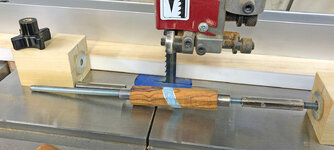
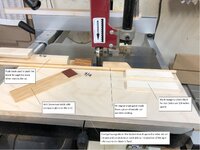
The copycat jig is essentially made from some 1-3/4 square blocks of Poplar, a piece of 1/4-20 Ready Rod, some spare barrel trimming sleeves (used for spacers) and a couple of 1/4-20 star knobs. I had all of this stuff on-hand so the cost was negligible. Mount the blank using the bushings, set the bandsaw fence to the desired distance and run the blanks through rotating the jig a quarter of a turn between cuts first to square up the blank with the tube, then by rotating the blank in the fixture and another four passes to cut the corners off. After eight passes you are left with a relatively symmetrical octagon shape on center with the tube.
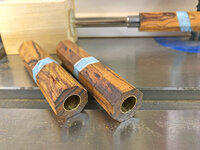
Anyhow, a before picture of one of the blanks showing shape irregularities due to my segmenting glue up along with a couple of pictures of the jig and the results of the blank after it was drilled, tubed, squared, and rounded on the jig are attached. For comparison I also attached a picture of my 3/4 inch fixed size rounding jig that it replaces.
Regards,
Dave
Today I built a copycat of the PSI Corner-B-Gone jig. Previously I had a couple of bandsaw jigs to cut the corners off of my blanks based on an angle that was a fixed distance from the blade. I had one for 3/4 and one for 7/8 blanks. The problem was that not all of my blanks are square and I also don't always get the tube perfectly down the center. These problems cause the blank to be quite out of round when I start to turn it.
I liked the idea of PSI's Corner-B-Gone jig because it uses the tube to reference the blade rather than a stationary guide on the fixture. This compensates for off-center drilled holes and it allows me to not only trim off the corners but also to trim off any excess width on oversized or non-square blanks. I used it to prep some blanks for Southwest Mesa kits and it worked much better than my other jig. It is also less bulky and takes up much less storage space. Whoever engineered this for PSI was one clever designer.
The copycat jig is essentially made from some 1-3/4 square blocks of Poplar, a piece of 1/4-20 Ready Rod, some spare barrel trimming sleeves (used for spacers) and a couple of 1/4-20 star knobs. I had all of this stuff on-hand so the cost was negligible. Mount the blank using the bushings, set the bandsaw fence to the desired distance and run the blanks through rotating the jig a quarter of a turn between cuts first to square up the blank with the tube, then by rotating the blank in the fixture and another four passes to cut the corners off. After eight passes you are left with a relatively symmetrical octagon shape on center with the tube.
Anyhow, a before picture of one of the blanks showing shape irregularities due to my segmenting glue up along with a couple of pictures of the jig and the results of the blank after it was drilled, tubed, squared, and rounded on the jig are attached. For comparison I also attached a picture of my 3/4 inch fixed size rounding jig that it replaces.
Regards,
Dave