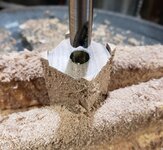
Hi there- I'm having trouble with barrel trimmers- lost the grub screw in one (waiting for replacement) and the other just doesn't work without really hard pressure-I use it in a hand-held drill. So I took note of previous posts and bought a blank arbour and got a set of bars- sorry I'm not using the correct terms but hope you understand what I mean. I cut up small squares of sandpaper and have been using these stuck to the arbour to square my ends on the lathe. However I'm finding that this process doesn't remove much of the extra wood remaining after I insert my brass tubes into the blanks. So I'm wondering how many millimètres could one expect to remove with this method??
Also how to best sharpen the barrel trimmers seeing as I have them anyway!!
Thanks in advance for any guidance.

You are using an out of date browser. It may not display this or other websites correctly.
You should upgrade or use an alternative browser.
You should upgrade or use an alternative browser.
Problems with barrel trimmers
- Thread starter Pebbles
- Start date
Signed-In Members Don't See This Ad
Signed-In Members Don't See This Ad
Penchant 4
Member
My method for sharpening barrel trimmer cutting heads:
This applies to the steel heads, not the carbide version.
Remove the cutting head from the shaft. Using a 'credit card' diamond sharpening plate (600 grit in my case), touch up the longitudinal faces of each cutter on the head. For clarity (I hope) sake, these are the faces that are parallel to the shaft when the head is re-installed. 3 or 4 light passes, making sure that the card is in contact with the entire surface of the cutter face. Make an equal number of passes on each of the faces.
Reinstall the head on the shaft.
As you have discovered, sanding is a slow process for removing more that a few thousandths of an inch (fraction of a millimeter). It can be a fine method of touching up the ends of the blanks following use of the barrel trimmer. Alternatively, cut the blank so there is the very smallest amount of excess length beyond the ends of the tube.
Hope this helps.
Good luck.
randyrls
Member
Maria; Take a look at the offset sanding jig made by Rick Herrell. Scroll down about 1/3 of the way to the bottom for "Offset Sanding Jig". You will have to make a disk sander about 5" in diameter from 80 to 120 grit sandpaper. I made mine from an old face plate and a piece of plywood. I use an old mandrel rod and make sleeves from a scrap piece of 7mm brass tube and maple to just fit into the size of the brass tube. You can also use a Transfer Punch Set
"Custom Made" penturning tools/accessories - International Association of Penturners
"Custom Made" penturning tools/accessories - International Association of Penturners
SabertoothBunny
Member
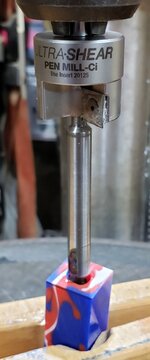
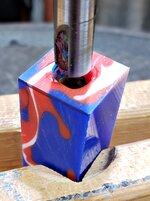
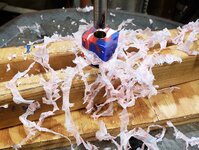
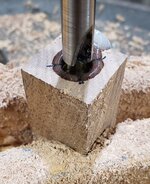
The solution for me was getting a better barrel trimmer. I saved up my pennies and got the Woodpecker Ultra-Sheer Pen Mill CI set, the whole set. Yes it is expensive but it uses carbide tips that can be rotated as necessary. This set also has a reamer for basically any tube size to ensure it is flush and not bouncing around preventing damage or uneven trimming.
Sometimes it is just better to spend the extra money on something higher quality instead of cheaper tools. For me personally this was one of those instances. I have little to no problem with blank trimming on the lathe or drill press and minimal damage caused. Any time damage is caused it is user error on my part going too fast because this cutter is sharp and aggressive.

 www.woodpeck.com
Sometimes it is just better to spend the extra money on something higher quality instead of cheaper tools. For me personally this was one of those instances. I have little to no problem with blank trimming on the lathe or drill press and minimal damage caused. Any time damage is caused it is user error on my part going too fast because this cutter is sharp and aggressive.
Pen Mill Ci – Carbide Inserts for Amazing Tool Life and Cleaner Cuts
Creating beautiful turned pens starts with carefully preparing the turning blank. Pen kits includes a brass insert tube that has to be glued into the blank. Then the blank needs to be trimmed perpendicular to and perfectly flush with both ends of the insert tube. The trimming process is...
www.woodpeck.com
Thank you Randy- I had looked at Rick's jig and may consider it. Of course I meant a Transfer punch set when I wrote "bars" !!Maria; Take a look at the offset sanding jig made by Rick Herrell. Scroll down about 1/3 of the way to the bottom for "Offset Sanding Jig". You will have to make a disk sander about 5" in diameter from 80 to 120 grit sandpaper. I made mine from an old face plate and a piece of plywood. I use an old mandrel rod and make sleeves from a scrap piece of 7mm brass tube and maple to just fit into the size of the brass tube. You can also use a Transfer Punch Set
"Custom Made" penturning tools/accessories - International Association of Penturners
Ted iin Michigan
Member
Sharpening isn't a particularly difficult thing but it requires a bit of attention to the results and adjustment, if necessary. Take a look at YouTube. Captain Eddy has a well-respected channel (he's a bit of a nut but he has good advice). He did a video quite a while back about sharpening barrel trimmers which I found VERY useful. My biggest takeaway was to NOT sharpen the "top" surfaces, just the sides. That way you don't risk changing the angle on the cutting edge. I also got a couple very small files which are quite helpful - the large ones can be a pain.
Hi Marcus, thanks for your reply- I have to look at not only the large cost of the kit but also shipping and import costs which add up !! I agree though that "You gets what you pays for !! »The solution for me was getting a better barrel trimmer. I saved up my pennies and got the Woodpecker Ultra-Sheer Pen Mill CI set, the whole set. Yes it is expensive but it uses carbide tips that can be rotated as necessary. This set also has a reamer for basically any tube size to ensure it is flush and not bouncing around preventing damage or uneven trimming.
Sometimes it is just better to spend the extra money on something higher quality instead of cheaper tools. For me personally this was one of those instances. I have little to no problem with blank trimming on the lathe or drill press and minimal damage caused. Any time damage is caused it is user error on my part going too fast because this cutter is sharp and aggressive.
Pen Mill Ci – Carbide Inserts for Amazing Tool Life and Cleaner Cuts
Creating beautiful turned pens starts with carefully preparing the turning blank. Pen kits includes a brass insert tube that has to be glued into the blank. Then the blank needs to be trimmed perpendicular to and perfectly flush with both ends of the insert tube. The trimming process is...
SabertoothBunny
Member
Hi Marcus, thanks for your reply- I have to look at not only the large cost of the kit but also shipping and import costs which add up !! I agree though that "You gets what you pays for !! »
Trust me, I get it. It is expensive and then international shipping makes it more painful. Been using mine for over a year and haven't had to rotate the carbide head at all. That is withe resins and wood to include ebony and desert ironwood so some extremely hard woods.
Don't rule it out completely. Best of luck finding a solution though!
Many thanks Ted for your advice—, I got the grub screws ( meant buying an assortment of 200!! ) and got the better barrel trimmer back in action today so panic over for the present. Yes - have seen all the sharpening videos and followed advice like yourself- I keep learningSharpening isn't a particularly difficult thing but it requires a bit of attention to the results and adjustment, if necessary. Take a look at YouTube. Captain Eddy has a well-respected channel (he's a bit of a nut but he has good advice). He did a video quite a while back about sharpening barrel trimmers which I found VERY useful. My biggest takeaway was to NOT sharpen the "top" surfaces, just the sides. That way you don't risk changing the angle on the cutting edge. I also got a couple very small files which are quite helpful - the large ones can be a pain.

Trust me, I get it. It is expensive and then international shipping makes it more painful. Been using mine for over a year and haven't had to rotate the carbide head at all. That is withe resins and wood to include ebony and desert ironwood so some extremely hard woods.
Don't rule it out completely. Best of luck finding a solution though!
Hi Bill, thanks for your help- I have got a barrel trimmer back in action so panic over. I am learning so much from this forum- thanks to everyone who replies to us "newbies"My method for sharpening barrel trimmer cutting heads:
This applies to the steel heads, not the carbide version.
Remove the cutting head from the shaft. Using a 'credit card' diamond sharpening plate (600 grit in my case), touch up the longitudinal faces of each cutter on the head. For clarity (I hope) sake, these are the faces that are parallel to the shaft when the head is re-installed. 3 or 4 light passes, making sure that the card is in contact with the entire surface of the cutter face. Make an equal number of passes on each of the faces.
Reinstall the head on the shaft.
As you have discovered, sanding is a slow process for removing more that a few thousandths of an inch (fraction of a millimeter). It can be a fine method of touching up the ends of the blanks following use of the barrel trimmer. Alternatively, cut the blank so there is the very smallest amount of excess length beyond the ends of the tube.
Hope this helps.
Good luck.
Woodchipper
Member
I also hit the vertical side with a couple of swipes with the CMT diamond file. Only takes a couple of minutes to touch up the trimmer head.My method for sharpening barrel trimmer cutting heads:
This applies to the steel heads, not the carbide version.
Remove the cutting head from the shaft. Using a 'credit card' diamond sharpening plate (600 grit in my case), touch up the longitudinal faces of each cutter on the head. For clarity (I hope) sake, these are the faces that are parallel to the shaft when the head is re-installed. 3 or 4 light passes, making sure that the card is in contact with the entire surface of the cutter face. Make an equal number of passes on each of the faces.
Reinstall the head on the shaft.
As you have discovered, sanding is a slow process for removing more that a few thousandths of an inch (fraction of a millimeter). It can be a fine method of touching up the ends of the blanks following use of the barrel trimmer. Alternatively, cut the blank so there is the very smallest amount of excess length beyond the ends of the tube.
Hope this helps.
Good luck.
its_virgil
Member
Each blade of a barrel trimmer (pen mill) has 3 surfaces(one is parallel to the shaft, one is perpendicular to the shaft and the third curves) and two of them should never be touched. Here is the best video I have seen on sharpening a barrel trimmer (pen mill) and I have seen them all.
Since you did not ask about using a disc sander I will not mention that the Offset Sanding Jig by Rick Harrel is the only barrel squaring method I now use.
It is barrel squaring, not barrel trimming. I have seen pen blanks with 1/4 inch or so of material removed from the end of the blank to the end of the tube. And, we wonder why they don't stay sharp.
Do a good turn daily!
Don
penicillin
Member
- Joined
- Feb 27, 2019
- Messages
- 1,036
NOT RECOMMENDED: Basic Steel Barrel Trimmers / Pen Mills
... But here is how I used them ... I have two of the Rockler barrel trimmers, the ones with six cutting edges. I sharpened them with diamond paddles. Eventually the individual cutting edges reach the point where they can't be sharpened evenly, so I bought the second set, which wore out quickly enough, too.
The proper way to sharpen them is flatten the flat faces, the ones that are parallel to the center shaft. Sharpen each face with the diamond hone using exactly the same pressure, number of strokes, etc. The fewer the number of strokes the better. DO NOT sharpen or touch the angled faces or the tips!
NOT RECOMMENDED solution described above:
https://www.rockler.com/barrel-cleaner-pen-mill-kit
https://www.rockler.com/double-sided-diamond-hone (Metal substrate, more durable. The ones I chose.)
https://www.rockler.com/diamond-hone-sharpening-set (Plastic substrate, not durable. I did not choose these.)
I will be giving away the Rockler barrel trimmer / pen mills for our club's next auction or to a beginning (begging?) local pen turner.
- -
RECOMMENDED: Sanding Jig on the Lathe
The proper solution is to buy or build a sanding jig for your lathe. Rick Harrell makes and sells good ones here:
https://www.penturners.org/threads/custom-made-penturning-tools-accessories.92501/
(search for "sanding")
Someday I will get around to building my own.
- -
MY CURRENT SOLUTION: Woodpeckers Pen Mill Set
I bought the Woodpecker's pen mill and have not looked back. They are expensive, but they work very well. They stay sharp no matter the pen blank material. Someday the carbide tips will be easy to replace when they finally get dull. I bought the 5 piece set from this page:
https://www.woodpeck.com/ultra-shear-pen-mill-inserts.html
I hope this helps.
leehljp
Member Liaison
I don't know how you cut your blanks to length, but if it is on a table saw, a good miter sled is excellent for trimming half a mm or so off and then finishing the last portion of a mm on the sanding jig that you have.
I have had the steel pen mill sets and two carbide sets. Those things can be dangerous when cutting end grain because they will suddenly grab. Because of my long use of the sled and sanding mill, I can sneak up on precise spot, but if I DID decide to use a pen mill again, it would be the Woodpeckers.
I have had the steel pen mill sets and two carbide sets. Those things can be dangerous when cutting end grain because they will suddenly grab. Because of my long use of the sled and sanding mill, I can sneak up on precise spot, but if I DID decide to use a pen mill again, it would be the Woodpeckers.
qquake
Member
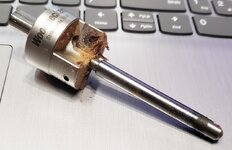
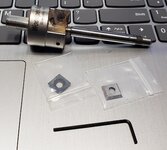
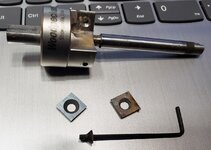
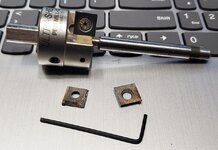
I agree with Markus (SabertoothBunny) on the Ultra Shear trimmer. I love that thing! I've been using it for a couple of years now. I rarely have to rotate the cutters, and have only replaced them once. A word of warning though. Buy the whole set, you'll end up needing all the different pilots. I just bought the cutting head and two pilots initially, but wish I had bought the big set. I have since bought all the pilots individually, at a higher cost than the set, plus the set comes with a nice fitted case. It works equally well on acrylic and wood.
Attachments
-
 ultra-shear01.jpg304.2 KB · Views: 127
 -
 ultra-shear03.jpg466.1 KB · Views: 127
 -
 ultra-shear04.jpg438.2 KB · Views: 125
 -
 ultra-shear07.jpg406.7 KB · Views: 132
 -
 024.jpg108.9 KB · Views: 124
 -
 025.jpg245.8 KB · Views: 115
 -
 027.jpg413 KB · Views: 120
 -
 027.jpg360.7 KB · Views: 120
 -
 029.jpg365.7 KB · Views: 122
Thanks Jim- as above it's on the wish list!I agree with Markus (SabertoothBunny) on the Ultra Shear trimmer. I love that thing! I've been using it for a couple of years now. I rarely have to rotate the cutters, and have only replaced them once. A word of warning though. Buy the whole set, you'll end up needing all the different pilots. I just bought the cutting head and two pilots initially, but wish I had bought the big set. I have since bought all the pilots individually, at a higher cost than the set, plus the set comes with a nice fitted case. It works equally well on acrylic and wood.
philipff
Member
I gave up on barrel trimmers years ago. My method; chuck the tube in the headstock chuck- -loosely, bring up the tail stock with a 60d rotator, and make the two align perfectly. Tighten the chuck. Then I back the tailstock out of the way and, using a round nose scraper just lightly trim the barrel end. Works perfectly. P.
w
w
Philip- sorry- I'm not totally au fait with all woodworking terms so do you mean the pen chuck in the headstock - and what is a 60d rotator? - perhaps a picture if possible-much obliged for the advice though- MI gave up on barrel trimmers years ago. My method; chuck the tube in the headstock chuck- -loosely, bring up the tail stock with a 60d rotator, and make the two align perfectly. Tighten the chuck. Then I back the tailstock out of the way and, using a round nose scraper just lightly trim the barrel end. Works perfectly.
Gary Beasley
Member
I think he means 60 degree live center in the tail stock so the blank runs true.
philipff
Member
Well, no and yes!. I hold the tube in the jaws of a standard wood chuck- -initially a bit loosely, bring up the 60d live center so the tube can be aligned perfectly and lock in the jaws of the head stock and back off the tail stock so the round nose tool can be brought to bear on the tube. Sorry my initial was not clear. P
wimkluck
Member
Pepples Sometimes they are available in europe. Search the dealers. I'm also looking.
Her is a link https://woodworkersworkshop.co.uk/woodpeckers-ultra-shear-pen-mill-ci-13-piece-set/
Her is a link https://woodworkersworkshop.co.uk/woodpeckers-ultra-shear-pen-mill-ci-13-piece-set/
Last edited: