Problem with Products Engineering Corp 6" Depth Gage

Signed-In Members Don't See This Ad

Penchant 4

Member
Joined
Jun 23, 2018
Messages
322
Location
Great Lakes Area
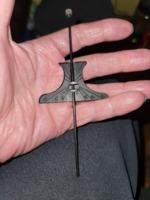
To check the depth of smaller diameter blind holes, I ordered the P.E.C. 6″ Depth Gage (7003-006), which includes a 3/32" diameter rod. It was ordered from McMaster-Carr (item # 20445A46). The clevis would not lock the rod in position. I contacted McMaster-Carr and they sent a replacement, with an apology for my inconvenience at receiving a defective item.

The replacement gauge would not lock the rod in place.

In three separate examples of this gauge, none of them would lock the rod to the body when attempting to check the depth of a hole bored square to a surface. It appears that the holes in the wings of the clevis are not drilled properly, i.e. too far from the base that rests against the body. In the photo attached, the rod will not even center in the trough.

I emphasize that McMaster-Carr have been helpful in trying to resolve this problem. In the course of the email exchanges with McMaster-Carr however, it does sound like P.E.C. told them that I did not know how to use the gauge.

Has anyone using this gauge had success with locking the rod to the body when checking a hole at 90 degrees?
 

Attachments

  • PEC Gauge.png
    PEC Gauge.png
    3.2 MB · Views: 168
Signed-In Members Don't See This Ad

Penchant 4

Member
Joined
Jun 23, 2018
Messages
322
Location
Great Lakes Area
Curious. If you put a washer under the nut/thumbwheel does it pull tight?

Pete
The clevis seats against the fixed bottom of the recess, so there is no way to get it to retract further. In frustration, I did try a washer under the thumbscrew, though...= more frustration.
 

Mortalis

Member
Joined
Aug 19, 2013
Messages
658
Location
Bardstown, Ky
Could it be that the clevis is not designed to "lock" the bar only to hold it? I would think something like that could be held in place after finding the depth by holding the depth pin between securely your thumb on the clevis side and forefinger/middle finger on the other side.

You could add some thickness to the area on either side of the clevis (Tape or thick paper washer that fits over the clevis and sits inbetween the pin and the back of the device perhaps) and that should help do what you are looking to do.

Mind you, I dont know what the designer had in mind and I'm not saying the mechanism is right or wrong.

Perhaps even reverse the clevis so that the thumb screw is on the side you are showing the pin through clevis is on the other side without the guide channel?
 
Last edited:

monophoto

Member
Joined
Mar 13, 2010
Messages
2,542
Location
Saratoga Springs, NY
I understand the feeling because I've been there. You are caught between the possibility that the product is defective, or the possibility that you are doing something dumb. And talking to an intermediary who isn't familiar with the tool doesn't help.

My suggestion is to call PEC directly to discuss the problem. They are in Southern California, 310-787-4500 and are open M-F 8sam - 5pm CA time. Ideally, you should be able to talk so someone who knows that particular tool and who can figure out whether it is a defective tool or operator error.

For what it's worth - it's not difficult to make a depth gauge similar to the PEC model. I made mine from a scrap of wood and a thumb screw and nut that I recycled from a busted Harbor Freight F-clamp. I bought brass rod, but I could have used coathanger wire so that the total cost would have been zero. The nut provides metal threads to receive the thumbscrew which tightens down on the rod which passes through a hole in the wood. The only thing that the PEC gauge does that mine does not do is that its possible to change the angle on the PEC gauge; mine is fixed at 90deg.
 
Last edited:

penicillin

Member
Joined
Feb 27, 2019
Messages
1,036
@Penchant 4's PEC 7003-006 depth gauge has both a flat blade (ruler) and also a steel rod to fit in narrow holes. The clevis grips the blade in one orientation. The steel rod fits in a hole drilled through the clevis, with the clevis rotated 90 degrees. Most similar depth gauges do not include the thin steel rod shown in @Penchant 4's photo above, only a thin flat blade.

Based on Penchant 4's description of the problem, the drilled hole is in the wrong place, so the clevis cannot be tightened sufficiently to lock the steel rod in place. This is a manufacturing or design defect that cannot be fixed easily. I would return the tool and ask for my money back.

-> Obviously the PEC depth gauge is useless if it won't lock. That is an essential feature of those depth gauges. The knob also lets you adjust how much friction there is when you make a measurement, too.

That type of slender depth gauge is a staple among my woodworking tools. I use it almost every day. I highly recommend getting one. I have not found a need for a depth gauge with a slender rod. Based on @Penchant 4's comments above, I would avoid the PEC brand when buying a depth gauge.

I have two of those depth gauges. Both have flat blades with calibrated scales. One is an old Lufkin, long since out of production. I use it every day. The Lufkin blade is 5 mm wide, but the scales are standard - 1/32 and 1/64 on respective sides, like many combination square blades. (If you want to see the vintage Lufkin 510 that I use, search for "Lufkin 510" or "Lufkin 511". Honestly, any brand is fine, as long as the blade or rod locks.)

The other depth gauge came with the Harbor Freight precision measuring set. The Harbor Freight blade is 6 mm wide. It could be useful if you need depth measurements in metric - one side of the blade has 1/2 mm markings. I bought the Harbor Freight set for the three cheap spring calipers that come with it. All of the tools in the set are flimsy and cheaply made, but are sufficient for my simple woodturning needs. I recommend them only for the frugal or those on a tight budget:
https://www.harborfreight.com/6-piece-technical-measuring-set-94447.html

I just checked, and both flat depth gauge blades lock securely.
 

NeonWoodShop

Member
Joined
Jan 13, 2022
Messages
37
Location
SE VA
I've had a Mitutoyo 950-271 version since the mid-90s. I pulled it out of the drawer and could not find the rod, so I found a small screwdriver with a 3/32" shaft to test. The recess on the back of the head has a slot for the rule and a deeper groove for the rod
Mine does lock the screwdriver and the ruler in place, but only when the locking knob is really cinched down. The difference between tightening the knob so the rule/rod will slide with slight tension and completely locked is only a couple degrees of rotation of the knob.

I disassembled mine and found a small spring washer under the part the rule/rod slides through. I removed the washer and the gauge was able to lock down tighter, but the force required to unlock the knob was considerably greater.

I would suggest adding shims to the channel on the back of the head that the rule/rod slides in to see if that will allow the rod to tighten up. Aluminum foil makes great shims for temporary use. Once you achieve a satisfactory fit, you can measure the final thickness of the shims to see how far off the tool is. That might be useful information if you speak with PEC directly.

Check the recess on the back of the head to see if it machined evenly. Removing the paint in the recess may give the extra clearance to allow the rod to seat, or maybe some light sanding.

NOT what you should have to do with a brand new tool though.
 
Top Bottom